Swift website Settings
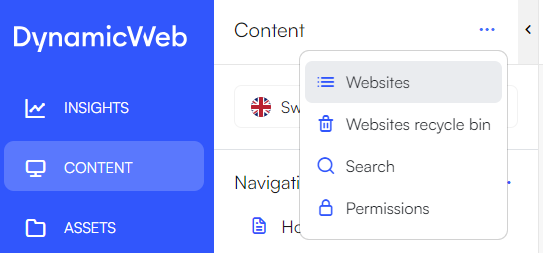
The website settings page contains all general settings for the core-elements of your website. For instance, you can edit the name, regional settings, ecommerce, cookie notice and much more. To see the list of websites within your solution, click the context menu above the website selector and select "Websites".
To view the settings for a specific website, click on the website you're interested in.
The sections in the article will go through the different settings within the website settings page.
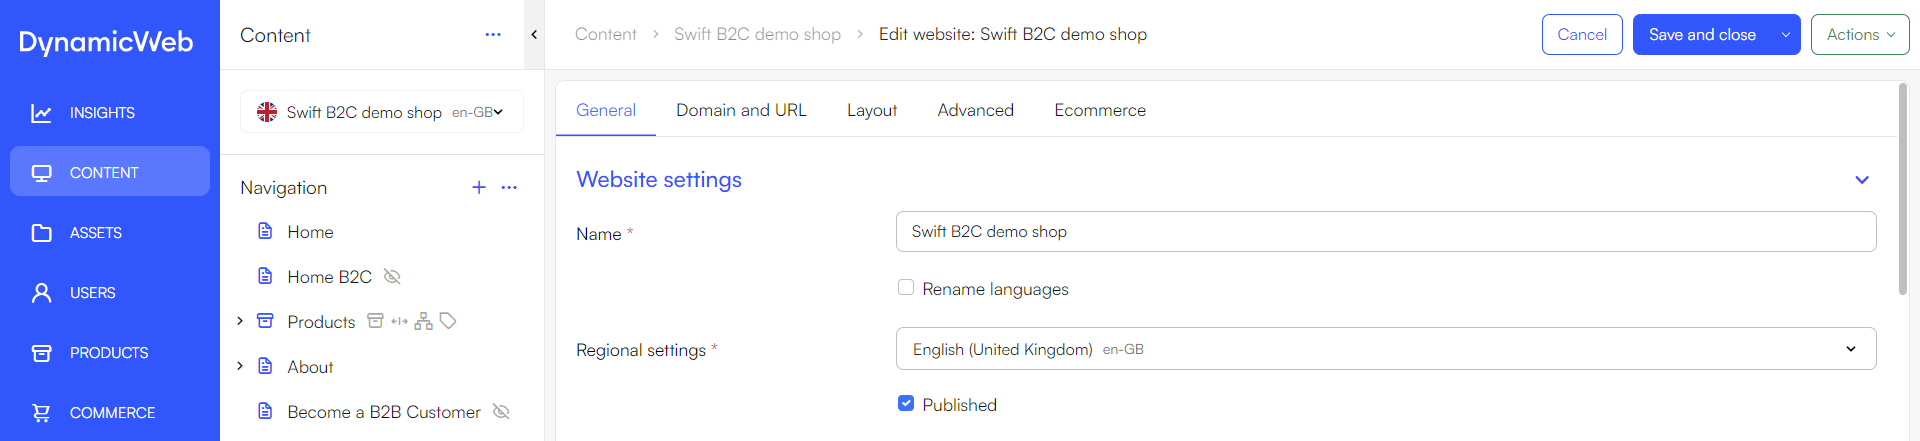
Website settings
In the website settings section, you can:
- Set the name of the website
- Select Regional settings
- This controls date and number formats and the region code will be included in page URLs if enabled
- Publish the website
- The website is unpublished as default
- Rename language layers
- When this is checked, all existing website layers will inherit the websites name + regional settings, e.g. "Swift B2C demo shop (da-DK)"

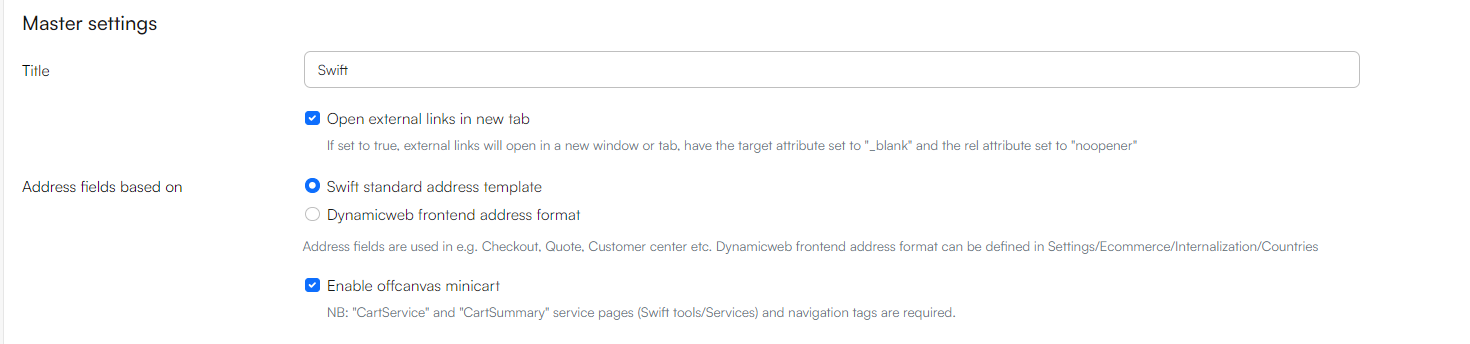
Master settings
In the Master settings section, you can:
- Set the title
- Check "Open external links in new tab"
- If checked, external links in the content section on your website will open in a new tab or browser window when clicked. The "rel" attribute will be set to "noopener", which is a security feature that prevents the new page from gaining access to the original page's window object
- This will only work for specific columns, like features or text columns with buttons, where the external link is added directly in the column settings. If for example you are using the navigation column and using internal pages to redirect to an external link, they will NOT open in a new tab when clicked.
- To target all external links no matter where they are created, add a custom JS to handle. See example below.
- Select what Address fields are based on:
- Swift standard address
- Dynamicweb frontend address format
- The Dynamicweb frontend address format can be defined in Settings/Products/Internalization/Countries
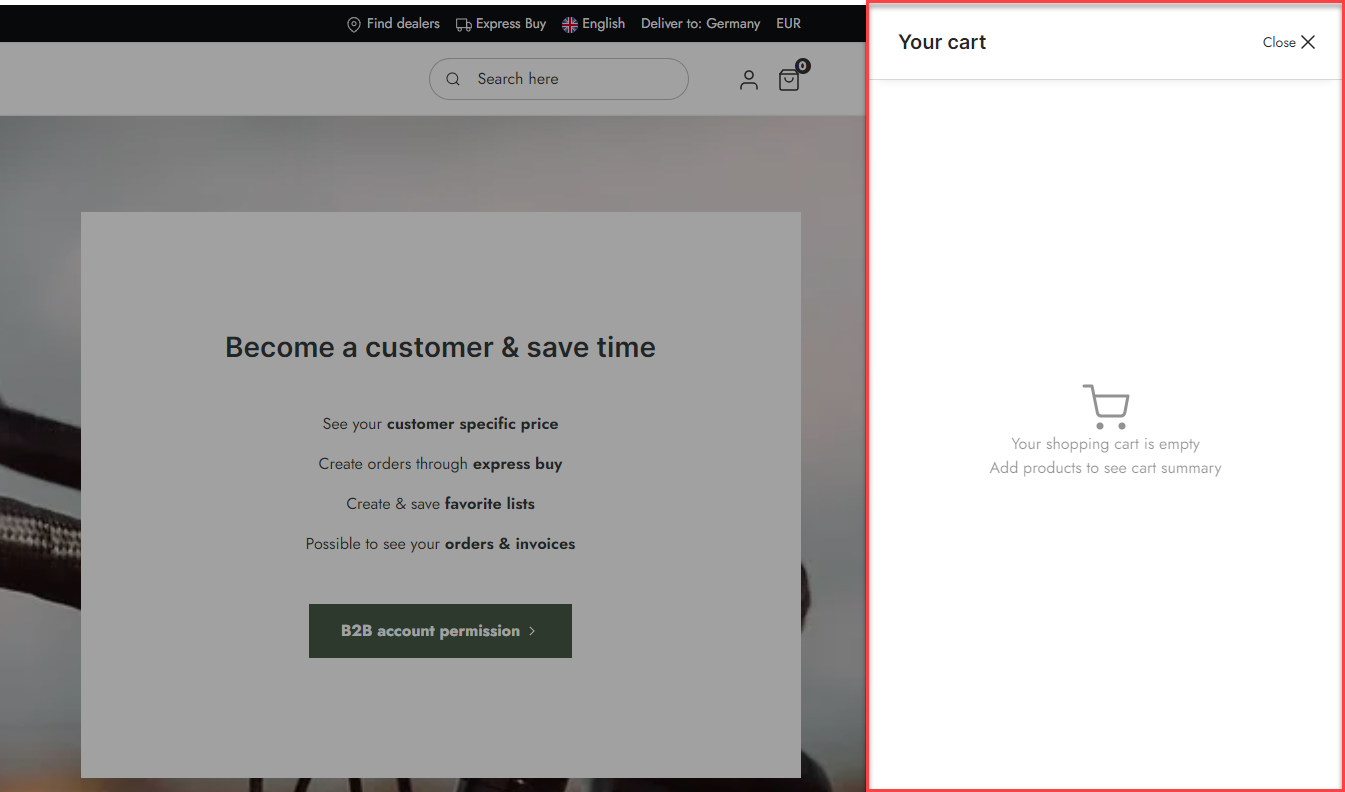
- Check "Enable offcanvas minicart"
Script to insert in e.g. custom header include to ensure all external links will open in new tabs:
<script>
  document.addEventListener('DOMContentLoaded', () => {
    let links = document.querySelectorAll('a[href*="://"]')
    links.forEach(link => {
      link.setAttribute('target', '_blank')
    })
  })
</script>
Offcanvas minicart settings
The offcanvas section allows you to configure the behavior of the offcanvas minicart. The available options are:
- Open when "cart navigation link" is clicked
- The offcanvas minicart will only open when the user clicks their cart
- Open when "add to cart" is clicked
- The offcanvas minicart will only open when the user adds a new product to their cart
- Both
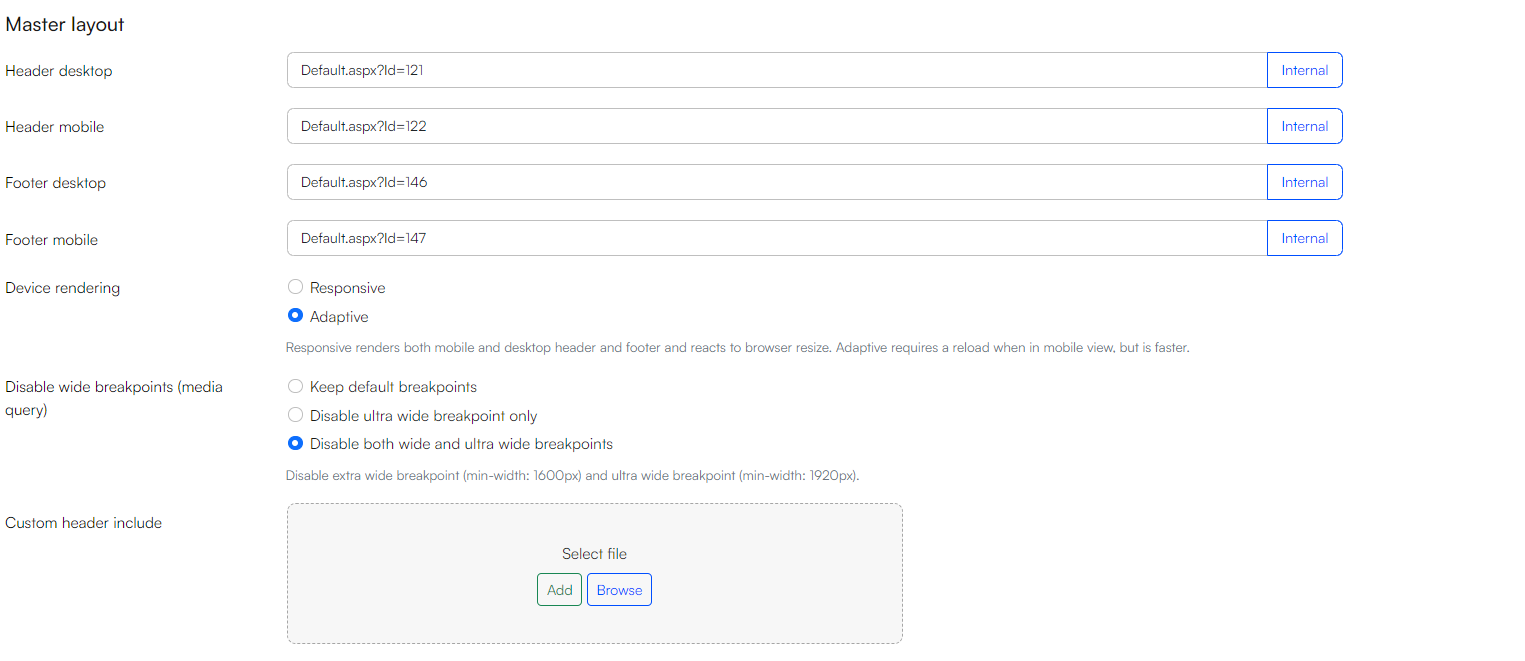
Master layout
The Master Layout settings offer options to customize your site’s header and footer across both desktop and mobile versions. Here’s what you can do:
- Define Header and Footer Content: Easily set up consistent header and footer elements for the master template, ensuring the same look and feel across all pages
- Choose Between Responsive and Adaptive Rendering: Decide how your site should respond to browser resizing
- Responsive: The layout automatically adjusts based on the size of the user’s screen, providing an even experience across all devices
- Adaptive: The layout changes based on predefined screen sizes, which makes it faster
- Include Custom Files in the Header: Select and add custom files to the header to enhance your site’s functionality. For example, you can customize the behavior of your cookie banner or integrate other third-party scripts.
You also have the option to adjust the layout of the webpage to suit different screen sizes using the breakpoint settings. These settings control how the design adapts across various devices:
- Keep default breakpoints: Retain the standard breakpoints, allowing the site to adjust automatically based on common screen sizes
- Disable Ultra-Wide Breakpoint Only: Turn off the ultra-wide breakpoint (for screens wider than 1920px), causing the site to render the same way as it would on slightly smaller screens
- Disable Both Wide and Ultra-Wide Breakpoints: Disable both the wide (1600px) and ultra-wide breakpoints. The layout will not change for these larger screens, maintaining the same appearance as on smaller screens
These options give you the flexibility to ensure your site looks great on any device, from smartphones to large desktop monitors.
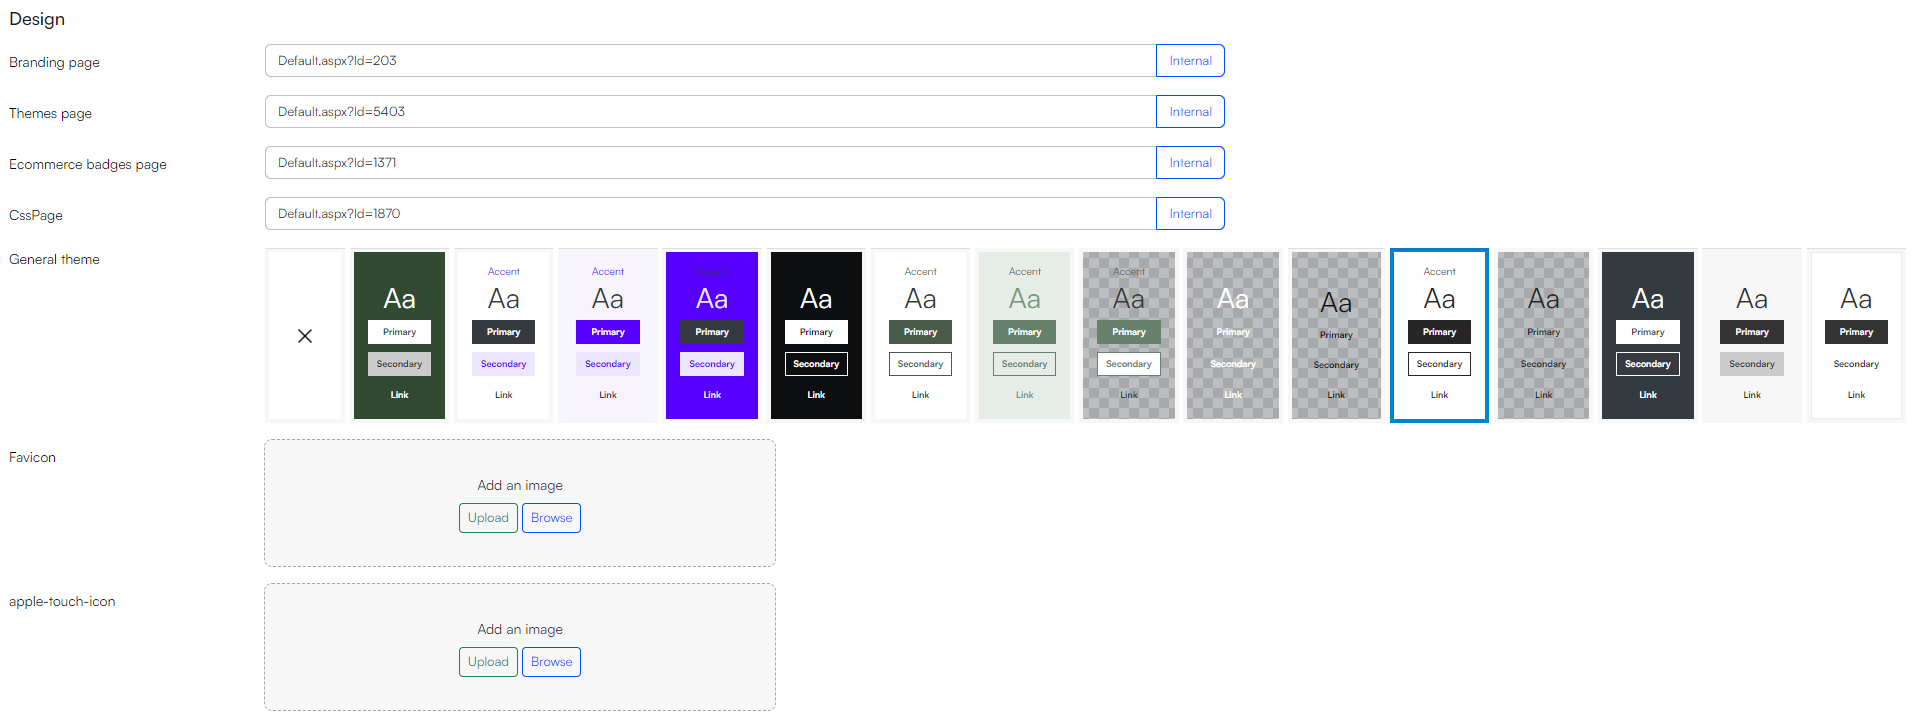
Design
The Design Settings section allows you to customize various visual aspects of your website, ensuring a cohesive user experience. Here's what you can manage:
- Select Branding, Themes and CSS Pages:
- Choose the Branding page, Themes page, Ecommerce badges, and CSS page that you want to apply across your website
- Set the general themes for your site, which are drawn from the theme collection configured above
- Set Your Favicon:
- The favicon is the small icon displayed on the browser tab next to your website's title. For example, on the Swift demo site, the default favicon is a grey globe
- You can upload a new image or choose one from the existing files in your solution
- Set the Apple touch icon:
- The Apple touch icon appears when users save your website to their iOS home screen or bookmark it
- Just like with the favicon, you can upload a custom image or select one from your existing assets
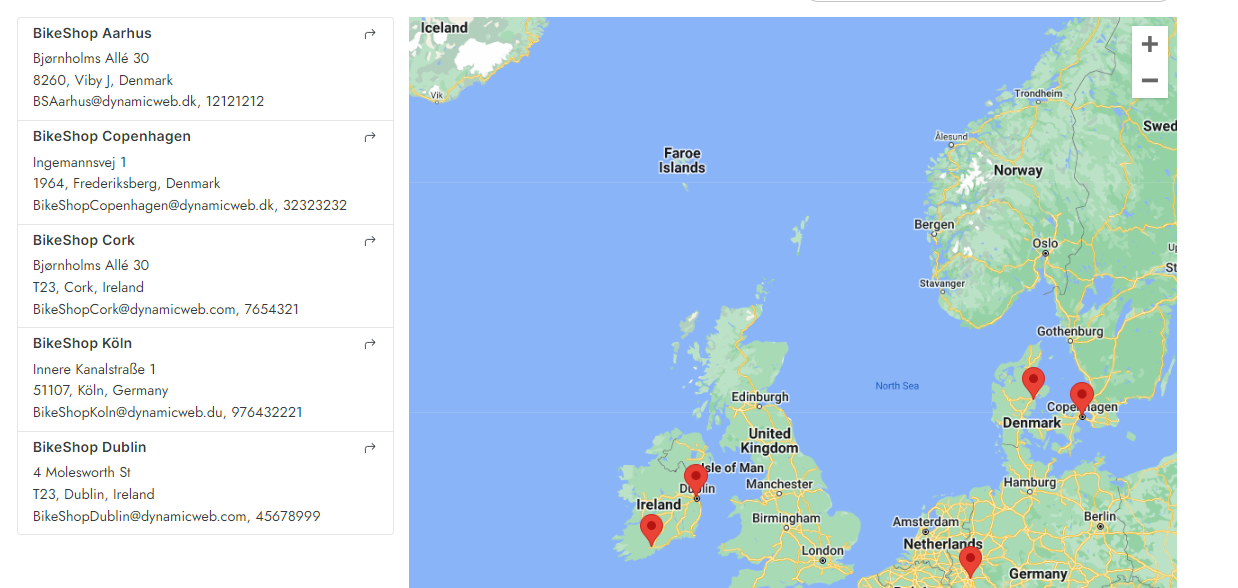
Google maps
In this section, you can integrate Google Maps into your website. To enable this functionality, you first need to:
- Obtain a Google API Key: Visit the Google Cloud Console to generate your unique API key
- Enable Required Services: Ensure that the necessary Google Maps services, such as the Maps JavaScript API and Places API, are activated in your Google Cloud account
- Input the API Key: Enter the generated API key into the field in the websites general settings
By following these steps, you'll be able to integrate the location map into your website. For more information on using the location map, go to the location map article.
Anonymous users
The "Anonymous users" section allows you to control whether anonymous users can view prices and add items to their cart. You can choose from the following options:
- Anonymous users can see prices and add items to their cart
- Anonymous users can see prices but cannot add items to their cart
- Anonymous users cannot see prices or add items to their cart

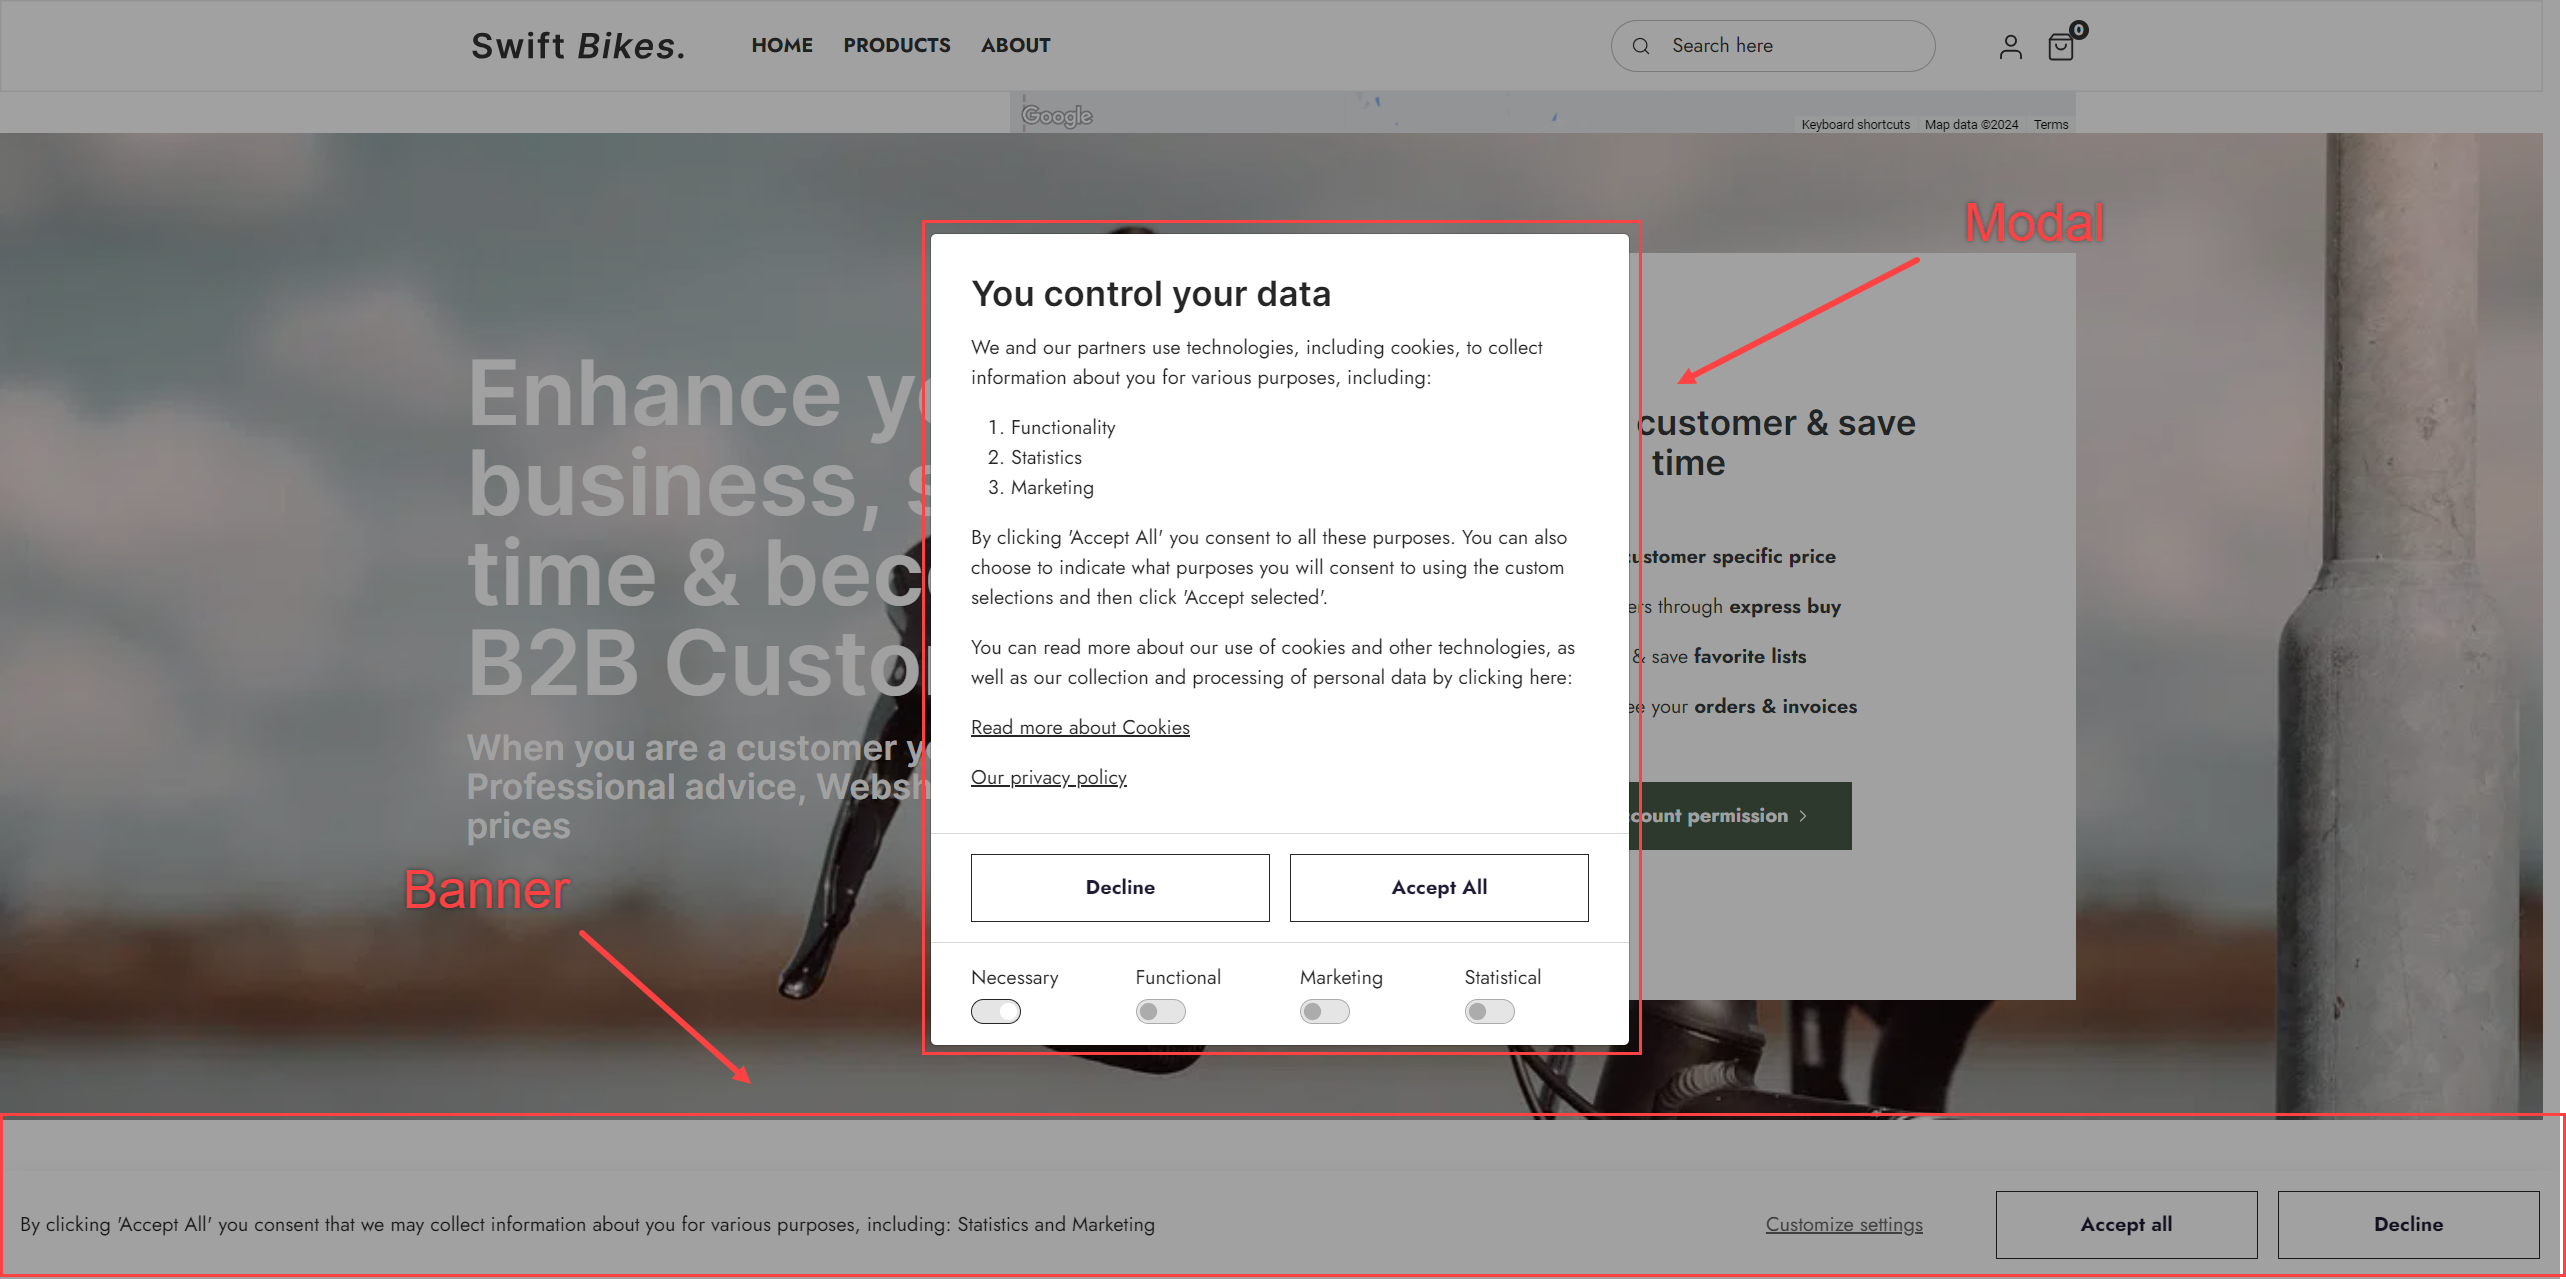
Cookie notice
The Cookie Notice section allows you to customize how cookies are presented on your website. The available options include:
- Add Privacy policy link: Include a link to your website’s privacy policy
- Cookie policy: Include a link to your website's cookie policy
- Select the layout for the cookie notification:
- Modal: A larger, prominent pop-up window that appears in the center of the screen, often dimming or blocking access to the rest of the page until the user interacts with it
- Banner: A small strip or notification that appears at the top or bottom of the webpage. It occupies a minimal portion of the screen, allowing users to continue browsing while they decide on their cookie preferences
- Both: Initially displays a banner notification, which then transitions into a modal after some time
- Set the theme: Set the theme for both the banner and modal
You can read more about cookies here
Website Ownership verification
In this section, you can:
- Add Google Site Verification: This step confirms your ownership of a website to Google Search Console. Once verified, you gain access to private search data and can influence how Google crawls and indexes your site. For detailed instructions, visit the Google Support page
- Add Pinterest site verification: Verifying your site with Pinterest allows you to see how often your content is shared on their platform. It also links your Pinterest profile to any Pins from your website, making it easier for users to find more information. For more details, check the Pinterest Help Center
Open Graph
Open Graph Protocol (OGP) is used to enhance the visibility and appearance of web pages when shared on social media platforms. By defining specific meta tags like title, type, image, and description, OGP helps ensure that shared links are displayed with consistent, rich previews. This improves user engagement by providing a visually appealing snippet of your content.
In the Open Graph section, you will find:
- Facebook App id: Connects your content with a specific Facebook application
- Open Graph Type: Defines the type of your object, such as "website"
- Open Graph Title: The title of your object as it should appear within the graph, e.g., "Swift"
- Open Graph Image: The image image that represents your object
- Open Graph Image ALT: A description of the image
- Open Graph Description: A one to two sentence description of your object
- Open Graph Site Name: The name of the website that is sharing the content
Twitter card
Twitter Cards are a feature provided by X (former Twitter) that allows you to attach rich media experiences to your posts, beyond the standard 280 characters. When someone posts a link that contains properly formatted Twitter Card meta tags, X will automatically create a "card" to accompany the post. These cards provide a preview of the content, which can include images, videos, audio, and additional text.
In the Twitter Card section, you will find:
- Twitter Site: This is the websites username on X
- Twitter URL: This is the web address of the page you want to share
- Twitter Title: This is the title of the content you're sharing, to be used as the headline for the Twitter card
- Twitter Description: This is a brief description of the content, and should give users more context about what they'll find if they click on the link
- Twitter Image: This is the image you want to show on the Twitter Card
- Twitter Image ALT: This is a text description of the image conveying the essential nature of an image to users who are visually impaired. Maximum 420 characters
These elements help make your Twitter Card more informative and visually appealing, encouraging more people to click on your content!

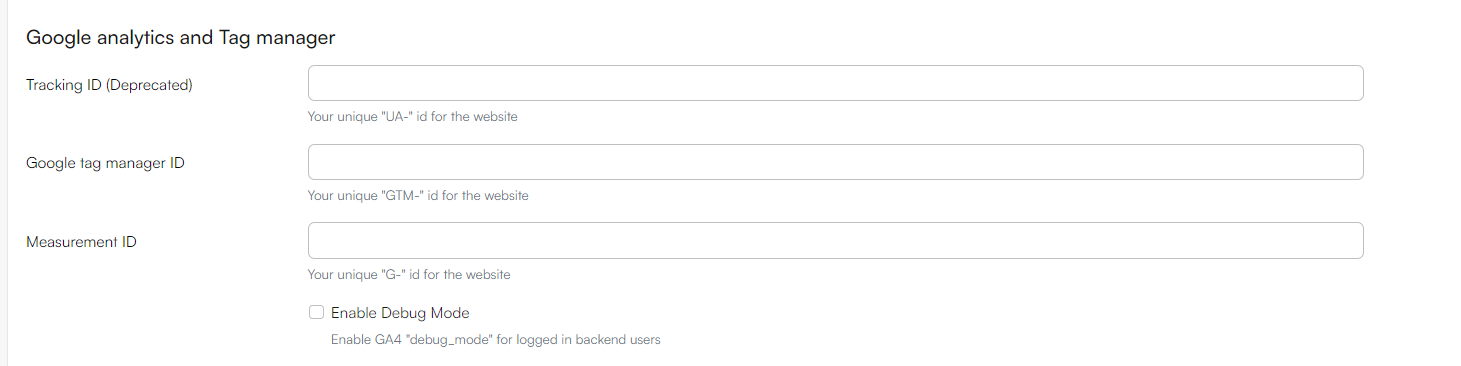
Google analytics and tag manager
These settings allow you to configure Google Analytics and Google Tag Manager for tracking and analyzing website traffic and user behavior. The options are:
- Tracking ID (Deprecated): Used to input the Universal Analytics (UA) Tracking ID, which typically starts with "UA-". Universal Analytics is being phased out by Google in favor of Google Analytics 4 (GA4)
- Google tag manager ID: Enter your Google Tag Manager (GTM) ID here. The GTM ID typically starts with "GTM-" and is used to manage tags (like analytics and marketing tags) without modifying the code on your website
- Measurement ID: This is where you enter your Google Analytics 4 (GA4) Measurement ID, which typically starts with "G-". The Measurement ID is used for tracking website data and user behavior in GA4
- Enable Debug mode: Check if you need to test your GA4 implementation or troubleshoot tracking issues
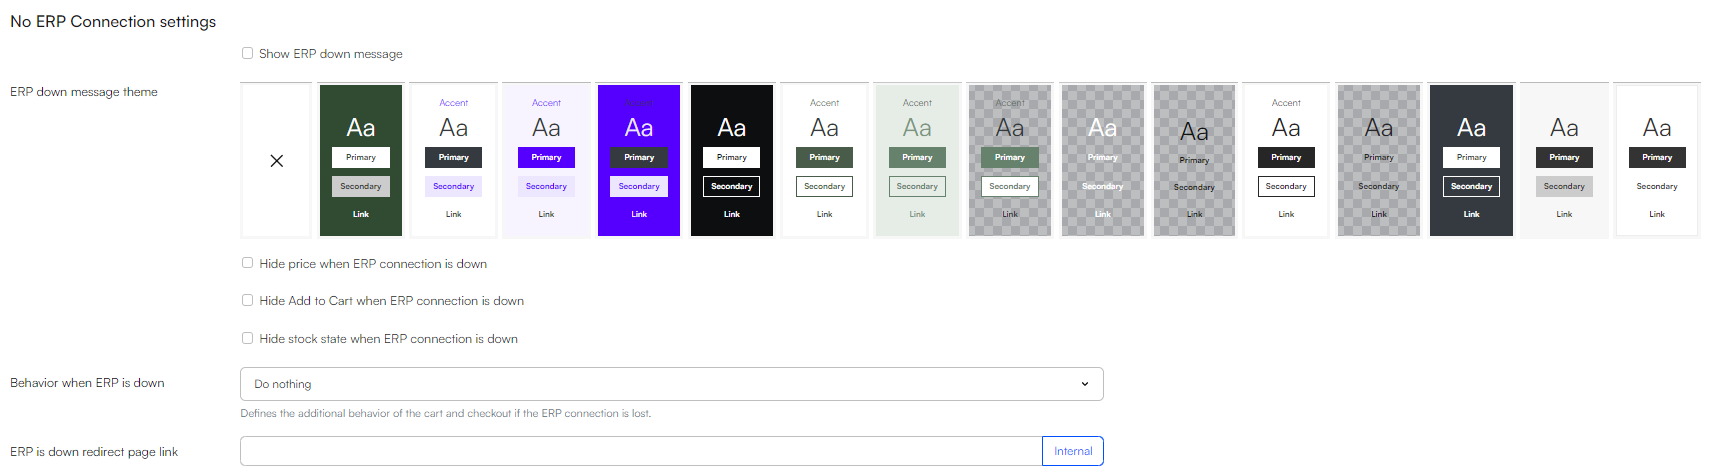
No ERP Connection settings
If the connection to your ERP system is down, you can customize the website's behavior using the following options:
- Show ERP down message: Check if you want the website to display a message notifying users that the ERP system is currently down
- ERP down message theme: Set the theme for the ERP down message
- Hide price when ERP connection is down: Check this option to hide all product prices on the website when the ERP connection is unavailable
- Hide Add to Cart when ERP connection is down: Check this option to disable the "Add to Cart" button, preventing users from adding products to their cart during ERP downtime
- Hide stock stat when ERP connection is down: Check this option to hide the stock availability status of products when the ERP connection is down
- Behavior when ERP is down: Define how the website should behave when the ERP connection is unavailable. You can choose from the following options:
- Do nothing: The website will continue to operate normally without any special actions
- Redirect to page: customers are redirected to another page, that is defined in the same section
- Disable payment: The checkout process will be disabled, preventing customers from completing their purchases