One of the key benefits of DynamicWeb is that it provides many ways to customize the platform, which can be organized into two general categories:
- UI extensibility involves creating your own screens in the administration UI
- Functional extensibility involves hooking into e.g. system events and extending or changing how the system works without changing the UI
Here are the most commonly used functional extensibility points:
- Notification Subscribers allow you to hook up to events/notifications and execute custom code
- Providers and Configurable Add-Ins are used to create new integrations, to e.g. custom payment processors or shipping services
- Services & Middleware are used for adding services into the ASP.NET Core services (dependency injection) and adding application wide middleware
- ViewModels may be extended with custom properties to add non-standard information to your template contexts
Setting up developer environment
To be able to develop custom extensions to DynamicWeb, you need to have a working DynamicWeb solution running on your local computer. To make that happen follow one of our install guides:
After following an install guide, you'll have a DynamicWeb 10 installed locally, which can be used when implementing your custom extensions.
Adding a project
Now the next step will be to create your extensions. It's recommended that you create separate projects for your customizations, because it will make it easier to deploy to other environments at a later stage.
First install the C# Dev Kit extension and Sign in with Microsoft to use it.

Have some patience while VSC loads all the DW10 references. It may take a while, so go get a warm beverage.
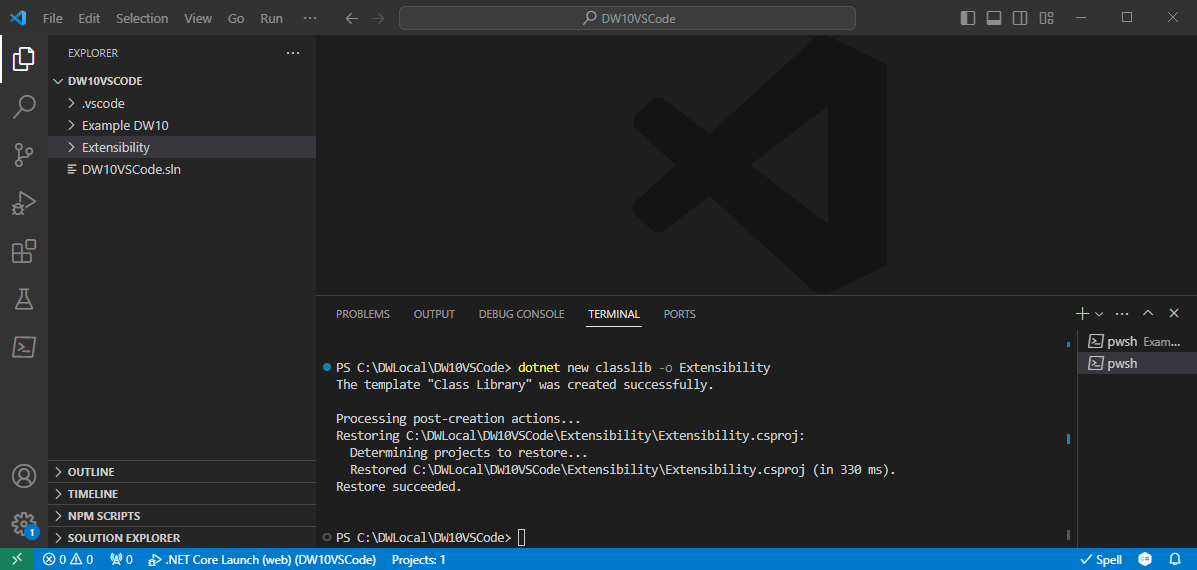
Open a terminal - make sure you're not in the 'Example DW10'-project folder but one level out in the solution-folder - and create a class library:
dotnet new classlib -o ExtensibilityThis will create a class library project with an empty Class1.cs class y
In the terminal navigate to the new class library project and add references to the relevant dlls:
 cd Extensibility
 dotnet add package Dynamicweb.Core
You should only add the references that make sense, e.g. Dynamicweb, Dynamicweb.Core, Dynamicweb.Ecommerce, or the UI-packages, depending on what you're setting out to do.
In the same terminal, you should add a reference from your Extensibility-project to your 'Example DW10'-project. This is to ensure that you custom addin is loaded when the projects starts, so you don't need to do anything else to install the addins.
 cd..
 cd Example DW10
 dotnet add reference ../Extensibility/Extensibility.csproj
Finally, you should add the Extensibility-project to the solution - this is to provide IntelliSense in the project:
 cd..
 dotnet sln add .\Extensibility\
You now have everything set up to build your own extensions.
Creating an extension
Before creating an extension, you first need to figure out what you want to achieve - and which extensibility points you can use to get it done. While each extensibility point is different, and requires you to inherit from a different base class, the development process will be very similar.
In this example we will create a simple Notification subscriber which triggers every time before a log event is saved. In the notification subscriber, we want to check if the severity of the log event matches a minimum log level defined in a GlobalSetting, and if the log event is below that level it will not be saved.
First create a new
.csfile in the Extensions-project:cd Extensions new-item MinimumLogEventLevelSubscriber.csThen implement the notification subscriber - in this article about Notification subscribers, you can see that:
A notification subscriber should inherit from the base class
Dynamicweb.Extensibility.Notifications.NotificationSubscriberIt will be decorated with the attribute
Subscribe, which indicates which notification it will react to, in this specific scenarioDynamicweb.Logging.Notifications.LogEventBeforeSaveThe actual functionality will then be put inside the OnNotify-method:
using System;
using Dynamicweb.Extensibility.Notifications;
using Dynamicweb.Logging;

namespace Extensibility
{
[Subscribe(Dynamicweb.Logging.Notifications.LoggingNotification.LogEventBeforeSave)]
public class MinimumLogEventLevelSubscriber : NotificationSubscriber
{
        public override void OnNotify(string notification, NotificationArgs args)
        {
        //Cast the provided args into the notification specific arguments, so we can access the properties
        var logArgs = args as Dynamicweb.Logging.Notifications.LoggingNotification.LogEventNotificationArgs;
        if(logArgs is null)
                return;

        //Get the minimum log level from GlobalSettings
        var minimumLogLevelValue = Dynamicweb.Configuration.SystemConfiguration.Instance.GetValue("/Globalsettings/System/Logging/MinimumLogLevel");
        if(!Enum.TryParse<LogLevel>(minimumLogLevelValue, out LogLevel minimumLogLevel))
                return;

        //Compare the log event level with the minimum log level
        if(logArgs.Event.Level < minimumLogLevel)
        {
                //Do not save the LogEvent
        }
        }
}
}
When you want to test your custom extensibility locally, you can do it quite simple by navigating to your 'Example DW10' project, and running it
    cd 'Example DW10'
    dotnet run dev
Now your application should starting building, and the solution will eventually start in the browser, and then you will be able to test and debug your custom extensions.
Upgrading a project
Since DynamicWeb is continually being updated and released, you may occasionally find that you need to update a custom project to ensure that you have the latest packages. You will also often have to reset or clear the IntelliSense cache to ensure that you can see the updated packages in your IDE.
Before following the steps below please ensure that your project file contains the wildcard versions of our NuGet packages, here when installed using the ProjectTemplates:
<ItemGroup>
        <PackageReference Include="Dynamicweb.Suite" Version="10.*" />
</ItemGroup>
...and here as individual package references:
<ItemGroup>
        <PackageReference Include="Dynamicweb" Version="10.*" />
        <PackageReference Include="Dynamicweb.Core" Version="10.*" />
        <PackageReference Include="Dynamicweb.Ecommerce" Version="10.*" />
        <PackageReference Include="Dynamicweb.Rendering.Providers.NetCore" Version="10.*" />
</ItemGroup>
To upgrade a project in VS Code:
Because of the wildcard references like <PackageReference Include="Dynamicweb" Version="10.*" /> you can simply run:
dotnet restore
This will pull the latest 10.x version available.
To force it:
    dotnet clean
    dotnet restore --force
To reset the IntelliSense cache:
VS Code relies on the .vscode/, bin/, and obj/ folders for IntelliSense and build artifacts, so to reset the cache you need to remove them and then rebuild the solution:
rm -rf bin obj .vscode
dotnet clean
dotnet build
Or automate via PowerShell:
Remove-Item -Recurse -Force bin,obj,.vscode
dotnet clean
dotnet build
Deployment
When your extension is finished the next step will be to move it to Test, Staging or Live sites. DynamicWeb offers a few different ways to achieve this - each having it's own benefits.
CLI
The DynamicWeb CLI is our own command line interface, which can be used to move a .dll or a .nupkg file from your local computer into another DynamicWeb solution e.g. Test or Staging.
To be able to use the CLI to install your extension, it requires that you have a running DynamicWeb solution, and that you have the username and password of a user, which has access to the solution.
To install an extension using the CLI follow these simple steps:
Install the CLI:
npm i @dynamicweb/cli -gSet up an environment, typically either test, staging or production:
dw envThis will ask you for the required information about the environment, where you want to deploy your extension to.
Enter the credentials of a user registered on the environment:
dw loginEnter the username and password of the user, you want to use. NB this user should already exist on the environment.
Finally, install your extension:
dw install ./bin/Debug/net10.0/Extensions.dll
The CLI has more functionalities available, and you can read more details about it in this article.
AppStore
Another method of distributing your extension is via the AppStore. This is especially useful if the extension is reuseable and can be used across many different solutions.
To make the extension show up in the DynamicWeb AppStore, you should publish it to NuGet.org and make sure it has the following property set:
<PackageTags>dynamicweb-app-store</PackageTags>
Read a full guide to how to create an AppStore-app and publish it here.
CI/CD
If you're working with other people on a more involved project where it's important to keep the main branch in a releasable state at all times you should consider setting up CI/CD - continuous integration/continuous deployment. Using such a setup, changes are continually integrated and deployed to an environment where they can be tested and approved or rejected.
CI/CD is a lot more complicated than the previous options, as there are many different aspects to consider such as your CI/CD framework, the development processes being used during development, and so on.
For an example on how we recommend a CI/CD setup to look like see this article.
Dependency handling
When an extension has third-party dependencies (e.g. NuGet packages), how those dependencies are resolved depends on how the extension is installed.
Uploading a DLL
Only the uploaded DLL itself is installed — no dependency resolution or download takes place. If the extension depends on third-party NuGet packages that are not already loaded by the running application, those dependencies will be missing and the extension may fail to load at runtime.
Use this method only for simple extensions with no external dependencies beyond what Dynamicweb itself provides.
Uploading a NuGet package (.nupkg)
All DLLs inside the package are extracted, and any dependencies declared in the package manifest (.nuspec) are automatically downloaded from NuGet.org. Dependencies of dependencies are resolved recursively. Assemblies already loaded by the running application are skipped to avoid conflicts. All downloaded dependency DLLs are placed alongside the main extension DLL.
Any files included in the package under a Files/ folder are extracted to the website's /Files/ directory.
The server must have outbound internet access to NuGet.org for dependency resolution to work.
Installing from the App Store
Equivalent to uploading a NuGet package in terms of dependency handling — all transitive dependencies are resolved and downloaded from NuGet.org automatically. Assemblies already loaded by the running application are skipped.
Summary
| Method | Third-party dependency handling |
|---|---|
| Upload DLL | None. Dependencies must already be present in the running application. |
| Upload NuGet package | Automatic. Dependencies declared in the package manifest are downloaded from NuGet.org. |
| Install from App Store | Automatic. Full recursive dependency resolution from NuGet.org. |
If your extension has third-party dependencies, distributing it as a NuGet package — either via the App Store or as a direct .nupkg upload — is strongly recommended.