DynamicWeb10, hosted by DynamicWeb, uses shared hosting to provide the best experience, including handling SSL, milestone releases, and database backup/restore. As a result, direct RDP access to a DW10 site is generally not available.
Solutions hosted by DynamicWeb Cloud will follow a versionless deployment strategy based on milestone releases. As such, it will no longer be possible to remain on outdated versions of the application. You can read about out release policy here.
Inside DynamicWeb Administration, there will be a setting to choose which milestone tier to lock the solution to, e.g., Current + 2. This means that the solution will always run on the milestone in position 3 in the illustration below. When a new milestone is released, the one from position 2 moves to position 3, which means that the solution locked to Current + 2 will be updated to the version that was Current + 1.
| R1 | R2 | R3 | R4 |
|---|---|---|---|
| Current | Current + 1 | Current + 2 | Current + 3 |
Examples
This example shows the release milestones at the time when Milestone 5 is released.
| R1 | R2 | R3 | R4 |
|---|---|---|---|
| M5 | M4 | M3 | M2 |
This example shows the release milestones at the time when Milestone 8 is released.
| R1 | R2 | R3 | R4 |
|---|---|---|---|
| M8 | M7 | M6 | M5 |
Tip
When a new release is rolled out, the partner email added under solution settings will be notified.
How to change release cycle
To find out which release cycle your DynamicWeb backend is using:
- Go to Settings > System > System Information
- Under File locations find the Bin location path - it will look something like
D:\dynamicweb.net\Applications\R4\10.0.33\bin - In this case you're on the R4 release cycle
If you want to change your release cycle or application version:
- Create a file called
changeversion.txtin thefiles\System\CloudHosting\folder - In this file write the release cycle you want to change to;
R1,R2,R3orR4.
This change will initiate an upgrade with a delay, and the updates will be logged and can be seen using the Event Viewer. To be notified when a site has been upgraded, make sure you add your contact information to partner email under the solution settings.
For any questions, reach out to DynamicWeb Operations.
Note
Once your solution has been migrated to target .NET 10, you can change release ring in the same manner with the following commands:
R1-NET10R2-NET10R3-NET10R4-NET10
How to recycle the application
To recycle your application follow these steps:
- Create a file called recycle.txt or restart.txt
- Upload the file to
Files\System\CloudHosting\ - This will trigger an application recycle
Need help? Contact DynamicWeb Operations.
Database Backup
In this section we detail the process for creating and restoring database backups in DynamicWeb Cloud.
Creating a database backup
To create a database backup:
- Create a file named
backup.txtin the\System\CloudHosting\BackupRestoreDB\Restoreor\System\CloudHosting\BackupRestoreDBfolder - To exclude tables add table names - one per line - to a file named
exclude-tables.txtplaced in the\System\CloudHosting\BackupRestoreDB\folder - A .bacpac-file will be generated in the
\Files\BackupRestoreDB\backupfolder. It can take some time and you can follow the process under: "\System\CloudHosting\BackupRestoreDB\logs" - All logs are saved in the
\System\CloudHosting\BackupRestoreDB\logsfolder
An example exclude-tables.txt file:
[dbo].[generallog]
[dbo].[Audit]
Restoring a database from backup
To restore a database from backup:
- Upload the new database (bacpac) to:
\System\CloudHosting\BackupRestoreDB\Restore - To only restore some database tables, create a file called
Update-Tables.txtin the\System\CloudHosting\BackupRestoreDBfolder - The database restoration process will commence, creating a log and a backup of the old database under:
\System\CloudHosting\BackupRestoreDB\backup - It can take some time and you can follow the process under
System\CloudHosting\BackupRestoreDB\logs - After completion, the website will recycle and check if the admin still returns status code 200 (OK)
- If everything is "ok," the old database will be removed
- If the website returns status code other than 200, a rollback will be initiated
To manually rollback the database to its state before the restore, copy the .bacpac from \System\CloudHosting\BackupRestoreDB\backup to \System\CloudHosting\BackupRestoreDB\Restore.
An example Update-Tables.txt file:
[dbo].[generallog]
Warning
Partially updating a database via the Update-Tables.txt file does not work with tables that have foreign key references. For example, if EcomCustomerFavoriteLists has a foreign key reference to AccessUser, attempting to update it may result in a foreign key constraint error.
Host Headers
As DynamicWeb 10 is built on .NET Core 8, the previous method for adding host headers to a solution is deprecated.
To add domains to your Dynamicweb 10 website, you need to follow these steps:
- Change your DNS to point at the solutions server to ensure let’s encrypt can generate your SSL certificate
- Access "Edit website" and navigate to "Domain and URL"
- Add the desired domain(s) to the list:
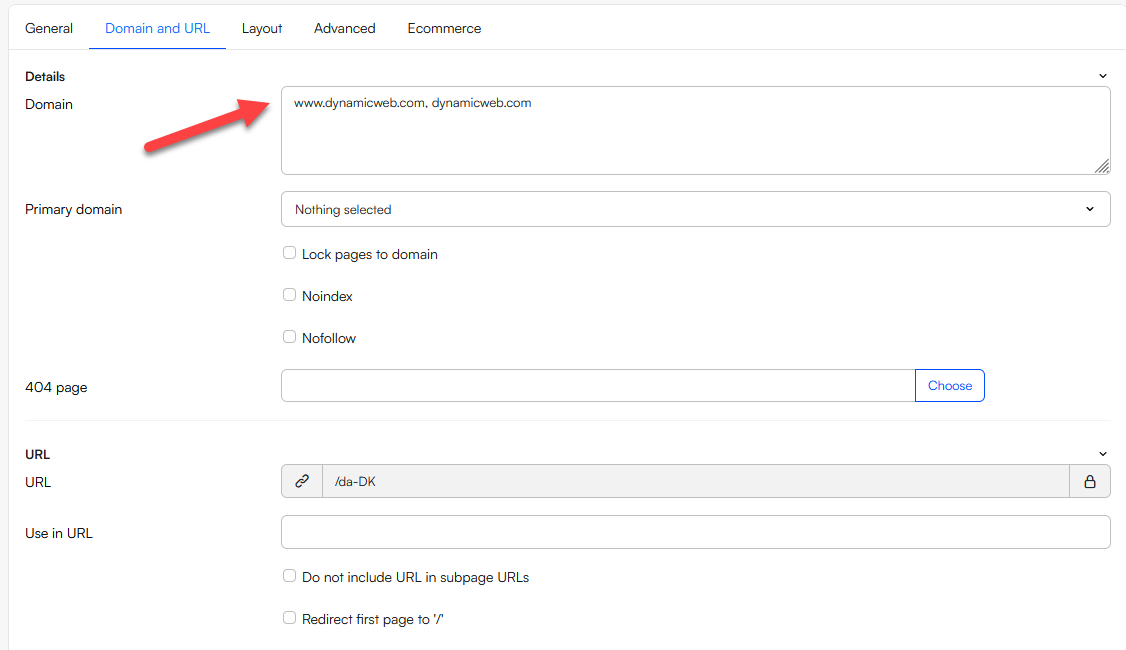
Subsequently, a scheduler will handle the addition or removal of the domain from IIS. It is important to note that the website settings act as the master. Therefore, if a domain is added to IIS without being included under "Manage Domains," it will be removed when the scheduler executes.
Here are some additional points to consider:
- Keep in mind that the scheduler runs every 5 minutes, resulting in a potential delay of up to 5 minutes
- You can review the added domains under "Assets\System\Hostheaders," and the modification date of the files will reflect the last time the scheduler was triggered
SSL Information
When you add a domain to your website, Let's Encrypt will automatically generate an SSL certificate for the website. This process can take up to 30 minutes and will cause the site to restart. If you add multiple domains, the site will restart once for each new domain - adding many domains may therefore lead to outages due to these restarts.
If you’ve already set up SSL for a domain but later change its DNS settings away from the server and then back again, you’ll need to contact operations to reattach the SSL certificate.
Cloud SMTP
To use DynamicWeb shared SMTP mail setup (SendGrid), you need to consider the following:
- SPF
- Domain authentication
SPF
By default, DynamicWeb solutions must be pointed to smtp.dynamicweb-cms.com using the solution SMTP-settings.
If you don’t have a SPF record, please contact the domain name server responsible, they can help you create a txt record pointing to v=spf1 redirect=spf.dynamicweb-cms.com ~all.
If you have more than one SPF record, it should look like this: v=spf1 include: otherdomain.com include:spf.dynamicweb-cms.com ~all
Domain authentication
If you need domain authentication, please go to out domain authentication documentation and follow the instructions.
Handling incompatible add-ins
We've seen several cases where incompatible add-ins are installed, causing sites to crash when they recycle because the system can't load certain DLLs.
We monitor all websites, and if a crash occurs, our system attempts to restart the site. If that fails, we roll back custom DLLs one by one, starting with the most recently installed, until the site is running again.
When the site is available again, DynamicWeb Operations and the partner email added under Solution settings is notified - the email looks something like this:

Copying a website hosting in DynamicWeb Cloud
We previously recommended you use FTP for this task - but this has now changed. To use our more modern CLI-based tool see this article.