Extranet
Handle user-related tasks like profile creation, login, address management and more
Note
A new version of user management apps are available which use only ViewModels for added speed and an improved developer experience.
The Extranet app is a paragraph app which is used to handle various user-related tasks from frontend.
When you add this app to a paragraph you will see a list of settings which control how the app works. But in contrast to other paragraph apps, it's difficult to give you an overall overview of the available settings. This is because, with the Extranet app, you initially select a mode which determines which other settings are available.
The different modes are:
Many settings are identical between modes, but some are not. Consequently, each mode is described separately below.
The folder structure for Extranet templates should be as followed: In your design folder have a folder named UserManagement with the following subfolders Addresses, CreateProfile, List, Login and ViewProfile.
Create profile/Manage subscription
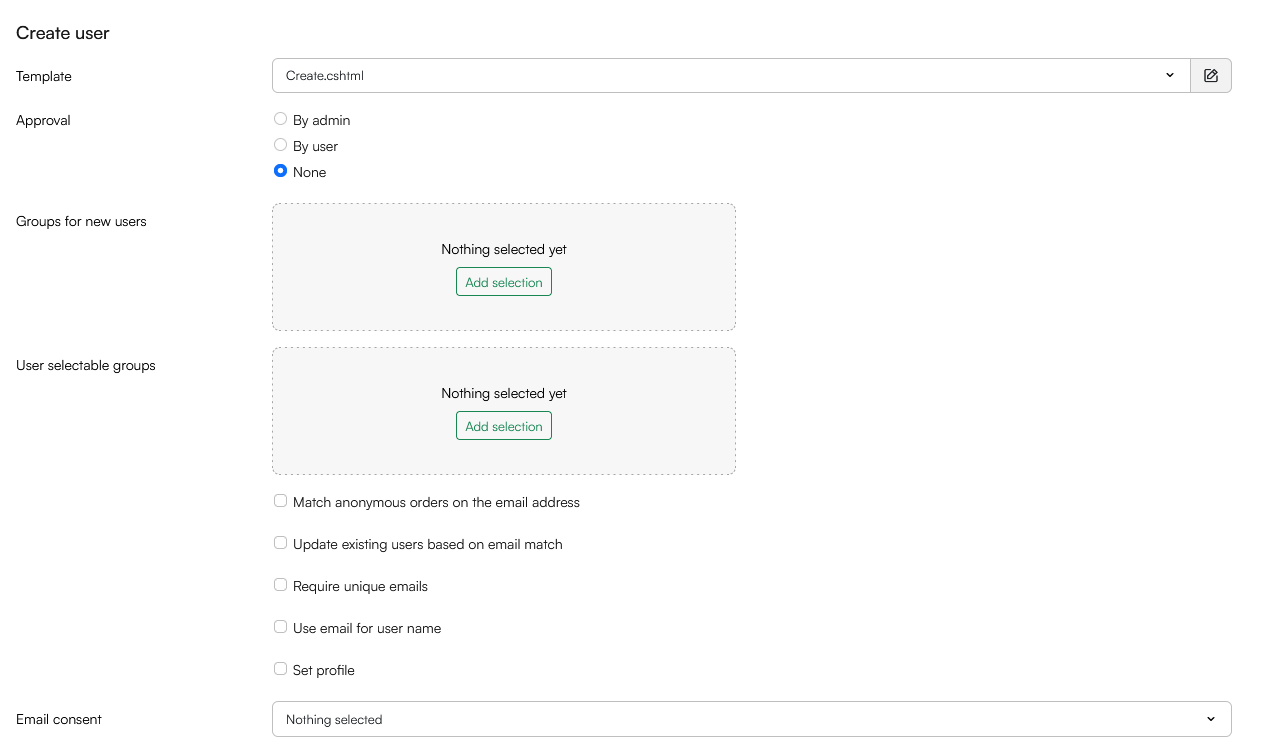
The Create profile/manage subscriptions mode is used to allow visitors to create user accounts from frontend. The settings are then used to configure the process:
 You must:
- Select a template which contains a form for creating a user
- Decide on an approval process
- By admin
- By user
- None
If needed you can:
- Specify which groups the new user should be added to - and which groups they can actively select to be added to. This can be used to e.g. sign up for various types of emails
- Select a consent activity which is collected if the user gives email permission when signing up. Consent activities are created using the Data Processing app and relevant to GDRP compliance
- Set up user confirmation emails, admin notification emails and user notification emails
- Set redirection settings to either redirect to a page or template
You also have access to some special settings - they are:
| Setting | Use | Notes |
|---|---|---|
| Match anonymous orders on the email address | Matches the new user to anonymous carts and orders if they have the same email | |
| Update existing users based on email match | - | Often used for newsletter-signups based on group membership |
| Require unique emails | Causes user creation to fail if the email already exists on the solution | |
| Use email for user name | Clones value from email-field to the user name field for new users | |
| Set profile | Creates a user record without values in the ProfileCreated and ProfileCreatedDate fields | This setting is intended to indicate that this user is a limited user only used to sign up for emails |
Create profile form
When adding a form in your template to create a profile initialise it with the tag UserManagement:User.FormStart and end it with UserManagement:User.FormEnd:
<!-- Form for profile creation -->
@GetValue("UserManagement:User.FormStart")
<div>
    <label for="Username"> Username </label>
    <input name="@GetValue("UserManagement:User.UserName.InputName")" type="text" id="Username"/>
    <label for="Email"> Email </label>
    <input name="@GetValue("UserManagement:User.Email.InputName")" type="email" id="Email"/>
    <label for="Password"> Password </label>
    <input name="@GetValue("UserManagement:User.NewPassword.InputName")" type="password" id="Password"/>
    <label for="PasswordConfirm"> Confirm password </label>
    <input name="@GetValue("UserManagement:User.NewPasswordConfirm.InputName")" type="password" id="PasswordConfirm"/>
    <button type="submit"> Create new user </button>
</div>
@GetValue("UserManagement:User.FormEnd")
Error messages
For adding error messages for form validation errors use the loop FormValidationErrors and the following TemplateTags:
<!-- List of error messages -->
@{
    var errors = GetLoop("FormValidationErrors");
    if (errors.Count > 0)
    {
        @foreach (var error in errors)
        {
            <div>@error.GetValue("UserManagement:User.FormValidationError.FieldNiceName"): @error.GetValue("UserManagement:User.FormValidationError.Message")</div>
        }
    }
}
Edit profile
The Edit profile mode allows users to edit their profiles from frontend. The settings are:

To use this mode you should:
- Select an edit template which will determine the layout when editing a profile
If needed, you can:
- Specify user groups which the user can join on their own accord
- Select an email related consent activity, which can be collected if the user gives email permission using the checkbox rendered by the
UserManagement:User.EmailAllowed.Input-tag
Edit profile form
Use a form, similar to the create profile mode, to make it possible for a user to edit their profile. When adding a form in your template to create a profile initialise it with the TemplateTag UserManagement:User.FormStart and end it with UserManagement:User.FormEnd. An example of this:
<!-- Form for profile editing -->
@GetValue("UserManagement:User.FormStart")
<div>
    <label for="Username"> Username </label>
    <input name="@GetValue("UserManagement:User.UserName.InputName")" type="text" id="Username" value="@GetValue("UserManagement:User.Name")" />
    <label for="Email"> Email </label>
    <input name="@GetValue("UserManagement:User.Email.InputName")" type="email" id="Email" value="@GetValue("UserManagement:User.Email")" />
    <label for='OldPassword'> Old password </label>
    <input name="UserManagement_Form_OldPassword" type="password" id="OldPassword" autocomplete="off" />
    <label for='NewPassword'> New password </label>
    <input name="UserManagement_Form_NewPassword" type="password" id="NewPassword" autocomplete="off" />
    <label for='NewPasswordConfirm'> Confirm password</label>
    <input name="UserManagement_Form_NewPasswordConfirm" type="password" id="NewPasswordConfirm" autocomplete="off" />
    <button type="submit"> Update profile </button>
</div>
@GetValue("UserManagement:User.FormEnd")
Link to editing an user profile from other Extranet modes:
<a href="@GetString("UserManagement:User.EditUrl")"> Edit profile </a>
Email permission
To collect the email related consent activity from the user, use the tag UserManagement:User.EmailAllowed.Input. This creates a checkbox which the user can check off to give email permission:
<div> Email permission: @GetValue("UserManagement:User.EmailAllowed.Input") </div>
List
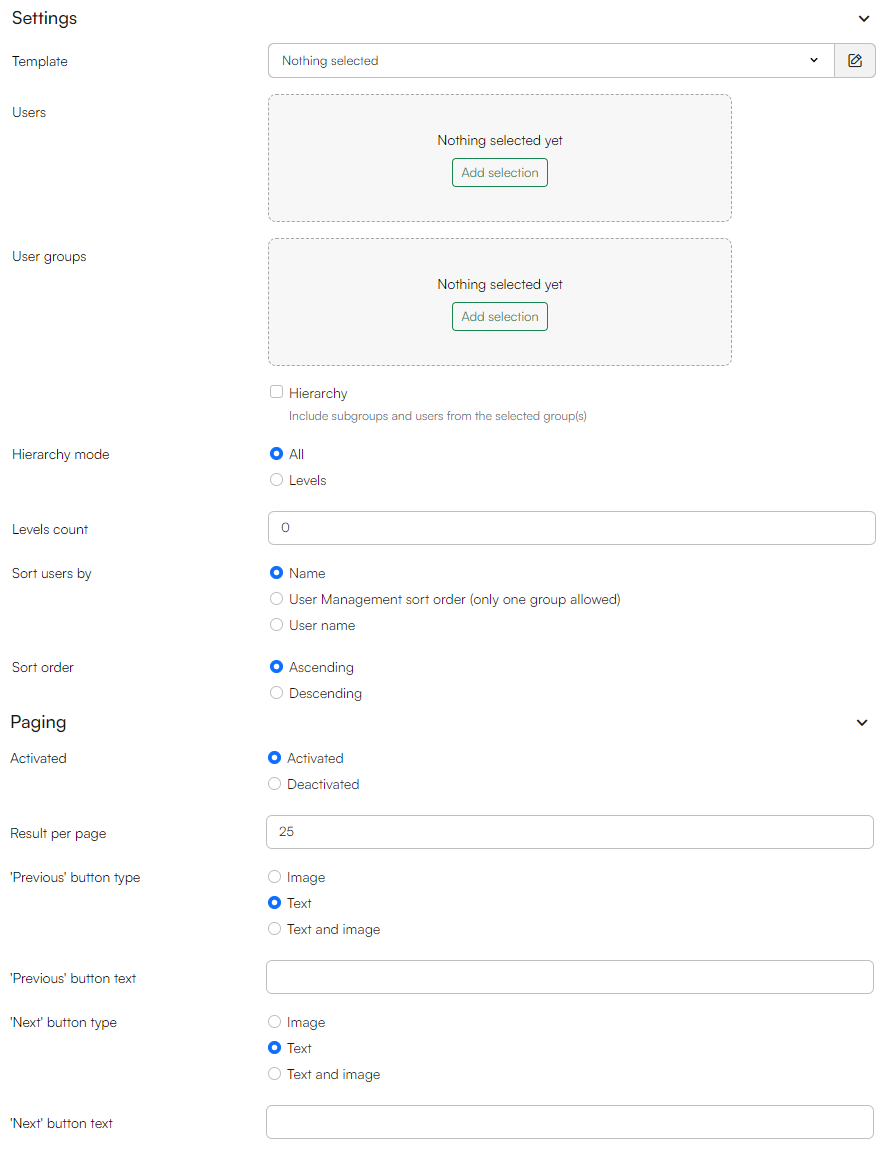
The list mode is used to publish lists of users and/or user groups – in either a flat structure or a tree-like structure with subgroups included. The settings used in this mode are:

You must:
- Select a template for rendering the list of users/groups
- Select the users and groups to list, and specify the hierarchy mode and sorting rules
If needed, you can:
- Specify if paging should be activated, results per page, and the text and type of buttons
- Select a template for rendering user details, see the view profile mode, and group details
- You can also set up a search template
User and user group lists
List users or user groups by using loops:
<!-- Lists all user groups -->
@foreach (LoopItem item in GetLoop("AllGroups"))
{
    <li>
        @item.GetValue("UserManagement:Group.Name")
    </li>
}
<!-- Lists all users -->
@foreach (LoopItem item in GetLoop("AllUsers"))
{
    <li>
        @item.GetValue("UserManagement:User.UserName")
    </li>
}
Paging
If paging is activated, the page links can be accessed by a tag or by using loops, e.g.:
<!-- Creates a 'next page'-link for a list of all users -->
<a href="@GetString("AllUsers.DwPaging.NextPageLink")"> Next page</a>

<!-- Creates links for all pages for a list of all users -->
@foreach (LoopItem item in GetLoop("AllUsers.DwPaging.LoopAllPages"))
{
    <a href="@item.GetString("AllPages.PageLink")"> Page @item.GetInteger("AllPages.PageNumber")</a>
}
Login
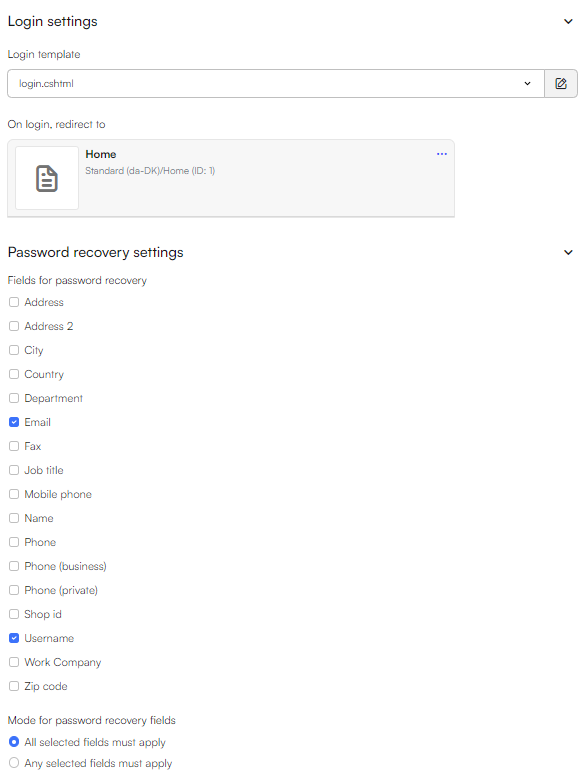
The login mode is used to log users into their account - and related features such as password recovery. It uses the following settings:

 To use this mode you should:
- Select a login template which is shown prior to logging in
- Specify a page to redirect users to once they've logged in
- Select which field(s) the user needs to fill for password recovery and how they apply
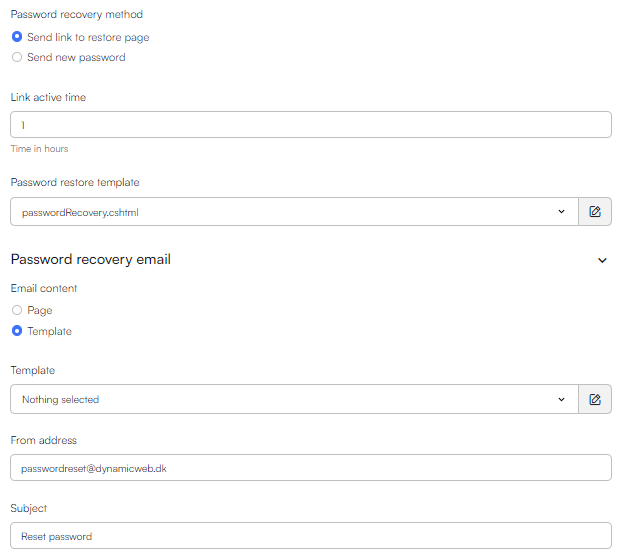
- Select a password recovery method:
- Send new password, and select a template for it
- Send link to restore page, select a template for it, and you can further specify for how long you want this link to be valid
If needed, you can:
- Specify password recovery email for the password recovery email sent to users, if nothing is selected a default email is rendered
- Choose to redirect to either a page or template, used when the Send link to reset page-method is chosen, if no page is selected the default is the login page
- Set a from address and email subject
Login form
Logging in with Extranet is done with a form. The tag DWExtranetAction returns the URL for the page that handles the form submission. A simple login form could be:
<!-- Login form -->
<form class="form-body" method="post" action=@GetValue("DWExtranetAction")>
    <label for="login-username"> Username </label>
    <input type="text" id="login-username" name="username"/>
    <label for="login-password"> Password </label>
    <input type="password" id="login-password" name="password"/>
    <button type="submit" name="LoginAction" value="Login"> Login </button>
</form>
<!-- Show login error message -->
@if (!string.IsNullOrWhiteSpace(GetString("DW_extranet_error_uk")))
{
    <div class="alert alert-danger">
        Error: @GetString("DW_extranet_error_uk")
    </div>
}
Redirect to the chosen password recovery method with LoginAction=Recovery present in the url:
<!-- Link to the password recovery method -->
<a href="/Default.aspx?id=@GetGlobalValue("Global:Page.ID")&LoginAction=Recovery"> Forgot your password? </a>
Password recovery form
For both the password restore template and password reset template a form is needed to handle the action of sending a new password or sending a link to restore page. The form for both templates can be identical as the form action is decided by the tag DWExtranetAction. For both methods the form should be visible when the value of UserManagement:User.Login.Action is Recovery:
<!-- A conditional to check the value of `UserManagement:User.Login.Action` -->
@if (@GetString("UserManagement:User.Login.Action").Contains("Recovery"))
{
    <!-- `DWExtranetAction` returns the URL for the page that handles this form submission-->
    <form method="post" action=@GetValue("DWExtranetAction")>

        <!-- Looping over the chosen password recovery field(s) -->
        @foreach (LoopItem item in GetLoop("UserManagement:User.Login.Fields"))
        {
            <label for="@item.GetValue("Field.Name")">@item.GetValue("Field.Title"):</label>
            <div id="@item.GetValue("Field.Name")"> @item.GetValue("Field.Input")</div>
        }

        <!-- Email information for the password recovery email sent to users -->
        <input type="hidden" name="ForgotPasswordMailTemplate" value="@GetString("UserManagement:User.Login.EmailTemplate")" />
        <input type="hidden" name="ForgotPasswordSenderEmail" value="@GetString("UserManagement:User.Login.EmailSender")" />
        <input type="hidden" name="ForgotPasswordMailSubject" value="@GetString("UserManagement:User.Login.EmailSubject")" />

        <input type="submit" name="LoginAction" value="Submit" />
    </form>
}
Password restore
If Send link to restore page-method is chosen, the Password restore template is active. Create a password recovery form for sending a link to restore the password when the user has filled the password recovery field(s). After the form has been filled, the value of UserManagement:User.Login.Action is RecoveryLinkSent, and a confirmation message should appear:
<!-- A conditional to check the value of `UserManagement:User.Login.Action` -->
@if (@GetString("UserManagement:User.Login.Action").Contains("RecoveryLinkSent"))
{
    <div> Check your email - we sent you an email with a link. Click it to continue to restore your password. </div>
}
If you have not selected a specific email template in the settings, the default email link will redirect the user to the Password recovery template. Now the value of UserManagement:User.Login.Action is changed to NewPasswordForm, and a form for choosing a new password should appear. Further conditions should be set that checks that a user is related to the email, and the recovery token from the email is valid. A setup could be:
<!-- Store the value of the tags for the condition -->
@{
    string loginAction = @GetString("UserManagement:User.Login.Action");
    bool foundUser = GetBoolean("UserManagement:User.Login.RecoveryToken.FoundUser");
    bool expiredToken = GetBoolean("UserManagement:User.Login.RecoveryToken.OutOfDate");
}

<!-- Check the value of `loginAction`, `foundUser` and `expiredToken`-->
@if (loginAction.Contains("NewPasswordForm") && foundUser && !expiredToken)
{
    <h3> Choose a new password </h3>

    <!-- `DWExtranetAction` returns the URL for the page that handles this form submission-->
    <form method="post" action=@GetValue("DWExtranetAction")>

        <!-- Email and recovery token information from the password recovery email sent to users -->
        <input type="hidden" name="RecoveryToken" value=@GetValue("UserManagement:User.Login.RecoveryToken") />
        <input type="hidden" name="ForgotPasswordMailTemplate" value="@GetString("UserManagement:User.Login.EmailTemplate")" />
        <input type="hidden" name="ForgotPasswordSenderEmail" value="@GetString("UserManagement:User.Login.EmailSender")" />
        <input type="hidden" name="ForgotPasswordMailSubject" value="@GetString("UserManagement:User.Login.EmailSubject")" />

        <!-- Password and password confirmation inputs and error messages if present  -->
        <label class="title" for=@GetValue("UserManagement:User.Login.Field.NewPassword.Name")> Password: </label> @GetValue("UserManagement:User.Login.Field.NewPassword.Input")
        <label class="error" for=@GetValue("UserManagement:User.Login.Field.NewPassword.Name")>@GetValue("UserManagement:User.Login.Field.NewPassword.Error")</label>
        <label class="title" for=@GetValue("UserManagement:User.Login.Field.NewPasswordConfirm.Name")> Confirm Password: </label> @GetValue("UserManagement:User.Login.Field.NewPasswordConfirm.Input")
        <label class="error" for=@GetValue("UserManagement:User.Login.Field.NewPasswordConfirm.Name")> @GetValue("UserManagement:User.Login.Field.NewPasswordConfirm.Error") </label>
        <button type="submit" name="LoginAction" value="ChangePassword">Submit</button>
    </form>
}
After the new password form has been filled, the value of UserManagement:User.Login.Action is PasswordChanged, and a confirmation message should appear:
<!-- A conditional to check the value of `UserManagement:User.Login.Action` -->
@if (@GetString("UserManagement:User.Login.Action").Contains("PasswordChanged"))
{
    <div> Congratulations! Password changed. </div>
}
Password reset
If Send new password-method is chosen, the Password reset template is active. Create a password recovery form for sending a new password when the user has filled the password recovery field(s). After the form has been filled, the value of UserManagement:User.Login.Action is PasswordSent, and a confirmation message should appear:
<!-- A conditional to check the value of `UserManagement:User.Login.Action` -->
@if (@GetString("UserManagement:User.Login.Action").Contains("PasswordSent"))
{
    <div> Check your email - we sent you an email with a new password. </div>
}
Manage addresses
The Manage Addresses mode is used to publish a list of addresses for the currently logged in user and allow the user to create new addresses or edit existing addresses. The settings used are:

To use this mode you must:
- Select an address list template for rendering a list of addresses
- Select a create address template to create new addresses or edit existing addresses
Addresses list
Within a manage addresses form render a list of addresses for the logged in user and provide functionality for changing default address, edit or delete an address. Use the form tags to start and end the form UserManagement:User.ManageAddresses.FormStart and end it with UserManagement:User.ManageAddresses.FormEnd. A simple solution:
<!-- List of user addresses inside the manage addresses form -->
@GetValue("UserManagement:User.ManageAddresses.FormStart")
<table>
    @foreach (var address in GetLoop("UserManagement:User.UserAddresses"))
    {
        <tr>
            <td>@address.GetValue("UserManagement:User.UserAddress.Description")</td>
            <td>@address.GetValue("UserManagement:User.UserAddress.Address")</td>
            <td>@address.GetValue("UserManagement:User.UserAddress.City")</td>
            <td> <!-- Show what address is default -->
                @if (!string.IsNullOrWhiteSpace(address.GetString("UserManagement:User.UserAddress.Default")))
                {
                    <span> Default address </span>
                }
            </td>
        </tr>
    }
</table>
@GetValue("UserManagement:User.ManageAddresses.FormEnd")
Managing addresses functions
To create buttons for setting a default address, adding, editing or deleting addresses use the following tags where each returns a script with a function:
@GetValue("UserManagement:User.ManageAddresses.MakeDefault.Javascript") <!-- Provides the function makeDefaultAddress(), use inside UserAddresses Loop -->
@GetValue("UserManagement:User.ManageAddresses.DeleteAddress.Javascript") <!-- Provides the function deleteAddress(). use inside UserAddresses Loop -->
@GetValue("UserManagement:User.ManageAddresses.UpdateAddress.Javascript") <!-- Provides the function updateAddress(), use inside UserAddresses Loop -->
@GetValue("UserManagement:User.ManageAddresses.AddAddress.Javascript") <!-- Provides the function addAddress() -->

@foreach (var address in GetLoop("UserManagement:User.UserAddresses"))
{
    <div>
        <!-- Buttons for changing the default address and editing-/deleting each of the user's addresses -->
        <button type="button" onclick="makeDefaultAddress('@address.GetValue("UserManagement:User.UserAddress.ID")');"> Make default </button>
        <button type="button" onclick="updateAddress('@address.GetValue("UserManagement:User.UserAddress.ID")');"> Edit </button>
        <button type="button" onclick="deleteAddress('@address.GetValue("UserManagement:User.UserAddress.ID")');"> Delete </button>
    </div>
}
<!-- Button for adding/creating addresses-->
<button type="submit" onclick="addAddress();"> Add address </button>
Create/edit addresses form
The create address template for creating or editing addresses uses a manage addresses form:
<!-- Form for adding/editing addresses -->
@GetValue("UserManagement:User.ManageAddresses.FormStart")
 <div>
    <label for="Description"> Description </label>
    <input name="@GetValue("UserManagement:UserAddress.Description.InputName")" type="text" id="Description" value='@GetValue("UserManagement:User.UserAddress.Description.Value")' />
    <label for="Address"> Address </label>
    <input name="@GetValue("UserManagement:UserAddress.Address.InputName")" type="text" id="Address" value='@GetValue("UserManagement:User.UserAddress.Address.Value")' />
    <label for="City"> City </label>
    <input name="@GetValue("UserManagement:UserAddress.City.InputName")" type="text" id="City" value='@GetValue("UserManagement:User.UserAddress.City.Value")' />
    <label> Default address </label>

    <!--Select default address, if address is already default the checkbox is checked-->
    if (@GetString("UserManagement:User.UserAddress.Default.Value") == "True")
    {
        <input type="checkbox" id="Default" name="Default" checked="checked" />
    }
    else
    {
        <input type="checkbox" id="Default" name="Default" />
    }
    <button type="submit"> Add/edit address </button>
</div>
@GetValue("UserManagement:User.ManageAddresses.FormEnd")
View profile
The View profile mode is used to publish details about a user account in frontend, either the:
- The currently logged in user
- A selected user account
The following settings are used:

To use this mode you must:
- Select a details template for rendering the user account details
- Select whether to show the logged in user's- or the selected user's profile
- Choose whether to allow editing in this mode, only possible if logged in user is selected
- If needed, you can change a section of predefined error messages for validation fails
If set to publish account details about the currently logged in user, and allow editing is selected, this mode also supports the modes Edit profile and Manage addresses.
User details
Render user account details with tags, e.g.:
<!-- List of user details -->
<ul>
    <li>@GetValue("UserManagement:User.UserName")</li>
    <li>@GetValue("UserManagement:User.Email")</li>
    <li>@GetValue("UserManagement:User.Phone")</li>
    <li>@GetValue("UserManagement:User.Address")</li>>
    <li>
        <img src="@GetString("UserManagement:User.Image.Clean")" alt="@GetValue("UserManagement:User.Name")" />
    </li>
</ul>
Link to the profile page of an user from other Extranet Modes:
<a href="@GetString("UserManagement:User.DetailUrl")"> View profile </a>
User group list
To display which User Groups the user is placed in, use the loop Groups:
<!-- List of user groups -->
@foreach (LoopItem item in GetLoop("Groups"))
{
    <li>@item.GetValue("UserManagement:Group.Name")</li>
}
Form antispam
If you’re using the FormStart tag to create a form they are added automatically, if not you can add them via the UserManagement:User.FormHidden tag in Extranet forms.