Forms for Editors is an app designed to help customers easily submit forms — perfect for situations like reaching out without the hassle of an email. If you’d like to learn more about the concept, check out this article.
Before you use this app, make sure you create a form using in the Forms for Editors part of the apps area.
Add this app to a paragraph to see the app settings - there are a lot of them, but basically you do this:
- Select a form to render & select a template which controls how it's rendered
- Decide what happens once it's been submitted
- Set up email notifications & receipt emails
- Configure a few additional settings which control e.g. how many forms you can submit, where uploads go, etc.
The settings are organized into the sections Form, When submitting form, E-mail, Receipt, Max submits, Upload settings and User management, each of which is described below.
What happens when a form is submitted
Before going through the individual settings it helps to understand what the app actually does, since several settings only make sense in the context of the submission flow. When a visitor posts a form, the app runs through these steps in order:
- Method check – the request must be an HTTP
POST; anything else is rejected. - Anti-spam check – the submission is validated by the built-in anti-spam mechanism (see Anti-spam & system fields). If it's flagged as spam, processing stops.
- Max submits check – if a submit limit has been configured and reached, the max submits action is triggered instead of saving.
- Save the submit – a submit record is created (storing IP, page, session, referrer, form and current user) and each form field value is saved as submit data. File-upload fields are stored on disk (see Upload settings).
OnAfterSubmitSavenotification – fired so custom code can react to the saved submit.- Send notification e-mail – the administrator/website-owner e-mail is rendered and sent (see E-mail settings).
- Send receipt e-mail – if a recipient e-mail can be resolved from the form, the receipt e-mail is rendered and sent to the visitor (see Receipt settings).
- Create user – if Create user on form submit is enabled, a user is created or updated from the submitted values (see User management settings).
- Register consent – for every checkbox field tied to a data-processing activity that was checked, consent is registered (see Consent & data-processing activities).
- Redirect – finally the visitor is redirected, either to a configured page after submission or back to the current page with an encrypted submit token (
&s=...) so the confirmation/receipt can be rendered.
Several of these steps expose notifications that developers can subscribe to.
Here's a more in-depth description of each area of the app settings.
Form settings
The Form-settings are used to control base functionality - like selecting which form to render.
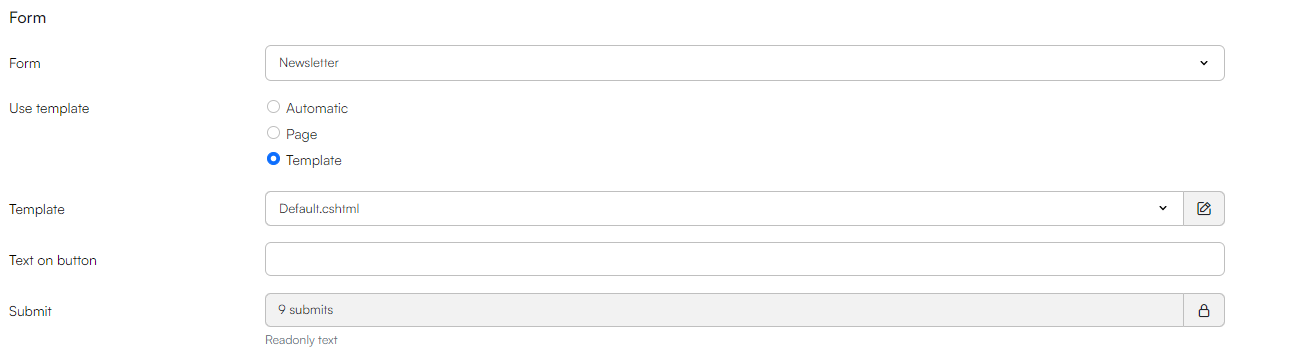
In the form settings, you can:
- Select a form:
- The form must already be created in Apps/Forms for editors/Forms
- Choose how the form is rendered with Use template:
- Automatic: uses the built-in default form template (or an automatic area template if one has been registered for the website)
- Template: uses a custom template, which must be created beforehand and placed under
Files/Templates/Forms/Form - Page: renders a page from your solution and uses its markup as the form template
- Set the button text with Text on button, which overrides the label of the form's submit button
In this section, you can also see how many submits have been made (the # submits read-only field).
Note
The Use template options control the form markup only. The e-mail, receipt and max-submits sections each have their own Use template setting that works the same way but resolves templates from their own folders.
If you select Template as the rendering method, the template should be placed under Files/Templates/Design/'YourDesign'/Forms/Form. An example template for rendering text & emails fields as well as a submit button could look like this:
@inherits Dynamicweb.Rendering.RazorTemplateBase<Dynamicweb.Rendering.RazorTemplateModel<Dynamicweb.Rendering.Template>>
@using System.Collections.Generic
@{
List<LoopItem> fields = GetLoop("Fields");
@GetString("Form.FormStart")
<div class="item-inner grid">
@GetString("Form.SystemFields")
@foreach (LoopItem field in fields)
{
string fieldType = field.GetString("Field.Type");
string systemName = field.GetString("Field.SystemName");
string value = field.GetString("Field.ValueFromAutoOrDefault");
string placeholder = Translate(field.GetString("Field.Placeholder"));
string label = Translate(field.GetString("Field.Name"));
bool required = field.GetBoolean("Field.Required");
if (fieldType == "TextInput" || fieldType == "Email")
{
string inputType = fieldType.ToLower() == "textinput" ? "text" : "email";
<div class="form-floating">
<input id="@systemName" class="form-control" type="@inputType" name="@systemName"
placeholder="@placeholder" value="@value" required="@required" />
<label for="@systemName">@label@(required ? $" ({Translate("required")})" : "")</label>
</div>
}
}
<button type="submit">Send</button>
</div>
@GetString("Form.FormEnd")
}
Anti-spam & system fields
If you use the Form.FormStart-tag to create a form, a set of form anti-spam fields are added to the form automatically. If you don't, you can add them via the Form.SystemFields-tag.
These hidden fields (together with the system identifiers for the form and paragraph) are what allow the app to validate the submission server-side. When the form is posted, the app runs an anti-spam check before the submit is saved. The check includes things like verifying the request is a genuine POST, validating the hidden security/honeypot fields, IP-based rate limiting, and — if enabled for the solution — an hCaptcha challenge. A submission that fails these checks is rejected and never stored.
Important
Always include either Form.FormStart (which opens the <form> element and injects the system/anti-spam fields) or Form.SystemFields inside your own <form>. Without them the post cannot be validated or processed.
When submitting form settings

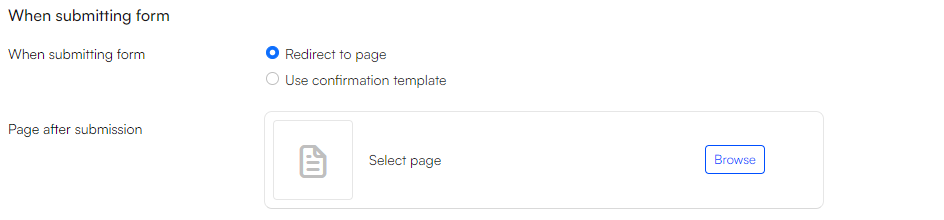
The When submitting form settings control what happens after a user submits a form. You can either:
- Redirect to page – send the user to another page on your website (Page after submission). If the selected page is internal the app redirects to it; if it's an external/absolute URL the user is sent there directly.
- Use confirmation template – stay on the same page and display a confirmation, using a Template (from
Files/Templates/Forms/Confirmation) and an optional rich-text Text that is exposed to the template.
Note
The confirmation is rendered after the redirect using an encrypted submit token appended to the URL (&s=...). This token also drives the receipt view, so the visitor only ever sees confirmation data for their own submission.
Here's a basic example of a template for showing a message after form submission. It should be placed under Files/Templates/Design/'YourDesign'/Forms/Confirmation.
@inherits Dynamicweb.Rendering.RazorTemplateBase<Dynamicweb.Rendering.RazorTemplateModel<Dynamicweb.Rendering.Template>>
<div class="thank-you-message">
<h1>Form submitted</h1>
<p>Thanks for the message!</p>
<p>We will get back to you as soon as possible.</p>
</div>
E-mail settings
The E-mail settings control the notification e-mail sent to the website owner (you) when a form is submitted. It contains the data the visitor entered.

There are a few properties in this section, here is a breakdown of them:
- Subject: The subject line of the email sent to the recipient
- Sender name: The name displayed as the sender of the email
- Sender email: The email from which the form submission is sent
- Get from E-mail field (under Sender email): If checked, the (valid) e-mail the visitor entered in the form is used as the sender's email and name instead of the value above
- Reply to: The email used when the recipient clicks "Reply" on the email
- Get from E-mail field (under Reply to): If checked, the (valid) e-mail the visitor entered is used as the Reply-To address
- Recipient: The email where the form submissions are sent
- Recipient CC: Additional email addresses that will receive a CC of the submission
- Recipient BCC: Additional email addresses that will receive a BCC of the submission
- Use template: Select how the email is rendered
- Automatic: Uses the built-in default e-mail template (or an automatic area template)
- Template: Uses a template of your choice from
Files/Templates/Forms/Mail - Page: Uses a page designed for the purpose
- Text: A rich-text body exposed to the template via the
Submit.MailTexttag
Note
The "Get from E-mail field" options rely on the form having a field designated as the e-mail field. The e-mail address is only used if it's a valid address — otherwise the configured Sender email / Reply to values are kept.
If you choose to use a template to control the content of the notification email, it should be stored in the following path: Files/Templates/Design/'YourDesign'/Forms/Mail
A simple email template could look like this:
@inherits Dynamicweb.Rendering.RazorTemplateBase<Dynamicweb.Rendering.RazorTemplateModel<Dynamicweb.Rendering.Template>>
@{
List<LoopItem> fields = GetLoop("Fields");
}
<!DOCTYPE html>
<html>
<body>
<h2>Form Submission</h2>
<p>You have received a new form submission. Below are the details:</p>
<table>
<thead>
<tr>
<th>Field Name</th>
<th>Value</th>
</tr>
</thead>
<tbody>
@foreach (var field in fields)
{
string fieldName = field.GetString("Field.SystemName");
string fieldValue = field.GetString("Field.Value");
<tr>
<td>@fieldName</td>
<td>@fieldValue</td>
</tr>
}
</tbody>
</table>
</body>
</html>
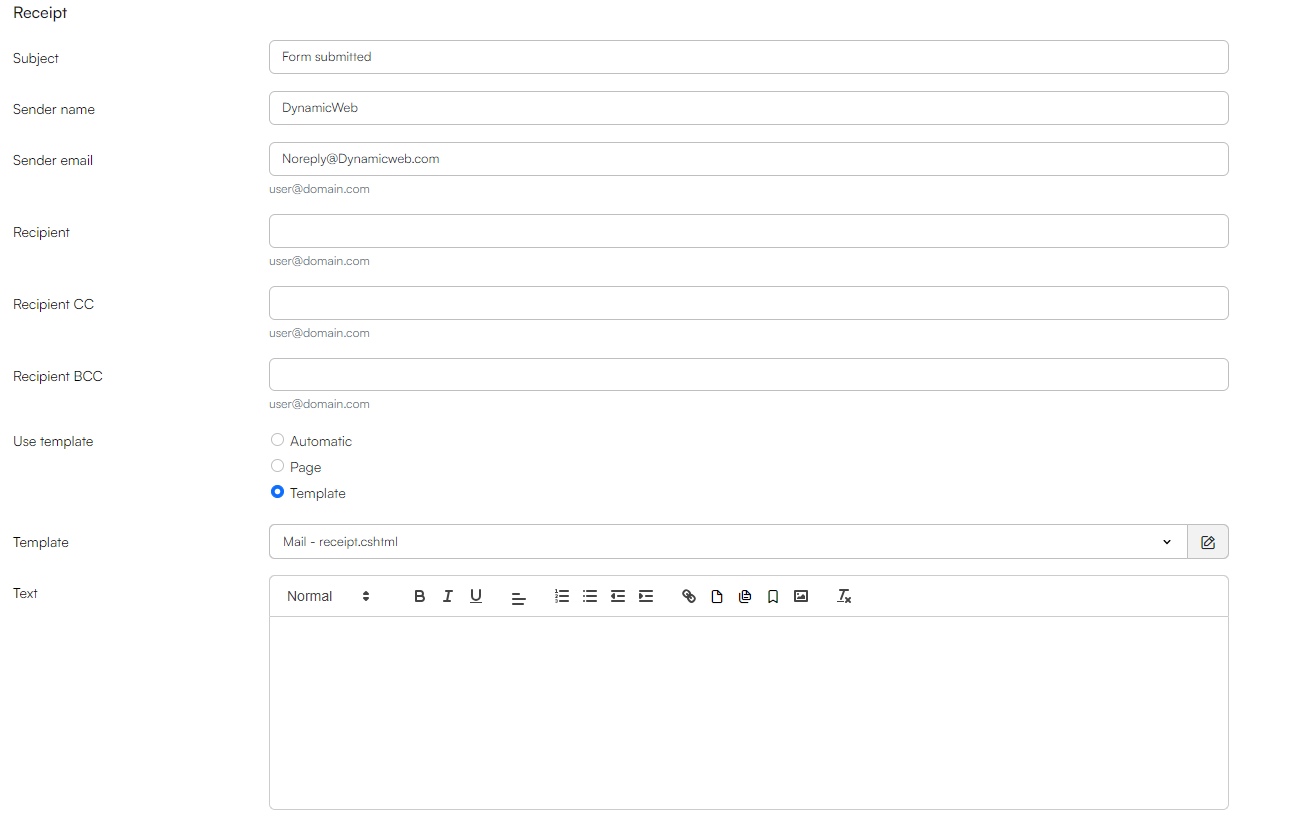
Receipt settings
The Receipt settings are used to set up the receipt email that is sent to the visitor who submitted the form. This requires that the form has a field designated as the e-mail field — the receipt is sent to the address the visitor entered there. If no valid e-mail address can be resolved from the submission, no receipt is sent.

There are a few properties in this section, here is a breakdown of them:
- Subject: Subject of the e-mail sent to the user submitting the form
- Sender name: The name displayed as the sender of the email
- Sender email: The email displayed as the sender
- Recipient CC: Additional email addresses that will receive a CC of the receipt
- Recipient BCC: Additional email addresses that will receive a BCC of the receipt
- Use template: Select how the mail is rendered
- Automatic: Uses the built-in default receipt template (or an automatic area template)
- Template: Uses a template of your choice from
Files/Templates/Forms/Mail - Page: Uses a page designed for the purpose
- Text: A rich-text body exposed to the template via the
Submit.ReceiptTexttag
If you select the Template option, the template should be placed under Files/Templates/Design/'YourDesign'/Forms/Mail. A simple template could look like this:
@inherits Dynamicweb.Rendering.RazorTemplateBase<Dynamicweb.Rendering.RazorTemplateModel<Dynamicweb.Rendering.Template>>
@{
var fields = GetLoop("Fields");
}
<!DOCTYPE html>
<html>
<body>
<h2> Thank you for your submission!</h2>
<p> Thank you for reaching out to us! We have received your submission, and our team will review it shortly. Below are the details you provided:</p>
<table>
<thead>
<tr>
<th> Field Name</th>
<th>Value</th>
</tr>
</thead>
<tbody>
@foreach (var field in fields)
{
<tr>
<td>@field.GetString("Field.SystemName")</td>
<td>@field.GetString("Field.Value")</td>
</tr>
}
</tbody>
</table>
</body>
</html>
Using a page as the notification or receipt email
For both the notification (E-mail) and the Receipt sections, the Use template setting offers a Page option. This lets you design the email body visually — as a regular page in the Visual Editor — instead of editing a Razor/HTML template file. You then insert the visitor's submitted values into that page using template tags written with double curly brackets, e.g. {{Field.Email.Value}}.
This is the same mechanism used by Swift's system emails, so if you've worked with those the syntax will be familiar.
How page-based email templates work
When you choose Page as the email template, the email is rendered in two passes:
- First pass – the chosen page is rendered to HTML exactly like a normal page. At this point your
{{ ... }}placeholders are not resolved — they are simply rewritten into real template tags behind the scenes. - Second pass – the resulting markup is run through the template engine again, this time with the submitted form data applied. Now each tag is replaced with the actual submitted value, and the finished HTML becomes the email body.
This two-pass behavior is the reason you write {{Field.Email.Value}} (curly brackets) rather than the normal template-tag syntax: a normal tag would be consumed and emptied during the page's first render, before the form data is ever available. The curly-bracket form survives the first pass and is resolved in the second.
Configuring a page as the email
To use a page as the notification or receipt email:
- Build the email as a page in the Visual Editor — typically inside your email folder/structure so it gets the right header/footer and email-friendly columns.
- Add a Forms for editors paragraph app to a paragraph and open its settings.
- In the E-mail section (notification to the website owner) or the Receipt section (receipt to the visitor), set Use template to Page.
- Select the page you built in step 1.
- Save.
When a form is submitted, that page is rendered and used as the email body, with your {{ ... }} tags filled in from the submission.
Inserting individual submitted values
To output a single submitted value, add a text column (or any rich-text content) on the page and type the tag using double curly brackets:
Thank you, {{Field.Name.Value}} — we received your message.
You can reach us about your enquiry at {{Field.Email.Value}}.
The part after Field. is the field's system name, not its label. You can find or set a field's system name on the Layout tab of the field editor (see Form fields). So a field with the system name Email is referenced as {{Field.Email.Value}}.
Tip
For list fields (dropdown, radio buttons, checkbox list) the submitted value is the option value. Use {{Field.<SystemName>.OptionText}} to output the human-readable option text instead.
Tag reference
The following tags are available on a page used as a notification or receipt email. They are populated from the submission before the page is used as the email body.
Per-field tags — replace <SystemName> with the field's system name:
| Tag | Description |
|---|---|
{{Field.<SystemName>.Value}} |
The value the visitor submitted for the field |
{{Field.<SystemName>.Name}} |
The field's label/name |
{{Field.<SystemName>.SystemName}} |
The field's system name |
{{Field.<SystemName>.OptionText}} |
For list fields: the selected option's display text (only set when the submitted value matches an option) |
Submission-level tags:
| Tag | Description |
|---|---|
{{Submit.Date}} |
Date and time of the submission |
{{Submit.ID}} |
The internal id of the submission |
{{Submit.FormID}} |
The id of the form |
{{Submit.Token}} |
The submission token (used to build the receipt link) |
{{Submit.Ip}} |
The IP address the form was submitted from |
{{Submit.SessionId}} |
The session id of the submitting visitor |
{{Submit.ReceiptUrl}} |
URL to view the receipt for this submission |
{{Submit.EmailFieldValue}} |
The value of the form's designated e-mail field |
Note
The notification e-mail includes all active fields. The receipt e-mail excludes fields marked Hide field in receipt, so a tag for a hidden field resolves to empty in the receipt.
Limitations
The curly-bracket syntax only works for scalar tags — i.e. a single value such as {{Field.Email.Value}}. It is not possible to build a loop over all submitted fields (for example, a "all values" table that automatically lists every field and its value) from a rich-text area on a page:
- Producing such a table requires the template engine's loop syntax (a
FieldValuesloop withSubmitData.*tags inside it). - Loop syntax cannot be authored from a rich-text editor.
So if you need a complete, automatically-generated list of every submitted value, use a file-based Template instead of a Page (see the template examples in the E-mail settings and Receipt settings sections, which use the Fields loop). On a page you must reference each field you want to show individually by its system name.
Max submits
The Max Submits section of the app enables you to set a limit on the number of times a form can be submitted. This feature is important for several reasons, such as preventing abuse and reducing spam.
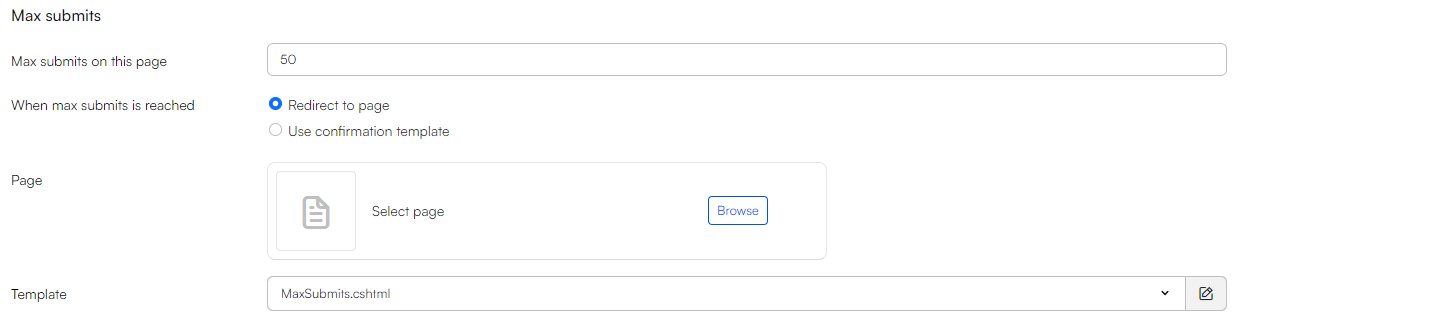
The configuration options in this section:
- Max submits on this page: Specifies the maximum number of submissions allowed for this form
- If left blank or set to 0, there is no limit set on the paragraph. If the form itself has a max submits value configured, that limit still applies.
- When max submits is reached: Select what happens when the submission limit is reached:
- Redirect to page: Choose a specific page to which users will be redirected once the limit is reached
- Use confirmation template: Use a template (from
Files/Templates/Forms/Confirmation) to display that max submissions has been reached, with the message exposed via theForm.MaxSubmitsReachedTexttag
Note
The limit is evaluated both when the form is rendered and when it is submitted, so a form that has reached its limit shows the max-submits action instead of the form, and a late post is still rejected.
A template for max submits can be as simple as this:
<div class="thank-you-message">
<h1>Max submits reached</h1>
</div>
Upload settings
The upload settings specify the path for storing files submitted through file fields on the form.

- Upload path: The folder where uploaded files are stored. If left empty, files are stored in a per-form default folder:
Files/System/FormUploads/Form_{FormID}/.
Uploaded files are validated and sanitized before being saved:
- The templates folder can never be used as an upload target.
- A number of executable/server-side file types are always blocked, regardless of other settings:
.cshtml,.cshtm,.vbhtml,.vbhtm,.aspx,.ashx,.asmx,.soap,.axd,.rem,.asp. - The global file manager extension rules are also enforced: the allowed extensions allow-list (
/Globalsettings/Modules/Filemanager/Upload/AllowedExtensions) and the disallowed extensions deny-list (/Globalsettings/Modules/Filemanager/Upload/DisallowedExtensions). - File names are sanitized (certain characters are replaced, optional space-replacement and latin-to-ascii normalization apply), and if a file with the same name already exists a numeric suffix (
_(1),_(2), …) is appended so existing files are never overwritten.
User management settings
The user management settings are used to create users and adding them to specific user groups.
This is particularly useful for signing users up for newsletters - by adding users to a newsletter group and using email marketing to target that group.
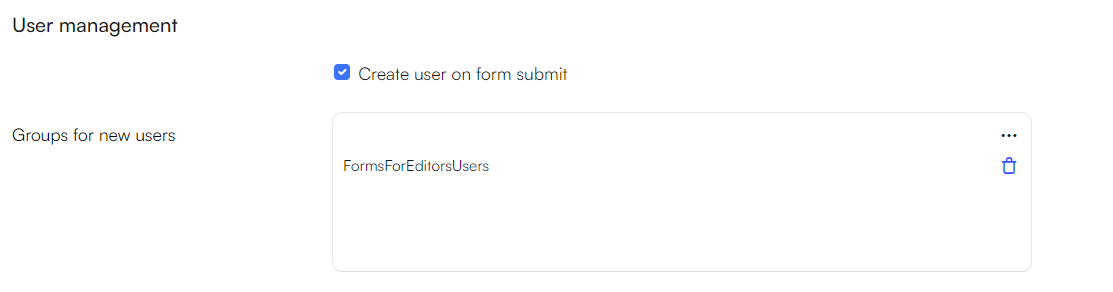
To use this function:
- Check the 'Create user on form submit' and select one or more user groups to add the users to under Groups for new users
- Edit your form fields and map them to the corresponding user management fields using the field's automatic value
To map user management fields to form fields, follow these steps:
- Navigate to Apps > Forms for editors > Forms
- Click on the form, you want to apply this function to, e.g. "Newsletter"
- Click Manage in the Form preview section and select the fields you want to connect
- Go to the Values tab
- In the Automatic Value section, choose the corresponding value for the field
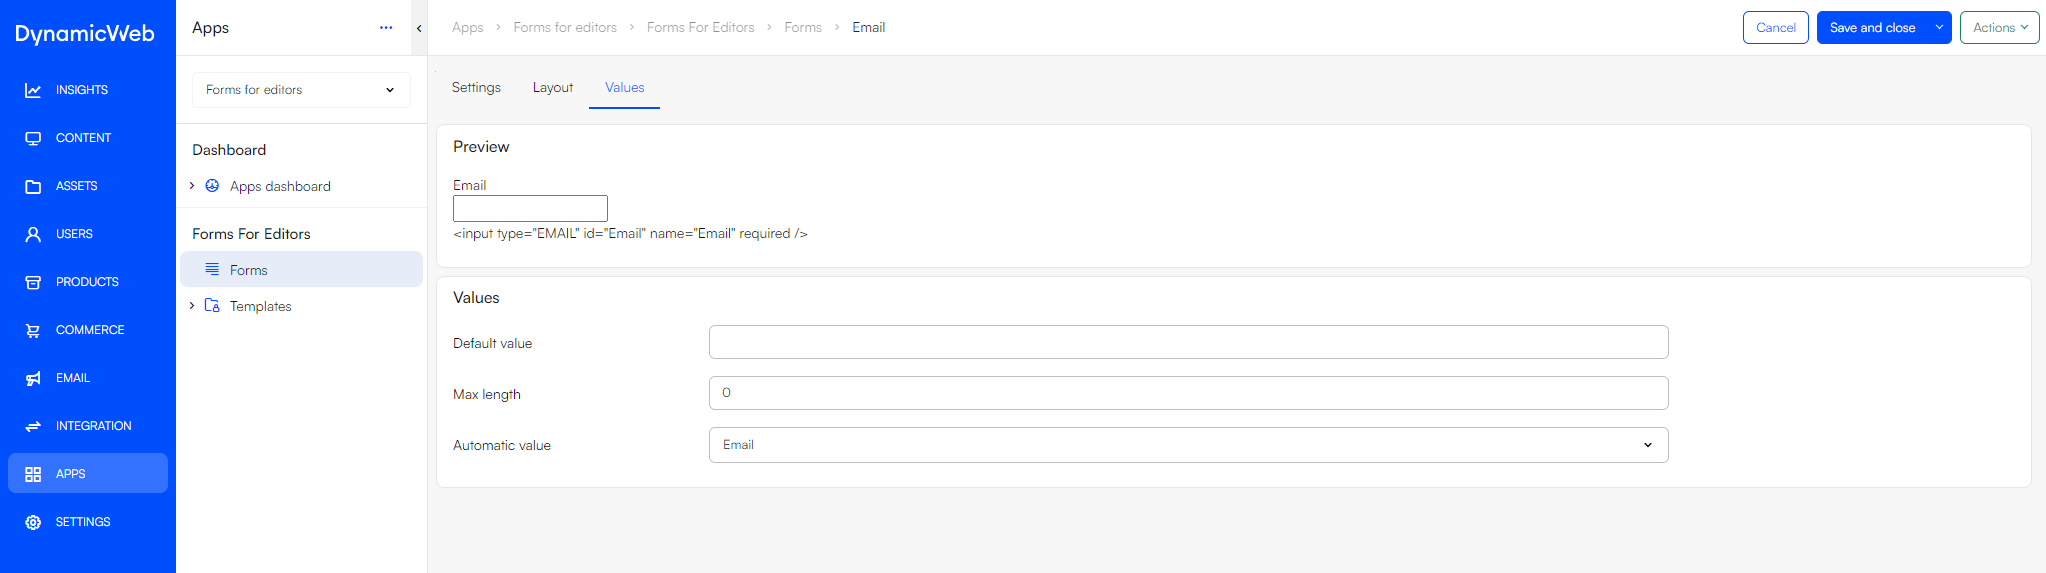
When users complete this form, they will automatically be added to the specified user group(s).
How users are created from submitted data
When Create user on form submit is enabled, the app does the following on submit:
- It resolves the e-mail address from the form's designated e-mail field. A valid e-mail is required — if none is found, no user is created.
- If a user is already signed in, that user is used; otherwise an existing user with the same e-mail is looked up; otherwise a new user is created.
- For new users, the fields below are populated from the corresponding form fields, based on each field's automatic value mapping. Existing users are not overwritten (except for the e-mail-permission flag).
- The user is added to the configured Groups for new users.
- If a password field is mapped, the password is set for the user.
The automatic values that map a form field to a user property are:
| Automatic value | User property |
|---|---|
AccessUserName |
User name / login |
AccessUserPassword |
Password |
AccessUserFirstName |
First name |
AccessUserMiddleName |
Middle name |
AccessUserLastName |
Last name |
AccessUserAddress |
Address |
AccessUserAddress2 |
Address 2 |
AccessUserHouseNumber |
House number |
AccessUserZip |
Zip/postal code |
AccessUserCity |
City |
AccessUserCountry |
Country |
AccessUserPhone |
Phone |
AccessUserPhonePriv |
Private phone |
AccessUserMobile |
Mobile phone |
AccessUserCompany |
Company |
AccessUserDepartment |
Department |
AccessUserJobTitle |
Job title |
EmailPermission |
E-mail permission (checkbox) |
Custom user text fields can also be filled by mapping a form field to the custom field's system name.
Note
EmailPermission is treated as a consent checkbox: for an existing user, the presence of the (checked) field sets e-mail allowed to true; for a new user the checkbox value is used directly.
Consent & data-processing activities
A checkbox field on the form can be tied to a data-processing activity (configured on the field via its Activity ID). When the form is submitted with such a checkbox checked, the app registers consent for that activity automatically — this is the mechanism used to capture GDPR-style consent (e.g. "I accept the privacy policy" or "Sign me up for the newsletter").
Consent is registered against the best available identity, in this order:
- User – if a user is signed in or was created during the submission, consent is registered for that user.
- Email – if the form has a valid e-mail value, consent is registered for that e-mail address.
- Visitor – otherwise, if a Dynamicweb visitor ID cookie is present and no user was resolved, consent is registered for the anonymous visitor.
Each consent record also stores request information (such as IP and request details) for the audit trail.
Automatic templates
When Use template is set to Automatic for the form, e-mail or receipt, the app resolves a template for you:
- If a template has been registered for the current website (area) for that template type (form, e-mail or receipt), that template is used.
- Otherwise the built-in default template embedded in the app is used.
This means you can ship working forms with zero template configuration, while still being able to override the look per website or per paragraph.
Extending the app with notifications
For developers, the frontend app raises a number of notifications during the submission and rendering lifecycle. Subscribe to these (via the standard Dynamicweb notification subscriber mechanism) to run custom logic — for example to enrich the submit, modify the outgoing e-mails, or integrate with external systems.
| Notification | When it fires | Typical use |
|---|---|---|
Notifications.Frontend.OnBeforeContent |
Before the app renders anything | Short-circuit rendering and supply your own output |
Notifications.Frontend.OnAfterSubmitSave |
After the submit and its data have been saved | React to a new submission (the Submit and Form are available) |
Notifications.Frontend.OnBeforeSendMail |
After the notification e-mail body is rendered, before sending | Inspect/modify the rendered template |
Notifications.Frontend.OnSendMail |
Just before the notification e-mail is sent | Modify the MailMessage (recipients, headers, attachments) |
Notifications.Frontend.OnBeforeSendReceipt |
After the receipt e-mail/receipt view is rendered, before sending | Inspect/modify the rendered receipt |
Notifications.Frontend.OnSendReceipt |
Just before the receipt e-mail is sent | Modify the receipt MailMessage |
The notification arguments expose the relevant Submit, Form, Template and/or EmailMessage objects depending on the notification.