In some cases, you may need to create admin users for individuals outside your organization, such as DynamicWeb staff, partners, or external collaborators. To enhance security, it’s advisable to set these users with time-limited access.
This tutorial will guide you through the steps to create such users.
Tip
Before you create these users, make sure you have an email address for each of them - you won't be able to securely allow them to login without sending them an email via DynamicWeb.
Create the user
First create each user account

Now that the user has been created, you need to active the user and configure it to function as an administrator.

Test user access
Log out with your own account, then log in to verify that the new account has access to whatever you want the user to have access to. This should be pretty trivial given that the user has administrator-level access to the solution.

Send user details to new user
After creating a new administrator user, you'll need to share the user information with the person who will be using it. Here’s how to do that:
- Go to the users overview
- Click the edit button
- From the Action menu, select Send user details
- Enter a subject for the email, such as 'Login and change your password'
- Provide the senders name and email
- Choose whether to use a template or a custom page to render the email
The available tags for the page and template can he found in the user account manual. The templates should be placed in Templates/ExtranetExtender.
There are various ways to implement this functionality, but the simplest approach is to send only the username to the user via email and configure the system to use either "Passwordless Authentication with Magic Links" or "TOTP (Time-based One-time Password)" for secure access. A simple template for "Sending user details" that includes only the username and email is shown below:
Dear @GetString("DWUsers:User:Name"),<br /><br />
Your account information:<br />
<strong>Username:</strong> @GetString("DWUsers:User:Username")<br />
<strong>Email:</strong> @GetString("DWUsers:User:Email")<br />

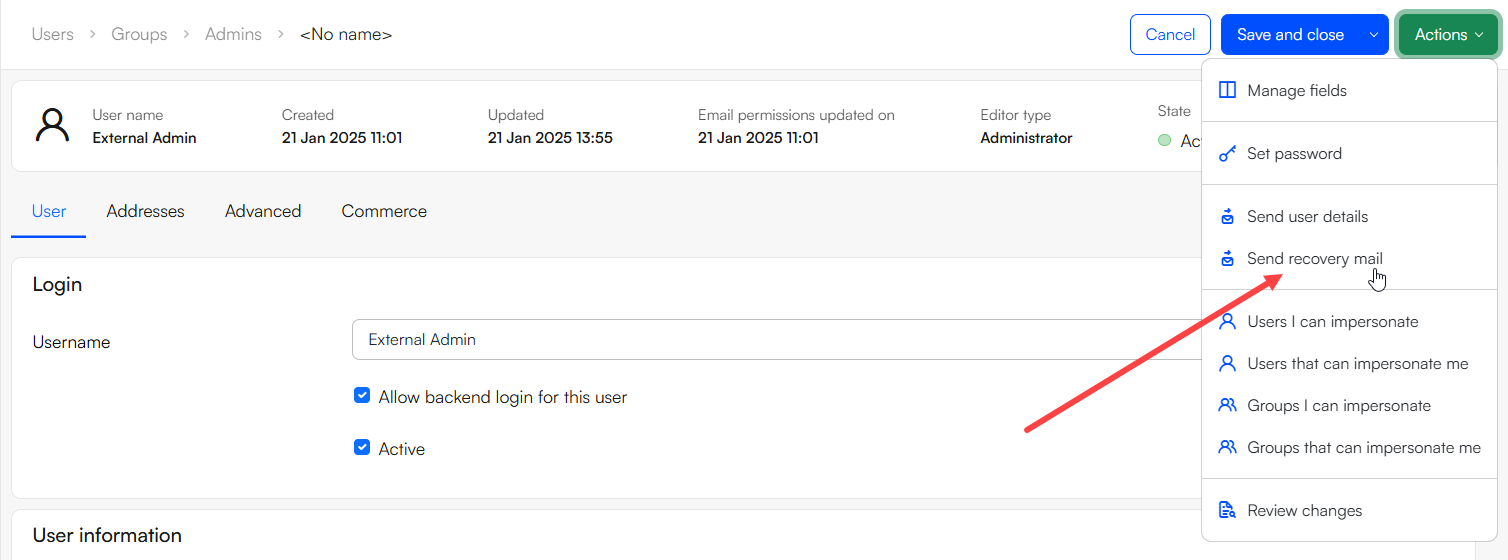
If you'd rather not use these sign-in methods in your solution, you can use the "Send Recovery Mail" feature for the admin user instead. This will send an email with instructions on how to reset their password, enabling them to set a new one for their account. Just make sure you've set up a password recovery page beforehand.
A simple template for the "send recovery mail" can be viewed below:
<head>
    <meta charset="UTF-8">
    <title>Profile Settings</title>
</head>
<body>
    <h3>Your Profile Settings:</h3>
    <table style="width: 300px; border-collapse: collapse;">
        @{
            var passwordRecoveryUrl = GetString("DWUsers:User:PasswordRecoveryUrl");
        }
        <tr>
            <td><strong>Login:</strong></td>
            <td>@GetString("DWUsers:User:Username")</td>
        </tr>
    <tr>
    <tr>
        <td><strong>Reset Password:</strong></td>
        <td><a href="http://@passwordRecoveryUrl">Reset</a></td>
    </tr>
    </tr>
        <tr>
            <td><strong>Name:</strong></td>
            <td>@GetString("DWUsers:User:Name")</td>
        </tr>
        <tr>
            <td><strong>Email:</strong></td>
            <td>@GetString("DWUsers:User:Email")</td>
        </tr>
    </table>
</body>
</html>