To set up publications you start by downloading and placing the publication files:
- Download a Files folder here
- Copy the folder Publications from
Files\Templates\Designsand place it inFiles\Templates\Designson your solution - Copy all content from
Files\System\Itemsand place it inFiles\System\Itemson your solution - Copy all content from
Files\Templates\Itemsand place it inFiles\Templates\Itemson your solution - Copy the folder PublicationProducts from
Files\System\Indexesand place it inFiles\System\Indexeson your solution - Copy the folder PublicationProducts from
Files\System\Repositoriesand place it inFiles\System\Repositorieson your solution
Now open your solution and from the backend you need to:
- Refresh item types under
Settings > Content > Item typesfrom either the context menu or action menu - Build indexes from the PublicationProducts repository under
Settings > Repositories > PublicationProducts
Now you are ready to follow the guide to a manual setup of a publication website.
Note
The publication tool is a design folder of its own it does not require Swift for the setup. However, it does require a DynamicWeb and Publications license.
Manual setup of a publication website
If you want to set up the publications tool manually or want to see if your setup is configured correctly please follow these steps.
Website creation
First you need to create a new empty website and fill in some information:
- For General information:
- Name the website
- Select the regional settings
- Enable as published
- In the Layout tab:
- For the Default page template dropdown, choose
Publications_ContentPage.cshtml
- For the Default page template dropdown, choose
- In the Advanced tab:
- For the Website properties item type dropdown, choose
Publication master
- For the Website properties item type dropdown, choose
- In the Ecommerce tab:
- Select a shop
- Set a language
- Choose the currency
- Choose the country for the website
This conclude the configuration for the website creation. Next you will need to create the pages to make the publications tool usable.
Publication folder
The first thing to do is to create a publications folder.
- Click on the + next to Navigation in the content tree
- Choose Publications folder and make it hidden in menu
Before you can link a header and footer or assign fonts for body and heading you will have to create them.
Header and footer
The next thing to do for the publications folder to work, is to create a header and footer. For this you will need to create a layout folder.
- Create a new page in you newly created publications folder
- Choose Layout folder. Make sure it is published
- In the layout folder create a new page and choose Header/Footer layout. Name it Header and make sure it is published
- Create a new page in the layout folder, choose Header/Footer layout. Name this one Footer and make sure it is published
These are the pages you should design for your header and footer.
Fonts folder
With the Publication Fonts folder you have the option to add custom fonts or use google fonts. This is done from a Fonts folder:
- Click on the + next to Navigation in the content tree
- Choose Publications fonts and make it hidden in menu
- Click on the Publication fonts folder and create a new paragraph, here you choose Font
- Setup the font by choosing either a google font or a custom font
Now you can head back to the publications folder and select the created fonts and header/footer for the publications folder. Remember to save your changes.
Components
Before you start designing the actual catalog you might want to make ready for the use of components. As you want to keep components for different publications folders separated, the component folder is placed in each individual publication folder:
- Create a new page in the publication folder
- Choose the Component folder and make it hidden in menu
It is in this folder, that you want to place and design your component cards.
Catalog folder
To start creating the catalog, you need to create the catalog folder. This is also done in the publications folder:
- Create a new page in the publication folder
- Choose the Catalog folder and make sure it is published
It is in this catalog folder that you want to place all your pages, product list and product pages containers.
When working with Product list- and Product pages container you need to:
- Attach a attach the paragraph type App to a column on the page, and select the Product Catalog for ViewModel app
- Select the publication products query and if needed use the Override standard parameters setting to create parameters for what products should be shown so as to not show all products
- Lastly you create subpages for the product list or product pages containers that can contain content or components, read about the subpages here
Final structure
When you have finished this simple setup, you should have a structure looking like this:
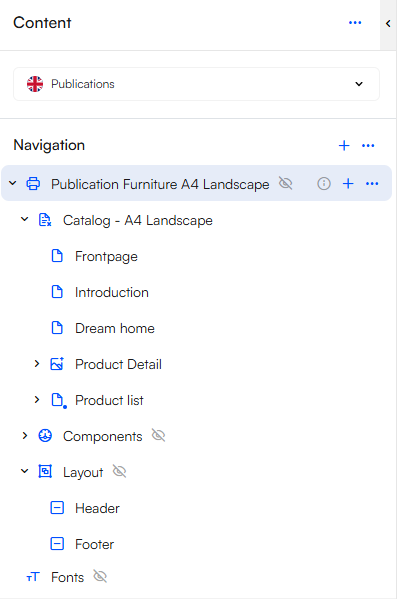
Remember you can create multiple publication folders if you wish to create multiple catalogs.