Checkout
The components which make up the Checkout feature in Swift
Swift ships with a checkout design which guides the customers through the checkout process. It consists of the following pages:
- A Cart page which is used to show the cart content to the customer
- An Empty cart page which is displayed when the cart is empty
- A Checkout anonymous page which handles the checkout process for anonymous users
- A Checkout user page which handles the checkout process for registered users
- A Quote checkout user used to handle checkout to a quote for registered users
These pages are supported by the following service pages:
- The CartService page keeps track of cart contexts and cart content
- The CartSummary page is used to make a data available off-canvas mini-cart and express-buy
Configuration options
The Swift checkout implementation consists of several features that can be enabled or disabled. Some of them are configured simply by checking or unchecking a checkbox, while others might need some explanation.
Here is a list of the most important features.
Delivery Dates
Delivery dates allows the customer to choose specific dates for delivery instead of the next available date. This is often relevant in a B2B scenario. In Swift, you can create different settings for anonymous users and signed in users.
The settings are available either by entering the app column via the visual editor or the list view. Swift has two different pages depending on if the customer is signed-in or anonymous. This means that you will have to be specific about the situation you want to design for when configuring the delivery date.
- Go to the the settings of the checkout App column
- In the Content tab, check the Enable Delivery Date field in checkout checkbox
This will open a new section called Disabled Delivery Dates. Here, you can choose specific days of the week that are not available for delivery (e.g., weekends). You can also create longer periods of disabled dates (e.g., holidays).
If the customer has chosen a specific delivery date, it will be shown on their receipt.
Terms and Conditions
Accepting terms and conditions are often a fundamental part of purchasing online. However, in some scenarios you might want to disable the need for confirmation. Swift is constructed with two checkout pages; one for anonymous users and one for signed in users. This means that you will have to change the settings on both pages if you want all your customers to be affected by the changes.
This documentation covers disabling the terms and conditions feature. If you wish to enable it, simply reverse these steps.
If you want to disable the field of terms and conditions in the checkout process, you will need to do the following:
- In the Content tree, locate and click the checkout page (either for anonymous users or signed-in users).
- Enter the Checkout app either via the visual editor or the list view.
- In the Content tab, under the Links section, clear the Terms and Conditions Page Link field.
- Enter the App column.
- In the Field validation section, uncheck the Customer acceptance checkbox.
- Hit Save and close.
Billing address editing and managing addresses links
During checkout, a signed-in customer is presented with links for both editing the billing address and managing their addresses. If you wish to hide one or both links, you can configure these settings within the checkout app on the user checkout page.
- In the Content tree, locate and click on the Checkout page for signed in users.
- Enter the Checkout app either via the visual editor or the list view.
- In the Content tab, under the Addresses section, check one or both checkboxes for Hide edit billing address link and/or Hide manage your addresses link.
- Hit Save and close.
Removing account creation/login during checkout
When users are anonymous, the checkout phase will present different options for creating an account or logging in, based on the data provided by the user. If you prefer not to have this feature – for instance, if your Swift solution doesn't incorporate a user setup – it can be removed.
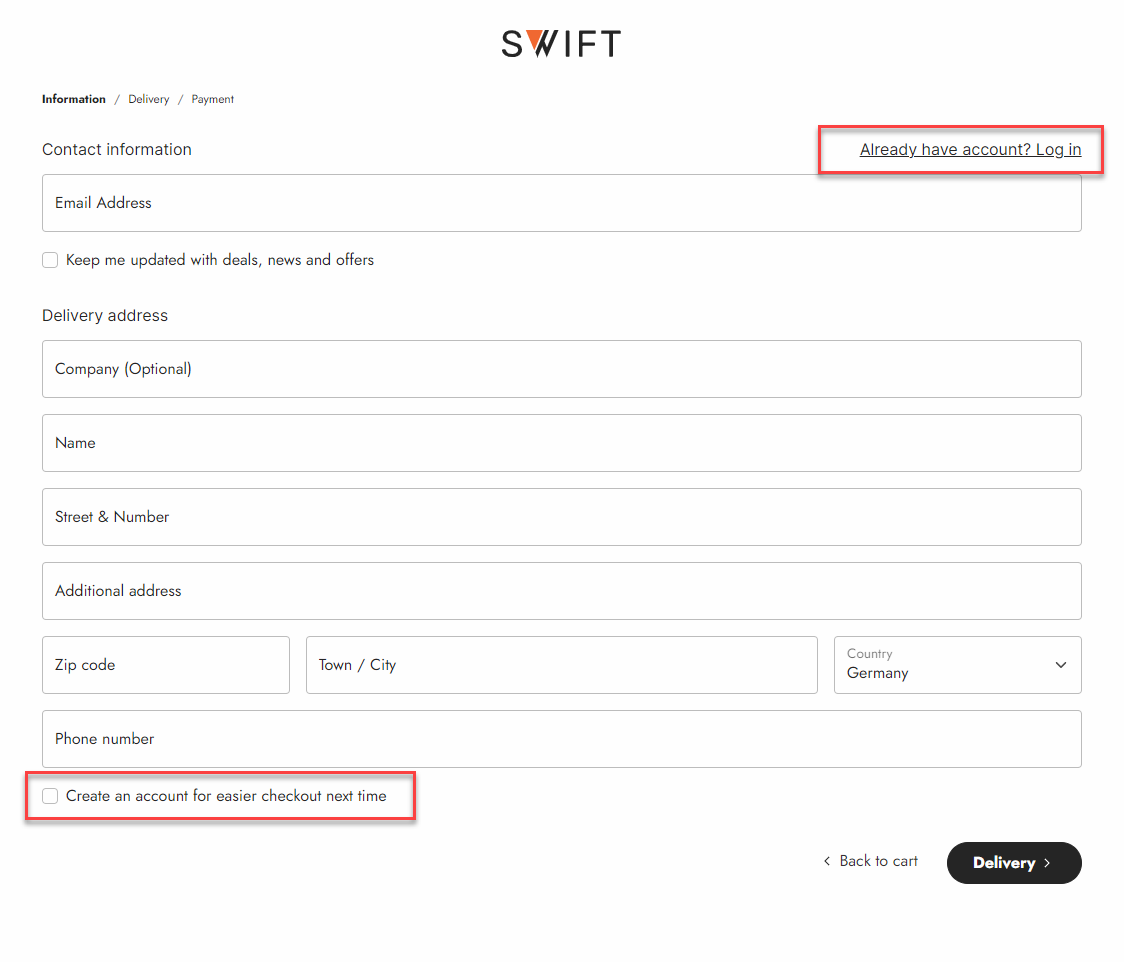
Given that users have both the option to create an account and to log in, we will divide this guide into two distinct sections.
- Already have an account? Log in
- Locate the checkout page you want to change, this is properly the anonymous checkout page. In the default Swift solution, this is located at: Navigation/Utilities/Cart/Checkout anonymous
- Enter the settings of the checkout app At the bottom in the Links section locate the Sign in page link field
- Clearing this field will remove the "Already have an account Log in" link at the top of the checkout
- Create an account for easier checkout next time
- Locate the checkout page you want to change, this is properly the anonymous checkout page. In the default Swift solution, this is located at: Navigation/Utilities/Cart/Checkout anonymous
- Enter the settings of the Cart App
- Enter the App tab
- In the User Management section, if you deselect the Create user in checkout option, it will remove the Create an account for easier checkout next time option from the user's view on the front end
Manual Setup
If you want to set up the cart and checkout manually without using the page presets, you can follow this guide:
- Go to Content > Navigation > Utilities, add a new page and select Cart under Empty Items.
- Create these subpages under the Cart page:
- Empty Cart
- Checkout anonymous
- Checkout user
Cart page
The Cart-page is used to show the contents of the shopping cart to the user - to set it up manually:
- Enter the Cart Page and add an empty 1 column row
- Add a Cart app to the empty row
- Give it the title Cart
- Under the Links section, add the appropriate links:
- Shop page link: Products
- Product page link: Products > Details
- Checkout anonymous page: Navigation > Utilities > Cart > Checkout anonymous
- Checkout signed in page link: Navigation > Utilities > Cart > Checkout user
- Enter the App tab
- Select the Shopping Cart app
- Under the Settings section, select a Channel
- Under the Steps section, add a new step, name it Cart and select the Cart.html, and select Ok
- Add a new step and call it Checkout. Do not select a template, but check the checkbox Is checkout
- Under the Field validation section, you can check the Customer acceptance checkbox and the A check for stock status checkbox
- Under the Field validation section, you can also add custom validation groups - typically for Billing and Delivery. To add a group, press Add, select an Id, and choose an error message
- Under the Empty cart section, check the Redirect to internal page checkbox and choose the Empty cart as the internal page
Empty Cart page
The subpage Empty cart is a regular content page – you can use the visual editor to create whichever content you want. In the example below, a Feature column with an icon and a text.
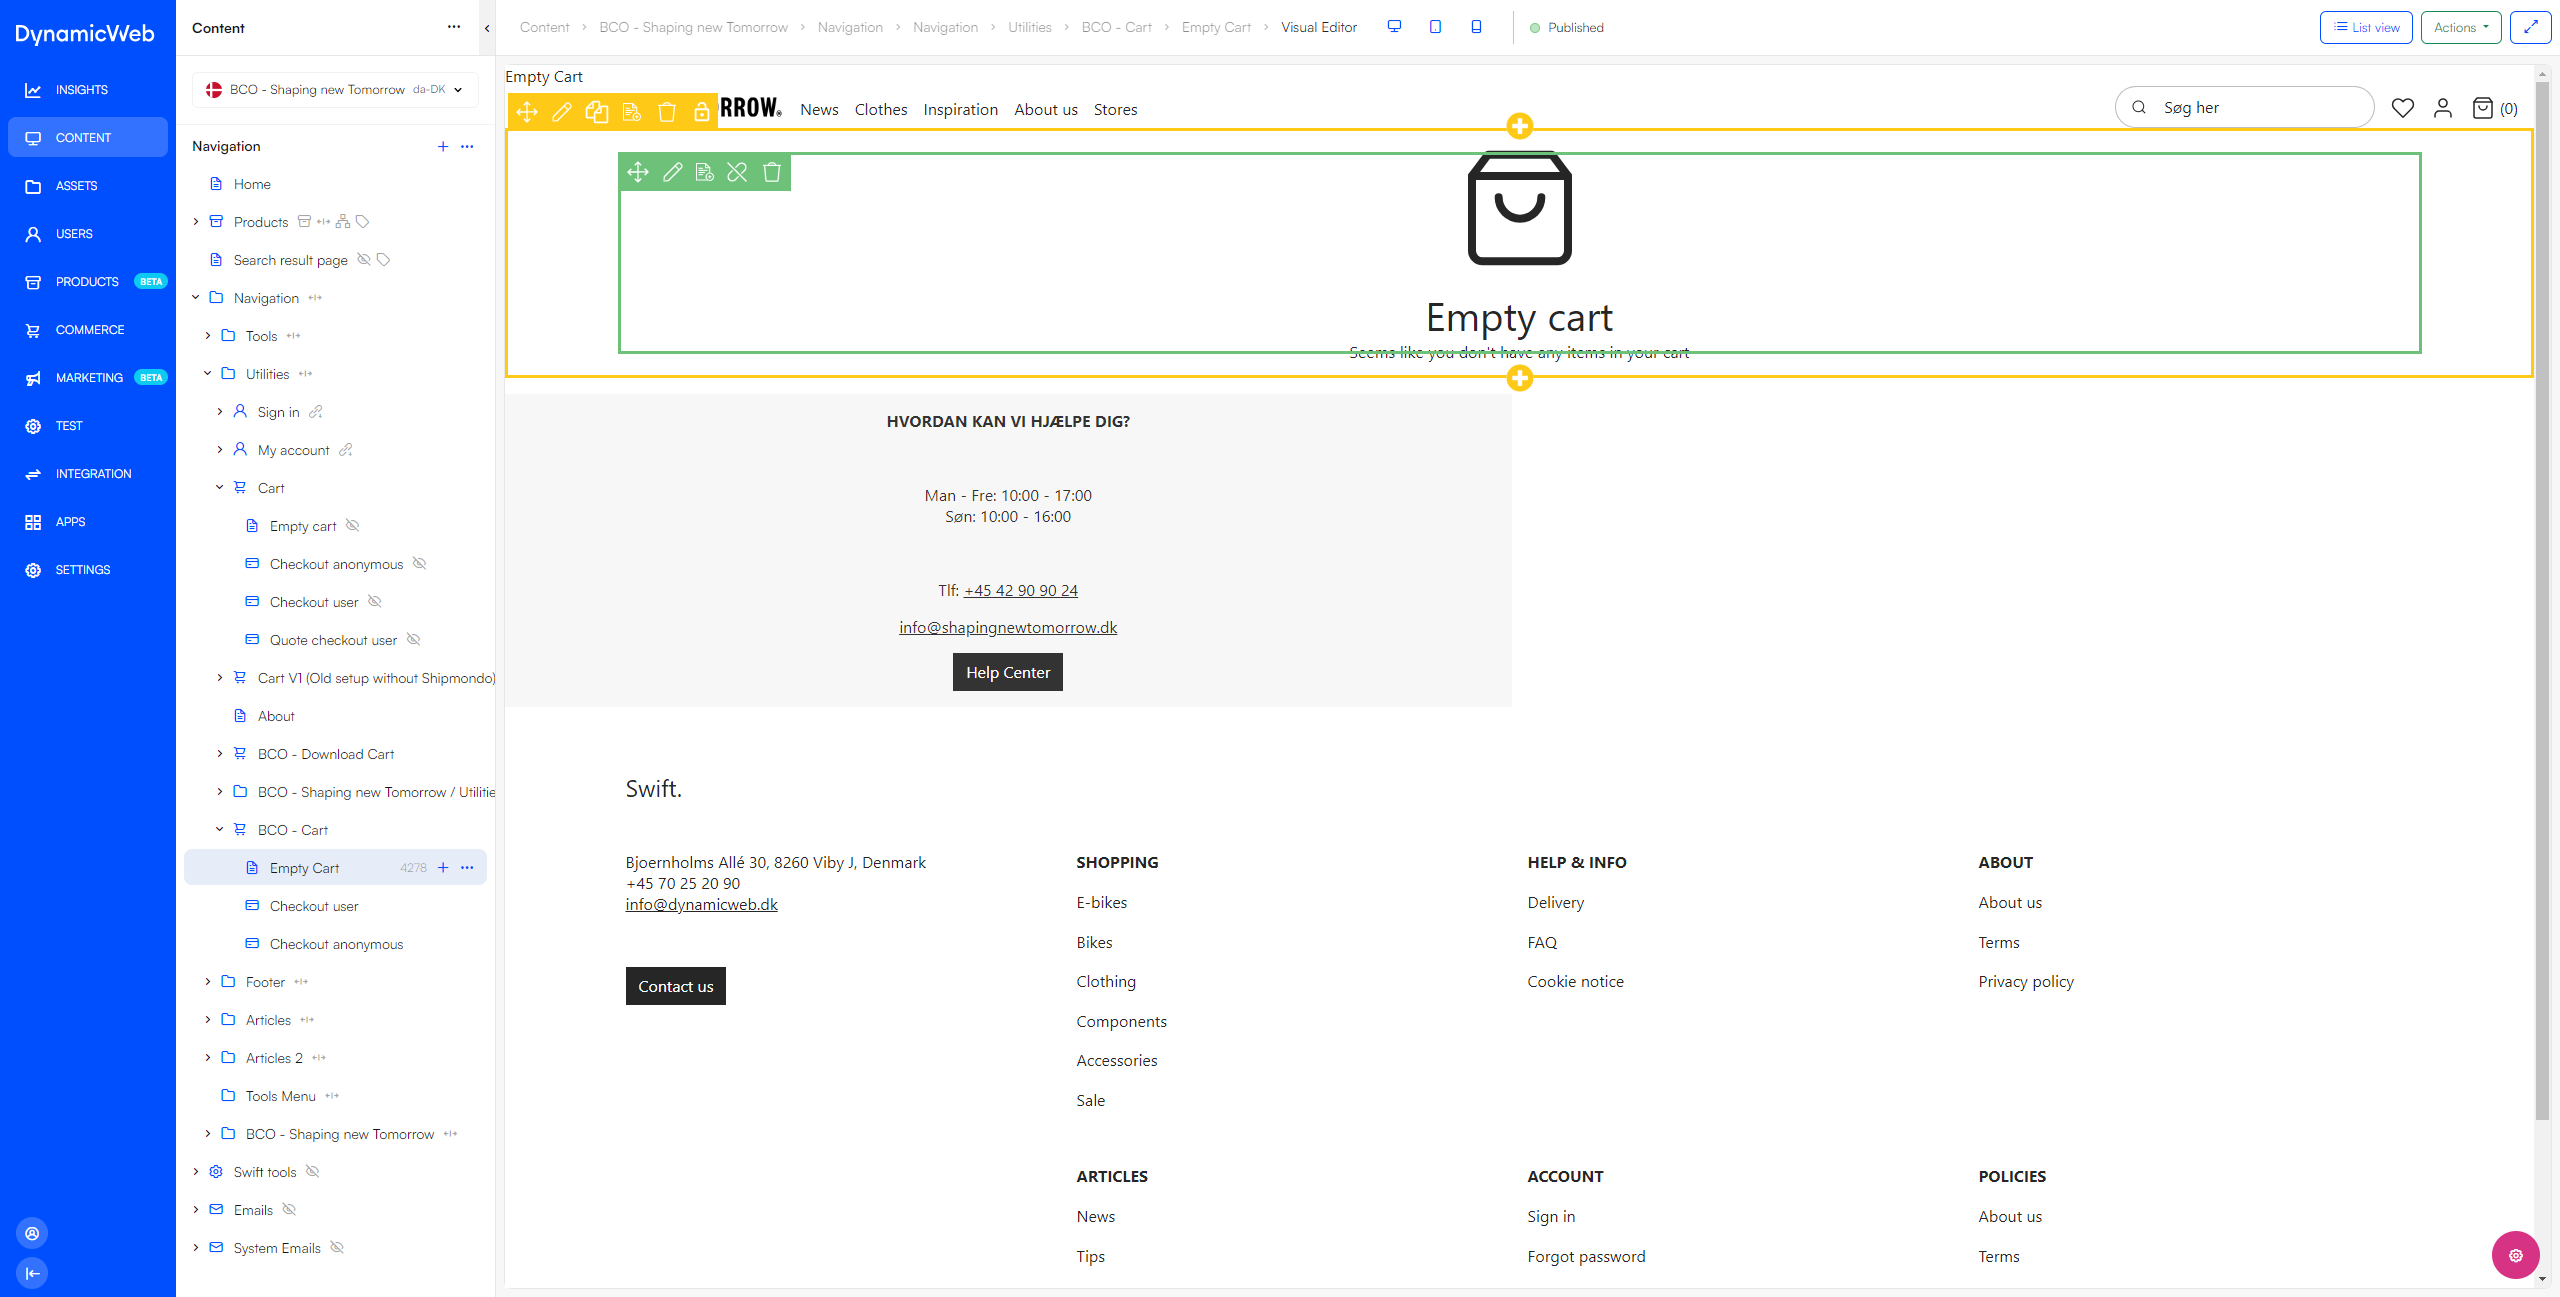
To create this specific design, follow these steps:
- Add a 1 column row
- Add a Feature column to the row
- Select the correct icon and select the icon size 128 x 128px
- Give it the title: Empty cart
- Give it the text: Seems like you don't have any items in your cart
- Under Title settings, select h1 and Headline 1
Checkout anonymous page
The checkout anonymous page uses a shopping cart to check out anonymous users – here’s how to do a full manual setup:
- Go to your checkout anonymous page, enter the page settings by pressing the pink circular button in the bottom right corner
- In the Publication tab, select Hidden in menu
- Hit Save and close
- Add a 1 column row and select the Checkout App
- Head to the App tab and select a Shopping Cart app
- Select a Channel
- Under the Steps section, add the following steps:
- Information - for reference, the standard setup uses the InformationAnonymous_v2.cshtml template
- Delivery - for reference, the standard setup uses DeliveryAnonymous_v2.cshtml template
- Payment - for reference, the standard setup uses the PaymentAnonymous_v2.cshtml template
- Checkout - remember to call it checkout and check the Is checkout checkbox
- Receipt - for reference, the standard setup uses the Receipt.cshtml
- Under the Field validation section, you can check the Customer acceptance checkbox and the A checkout for stock status
- Under the Field validation section in Custom validation groups, you can add field validation as appropriate - typically for billing and shipping address fields
- Under the Newsletter section, you can check the Use email subscription
- Under the Empty cart section, check the Redirect to internal page and select the Empty Cart page
- Under the User management section, disable Apply user details to order and enable Create user in checkout
- In Groups for new users, add Accounts
- Now go to the Content tab and it it the title: Checkout
- Scroll down and fill out the following:
- Add your Logo
- Logo link: Home
- Product page link: Products > Details
- Cart page link: Navigation > Utilities > Cart
- Sign-in page link: Navigation > Utilities > Sign in
- User addresses page link: Navigation > Utilities > My account > My addresses
- User account page link: Navigation > Utilities > My account > My account information
- Checkout User page link: Navigation > Utilities > Cart > Checkout user
- Terms and Conditions page link: Navigation > Footer > About the shop > Terms
- Hit Save and close
Checkout user page
Like the checkout anonymous page, the checkout users page uses a shopping cart to check out logged-in users – the setup is almost identical, but there are key differences:
- Select your checkout user page and enter the Page settings by clicking the pink circular button in the bottom right corner
- Head to the Publication tab and select Hidden in menu
- Hit Save and close
- Add a 1 column row and add the Checkout App to the row.
- Head to the App tab and select a Shopping Cart app
- Select a Channel
- Under the Steps section, add the following steps
- Information - for reference, the standard setup uses the InformationUser_v2.cshtml template
- Delivery - for reference, the standard setup uses DeliveryUser_v2.cshtml template
- Payment - for reference, the standard setup uses the PaymentUser.cshtml template
- Checkout - for reference, the standard setup uses Cart.cshtml template. Remember to check the Is checkout checkbox.
- Receipt - for reference, the standard setup uses the Receipt.cshtml
- Under the Field validation section, you can check the Customer acceptance checkbox and the A checkout for stock status
- Under the Field validation section in Custom validation groups, you can add field validation as appropriate - typically for billing and shipping address fields
- Under theNewsletter section, you can check the Use email subscription
- Under the Empty cart section, check the Redirect to internal page and select the Empty Cart page
- Under theUser management section, disable Apply user details to order and Create user in checkout
- Now go to the Content tab and give it the title: Checkout
- Scroll down and fill out the following:
- Add your Logo
- Logo link: Home
- Product page link: Products > Details
- Cart page link: Navigation > Utilities > Cart
- User addresses page link: Navigation Utilities > My account > My addresses
- User account page link: Navigation > Utilities > My account > My account information
- Terms and conditions page link: Navigation > Footer > About the shop > Terms
- Hit Save and close
Quote checkout user
To manually create the quote checkout user page:
First, create the page:
- Go to the Cart folder in the content tree
- Press the three dots to the right of the Cart folder and create a New page
- Choose the Checkout page
- Add a 1 column row by pressing the +-sign in the Visual Editor
- Add the Quote checkout App and give it the title Quote checkout user
- Configure the app:
- On the Content-tab add a logo and a logo link
- In the Links-section, add a link to your overall Cart-page
- Switch to the App-tab and select a Shopping Cart app - then configure it:
- In the Settings section, choose your shop and enable checkout to quote
- In the Steps section your steps should be as shown in Table 1
- In field validation section disable customer acceptance
- Hit Save and close
| Step | Name | Template |
|---|---|---|
| 1 | Quote request | QuoteRequestUser.cshtml |
| 2 | Submit quote | |
| 3 | Receipt | QuoteReceipt.cshtml |
Please note that the Quotes-feature depend on a custom order field of the type Text(255) called QuoteRequest being present on the solution.
If you're manually implementing this, you should also remember to link the standard Cart-page to the quote checkout page un the Links section of the Cart app.