Guide 9 - Checkout
Welcome to the ninth guide in the Swift Design Tutorial, which aims to get you familiar with using Swift and its features to create beautiful websites.
In these guides we focus on what is possible to do with Swift without any customizations, as we believe this is the best way to learn what Swift is all about; simplifying the process of website-building to the point where you can create high-quality prototypes in the fraction of the time it usually takes.
As you know, the checkout process is a critical component of any online shopping experience. It's not just a place where shoppers check their chosen items before buying; it's an important step in the customer's experience. A well-structured and user-friendly checkout process can significantly influence conversion rates and overall customer satisfaction by providing clarity, security, and ease during the final steps of the purchasing process.
In this guide we cover:
- Creating the Checkout Environment
- Creating the Shopping Cart Page
- Creating a checkout process for Non-Logged-In Anonymous Users
- Creating a checkout process for Logged-In Users
- Creating the Empty Cart Page
Exercise 1: Creating the Checkout Environment
First thing’s first: Let’s create the actual page for the Checkout.
- Navigate to Content > Navigation > Utilities
- Click the three vertical dots and create a new page
- Select Cart as the item type
Note
As you might have noticed, Swift comes with a set of preconfigured Checkout templates. If one of them suits your needs in the future, you're welcome to choose it. However, in this guide, we’ll create a page from scratch, allowing you to tailor your checkout to your exact needs.

Selecting the Cart will create an empty page:

Let's start by giving the page a name:
- Head to the page settings by clicking the pink gear button in the bottom right corner
- Under Title name the page Shopping Cart
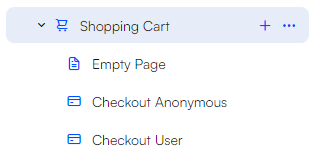
Next, we'll create these subpages to our Shopping Cart page:
- Empty Cart - This page shows a message indicating that the cart is empty
- Checkout anonymous - This page allows guests to buy items without needing to sign in
- Checkout user - This page simplifies checkout for logged-in users
To create these subpages:
- Click the three vertical dots next to your newly created Shopping Cart page and click New page.
- For the Empty page, select Page
- For the Checkout anonymous and Checkout user, select Checkout

- As usual, remember to name the pages
When this is done, you should have the three subpages below your Shopping Cart page:
Exercise 2: Shopping Cart
Now, head back to the Shopping Cart page and do the following:
- Create an empty 1-column row by clicking the yellow 'plus symbol'
- Add a Cart App to the column and give it the title Cart
- In the Links section, add the appropriate links:
- Shop page link: Products
- Checkout anonymous page link: Navigation > Utilities > Shopping Cart > Checkout anonymous
- Checkout signed in page link: Navigation > Utilities > Shopping Cart > Checkout User
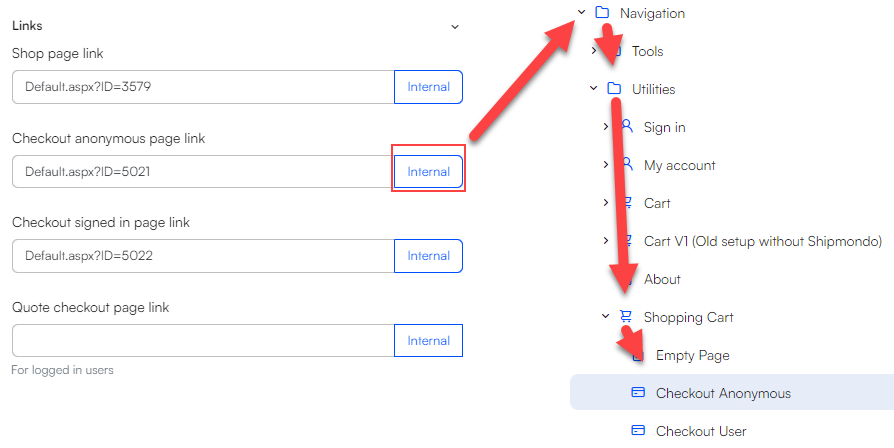 This makes sure that our Shopping Cart page links to the correct subpages we've just created.
Shopping Cart App
The next thing we need to do is configuring the Shopping Cart app.
To do this, head to the App tab and select the Shopping Cart app.
This opens up for a lot of configuration:
- In Settings, select the appropriate channel. In our case, we'll select the 'BIKES' channel
- In this example, we'll not select a Context cart and leave the Checkout to quote unchecked. However, if it's necessary for your shop, feel free to head to our documentation by clicking the links
Steps
In the Steps section, we'll define the steps in the checkout flow, e.g. Cart > Checkout.
Add the first step by clicking Add, provide a Name and select a Template
 This step of the checkout process displays the cart to the customer.
Next, we want to add another step and call it Checkout, but this time we'll not select a template, but instead check the Is checkout box.
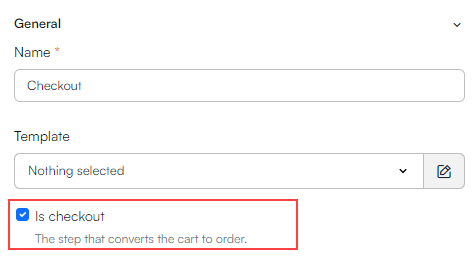
Alright, what we've done here probably needs a bit of explanation. What we've set up now is basically the steps on how the checkout process works. Essentially, when a customer has selected an order and want to purchase it, they head to the Cart (step 1).

Once customers decide if they want to purchase an item, they can proceed to the next step, Checkout (step 2). Upon clicking 'Checkout', they are directed either to the anonymous checkout or the user checkout, based on whether they are logged into the website. We haven't yet defined the specific steps for logged-in customers versus anonymous users, but we will address this for both the the checkout anonymous and checkout user later.
Field validation
Next, we need to set up the Field validation:
- In our example, we'll check the Customer acceptance box which forces the user to check a Terms & Conditions box. If they do not, the error message will be shown
- We'll also check the A check for stock status box that forces a check for whether or not the product is in stock. Again, if the product is not in stock, the error message will be shown
- Lastly, we'll add three Custom validation groups. This ensures that the customer fills out a minimum amount of information about themselves e.g. their billing address, billing city and billing zip
- To add a custom validation group, do the following:
- Select Add
- Choose an Id e.g. Customer address
- Check the Is checked box
- Select an error message e.g. Missing billing address
- Repeat this step for Customer address, Customer city, and Customer zip
This ensures that the user must type in their billing address, city and zip, otherwise the error message you've entered is shown:

Further configuration
- In the Newsletter section, you can choose to check the Use email subscription box. This option provides a checkbox that, when selected by the user, gives consent to receive marketing emails about deals, news, offers etc

- In the Empty cart section, check the Redirect to internal page and set this page to the Empty Cart you've previously created:
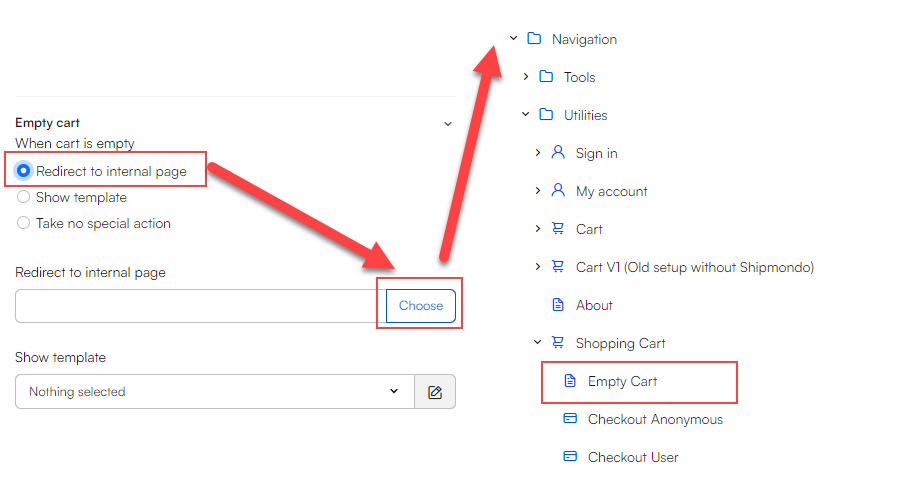 This ensures that if a user enters an empty cart, they're directed to the Empty Cart page we've created earlier. (Later in this tutorial, we'll build this page)
 - Next, we'll setup the User management
- Enable the Apply user details to order. This controls if the details from a logged-in user are applied to the cart on the first load
- Enable the Create user in checkout. This enables a non-logged-in user to easily create an account during checkout. Furthermore, we've selected the group where this new user will be stored, which is under 'Accounts'
- As you can see, there's multiple error messages that's already been filled out if the information the user uses to create an account is invalid. Leave them as is
- Next, we'll setup the Payment & delivery
- Finally, in the Additional settings, we'll just keep it as is. However, if you want to learn what the different checkboxes does specifically, check out our documentation here
- Hit Save
Testing the Shopping Cart
Now your page should look like this:

To check if the shopping cart works, let's add a product to it!
To add a product:
- Head to the category in which you want to add a product from
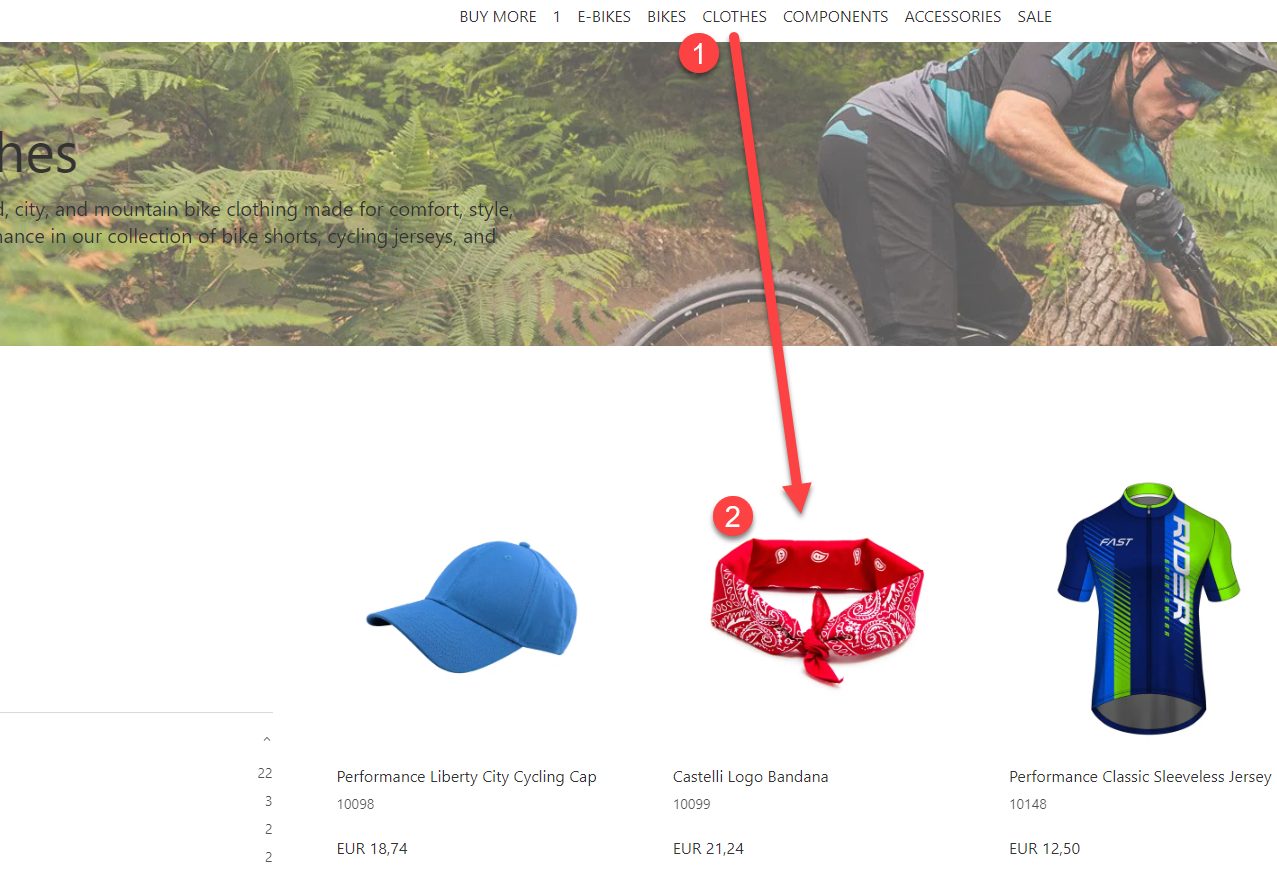
- Add it to the Cart
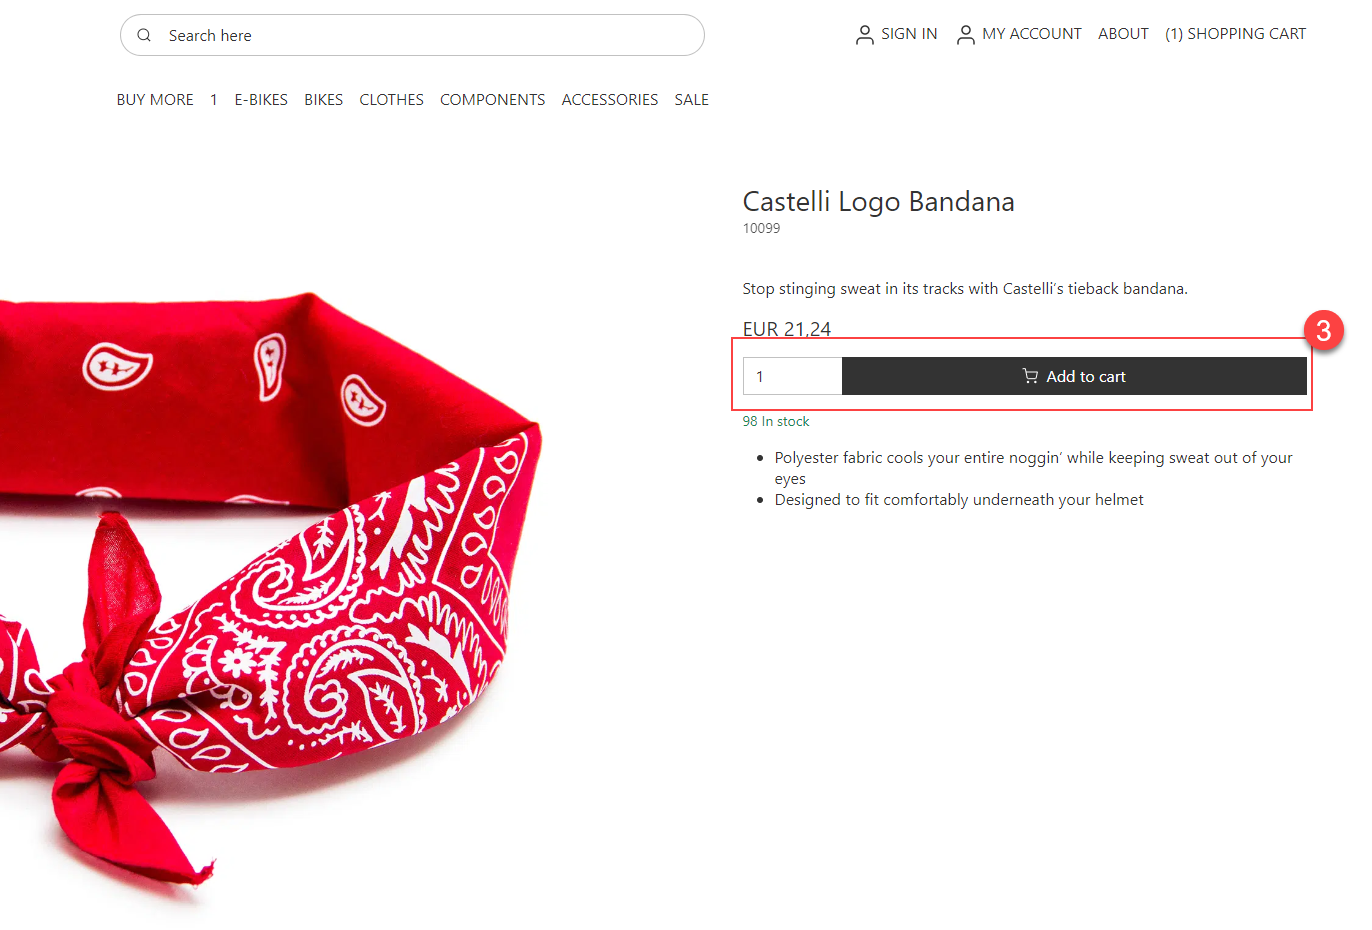
- Head back to your Shopping Cart page to check if the product has shown up.

The product showed up. Great! But what happens if we try to click Checkout?
We're redirected to an empty page:

However, fear not! This makes perfect sense! Remember that we configured our Shopping Cart page to redirect us to either the Checkout Anonymous or Checkout User page? This is what's happening here! We're not logged in to a user, so we're redirected to the Checkout Anonymous page - and since we haven't actually built this page yet, it makes sense that we're redirected to an empty page, right?
So, let's get right to it and build our Checkout Anonymous page!
Exercise 3: Checkout Anonymous
Usually websites will allow shoppers to purchase items without being logged in. This feature is what we will be setting up now.
Start by heading to the Checkout Anonymous page.
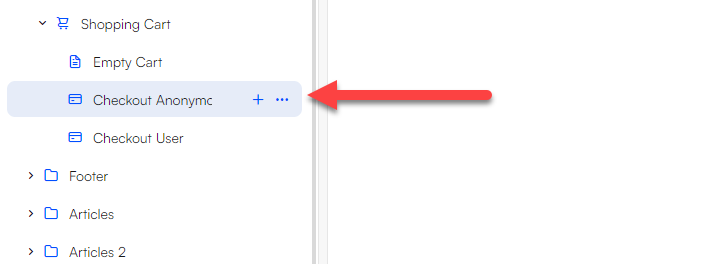
- Enter the page settings by pressing the pink gear button in the bottom right corner
- Enter the Publication tab, and select Hidden in menu and click Save
Checkout App
Next, add a 1-column row to the checkout anonymous page and add the Checkout App to this column
This app offers a wide range of configurable options.
In this tutorial, we won't cover everything. Instead, we'll focus on trying out the 'Enable delivery date field' feature to get a sense of how the configurations work. However, feel free to explore further on your own; doing so will only deepen your understanding of the process.
Delivery dates allows the customer to choose specific dates for delivery instead of the next available date. This is often relevant in B2B scenarios.
Enable delivery date field
Check the Enable delivery date field in checkout. This opens for a new section called Disabled Delivery Dates
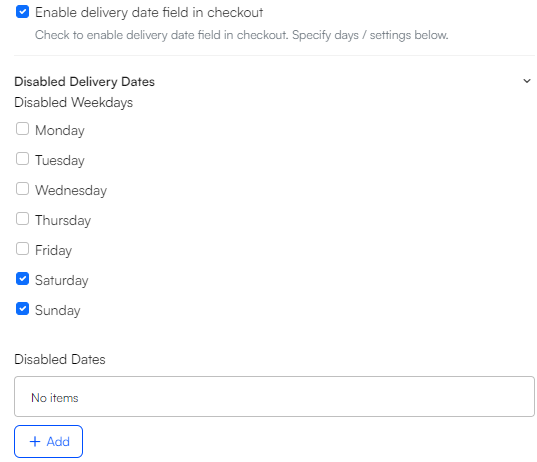
Here we've chosen to disable delivery on saturdays and sundays. Furthermore, we can disable delivery for specific dates or periods. To do this, simply click the Add button and specify a date:
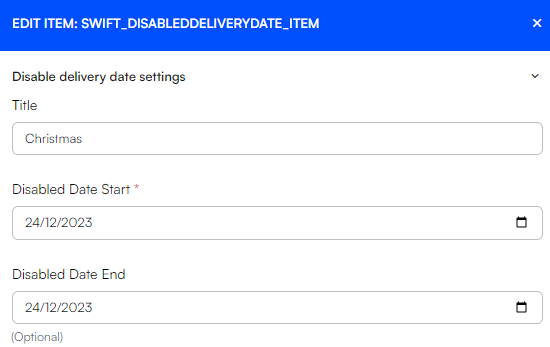 Here we've disabled delivery on Christmas.
Shopping Cart App - Checkout Anonymous
Similar to the Shopping Cart page, we also need to add a Shopping Cart App into our Checkout Anonymous page.
So, head ot the App tab and select the Shopping Cart app.
Select a Channel, in our example we'll select the BIKES channel.
Steps - Checkout Anonymous
In the Steps section, we'll add the following steps:
- Information
- Delivery
- Payment
- Checkout
- Receipt
These steps ensures that when a non logged-in customer has chosen a product they wish to purchase, they'll first fill out Information about themselves, such as address, email etc...
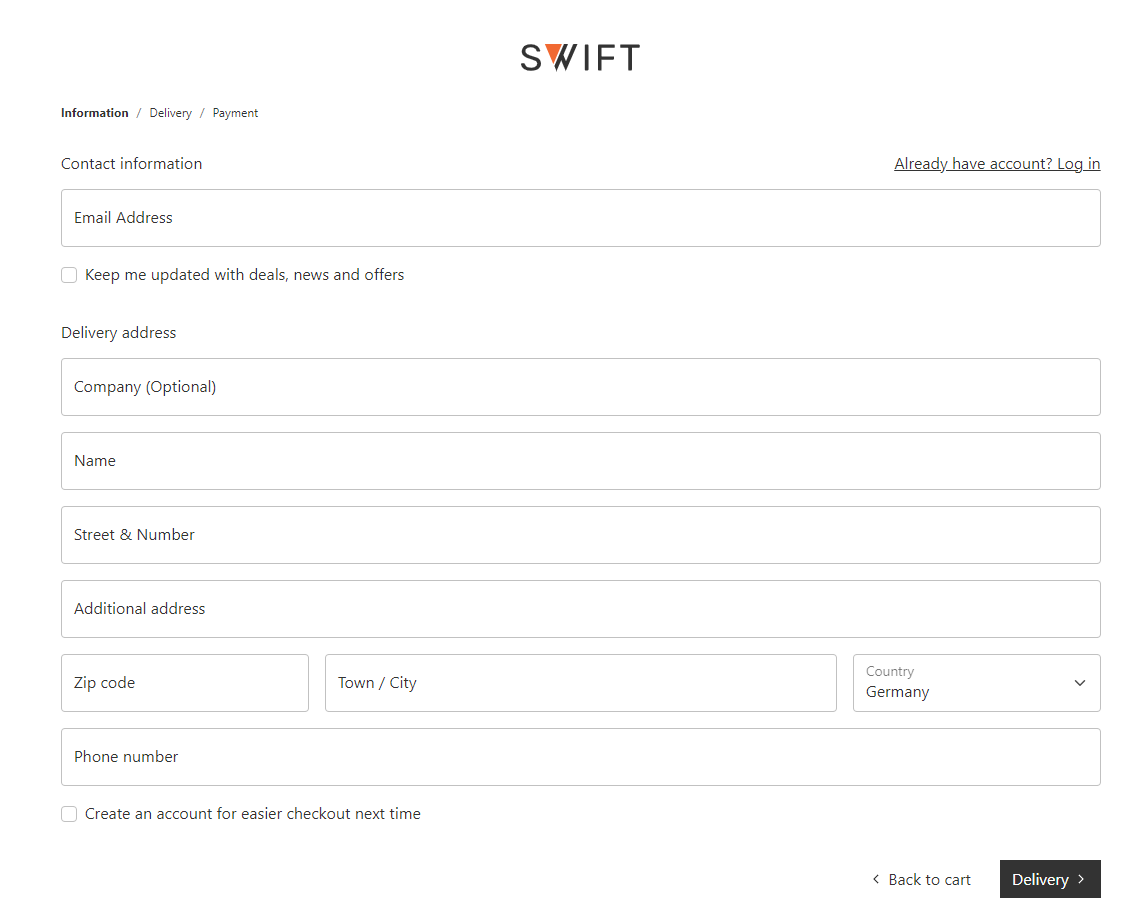
...Next, they'll select a Delivery method...
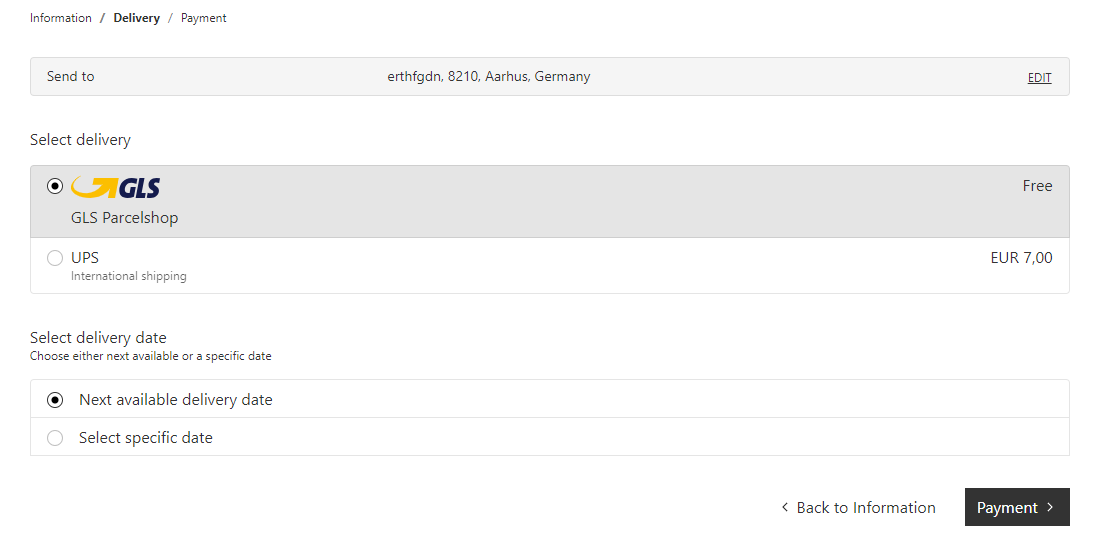 ...then they'll select how they wish to Pay...
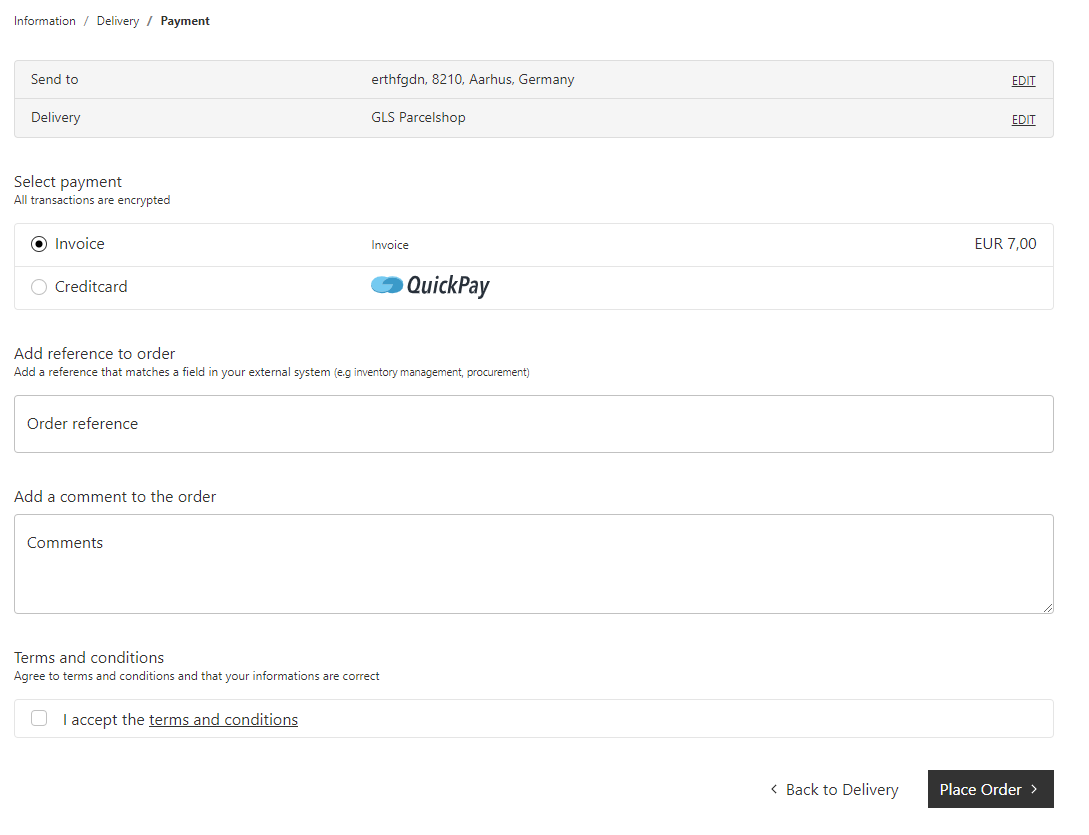
...then, in the Checkout, the cart is converted to an order and finally they'll receive a Receipt for their purchase.
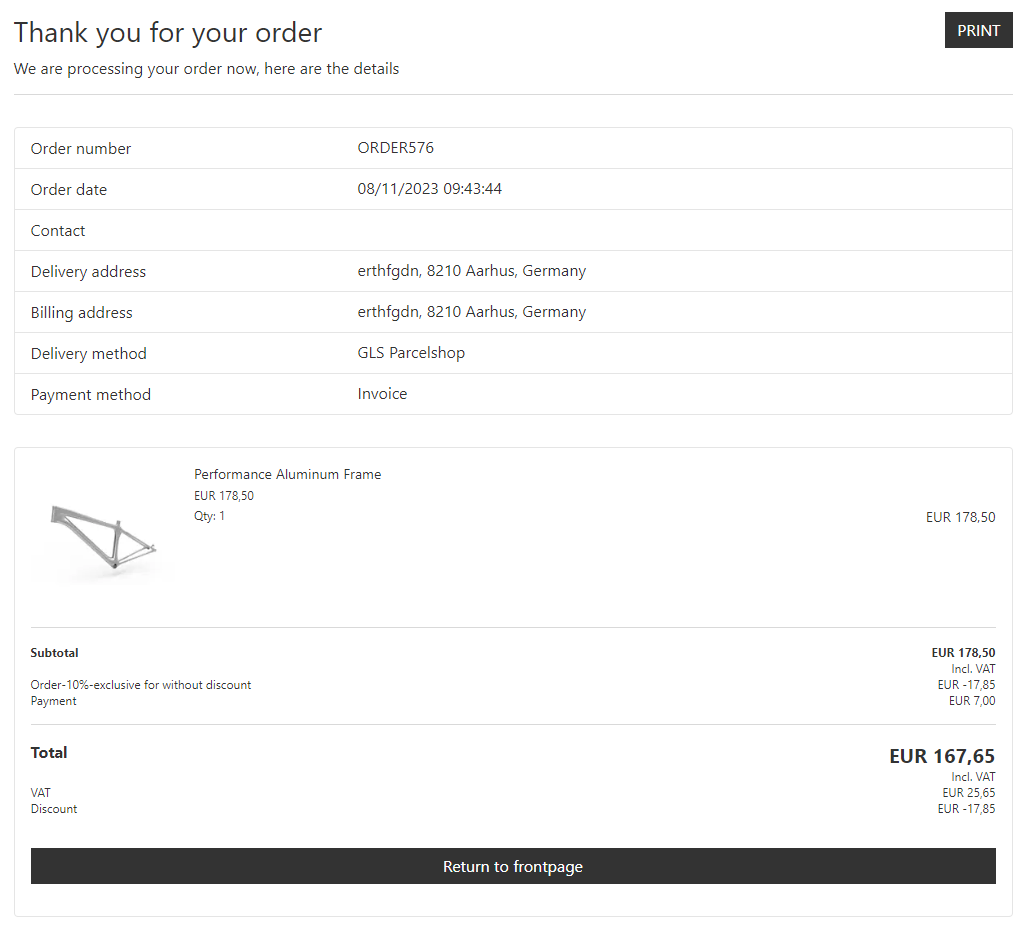
We'll add the steps in the same way as we did in the Shopping cart:
- Information: Name: Information, Template: InformationAnonymous_v2
- Delivery: Name: Delivery, Template: DeliveryAnonymous_v2
- Payment: Name: Payment, Template: PaymentAnonymous_v2
- Checkout: Name: Checkout, Template: Do NOT select any, instead check the Is checkout box.
- Receipt: Name: Receipt, Template: Receipt
Notification E-mails
After we've set up the steps, we can now configure the Notification emails. This is used to create email notifications for both customers and staff. It's most commonly used for order confirmation emails.
First, we'll start by specifying the recipient of the email. This can be done in several ways:
- Check the boxes for billing email or shipping email
- Check the box for custom field email and specify what type of email in the dropdown menu below
- Manually specify a recipient email - also accepts a list of email addresses separated by commas
For each notification email you must also:
- Provide a Subject of the email
- Select whether the email should be a page or a template
- If you select page, you must choose a pre-made email page. This would typically be an Order confirmation Email. You can find this by navigating to Choose > System Emails > Checkout Email > YourOrderConfirmationEmail
- To see how you can manually build such an email page, check out our guide
- If you select template, you must choose a pre-made template from the templates dropdown menu
- If you select page, you must choose a pre-made email page. This would typically be an Order confirmation Email. You can find this by navigating to Choose > System Emails > Checkout Email > YourOrderConfirmationEmail
- Provide a sender name and a sender email
- Select an encoding (defaults to UTF-8)
- Optionally, you can attach an image to your email
Further configuration - Checkout Anonymous
The next steps in the setup is almost the same as the Shopping Cart, so let's go through them quickly:
- In the Field validation we'll do the same as in the Shopping Cart:
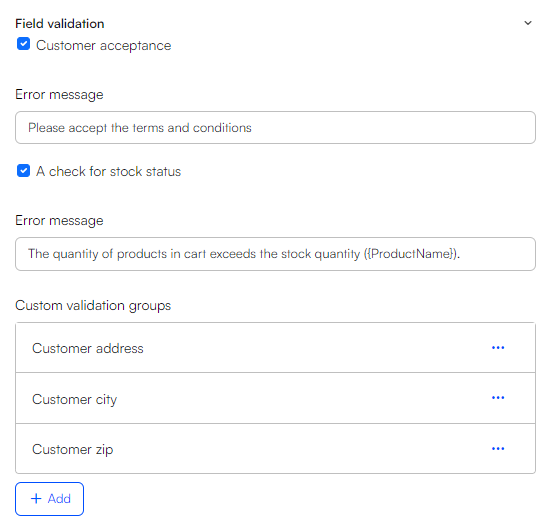
- In the Newsletter section, check Use email subscription
- Under Empty Cart, select Redirect to internal page and select the empty cart you've previously created.
- In the User management section:
- Disable Apply user details to order since we're making a checkout for anonymous users
- Enable Create user in checkout
- Select Accounts in Groups for new users:
- Check the Update existing users based on email match
- In the Payment & delivery section, select any payment and shipping method that's relevant to you
- Finally, in the Additional settings, leave it with the default options
That's it for the Shopping Cart App!
Logo & Links
Now, head back to the Content tab and scroll down to Logo:
- Select any logo you wish. Here we've selected the 'Swift' logo, but you're welcome to chose whatever logo you like.
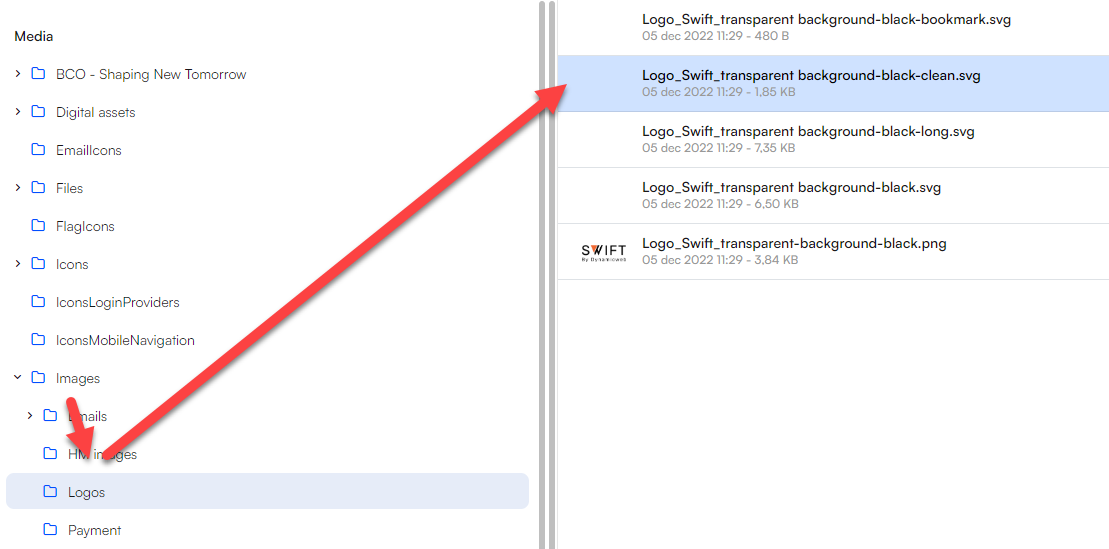
- Set the logo width, in our example we've set it to 120.
- Set the Logo link to the home page. So, when the user presses the logo, they'll be transported to the home page of your website.
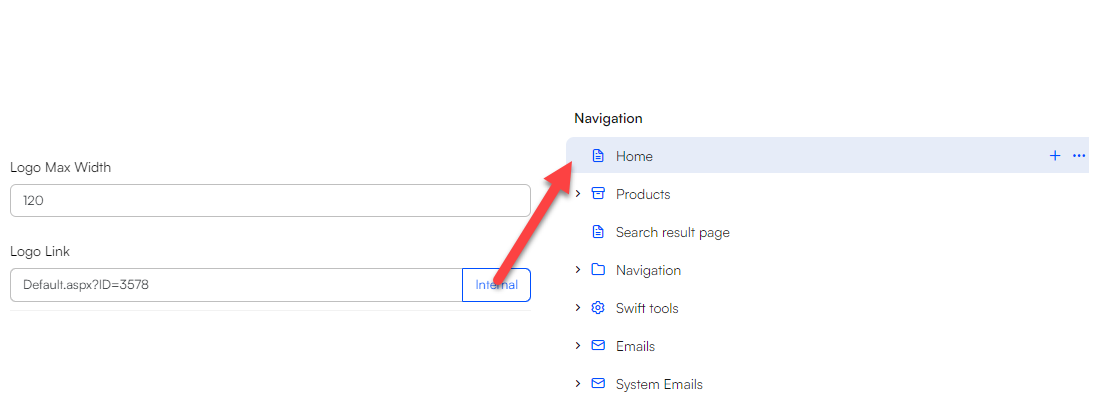
Lastly, we'll setup the links the user should be transported to if they wish to log in, head back to the cart etc:
- Cart page link: Navigation > Utilities > YourShoppingCart
- Sign-in page link: Navigation > Utilities > Sign in
- User address page link: Navigation > Utilities > My account > My addresses
- User account page link: Navigation > Utilities > My account > My account information
- Checkout User page link: Navigation > Utilities > YourShoppingCart > Checkout user
- Terms and Conditions page link: Navigation > Footer > About the shop > Terms
Hit Save
That's it! You've successfully set up your Anonymous Checkout process!
Too see if it works, head back to your Shopping cart

If you're not signed in, go ahead and hit 'Checkout'. You should no longer land on an empty page, but be guided through the new Checkout Anonymous process matching the one you just set up: The user puts in their information, picks how they want their stuff delivered, choose how to pay, and finally get a receipt!
Go ahead and try it out!
You've probably already guessed it, but the next thing we need to set up is the Checkout User page.
Exercise 4: Checkout User
Usually shoppers can log into an account linked to the website. Once logged in, users can access personalized features and manage their account on the website. This feature is what we will be setting up now.
But first things first, start by actually logging in:
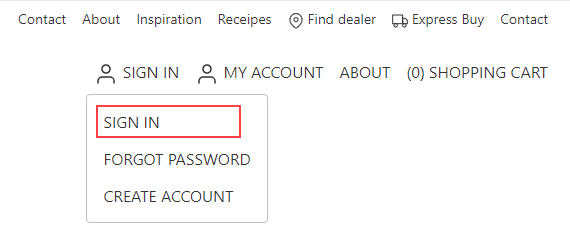
After you've logged in, head to the Shopping Cart page and press Checkout. You should be redirected to an empty page. This is a good thing, since we'll set up the checkout process for signed-in users now!
The setup of the 'Checkout User' page is almost identical to the 'Checkout Anonymous' page but with some key differences.
- Start by heading to the Checkout User page you've previously created and enter the Page settings by clicking the pink gear button in the bottom right corner
- Switch to the Publication tab and check Hidden in Menu
- Hit Save
- Add a 1-column row and add the Checkout App to the row
Shopping Cart App - Checkout User
Switch to the App tab and select the Shopping Cart App.
- Select a Channel in our example, we've chosen the BIKES channel.
- In the Steps section, create the same steps: Information, Delivery, Payment, Checkout, and Receipt
- However, this time, please note that we'll select different templates, which makes sense since we're now creating a checkout process for signed-in users.
- Information: Name: Information, Template: InformationUser_v2
- Delivery: Name: Delivery, Template: DeliveryUser_v2
- Payment: Name: Payment, Template: PaymentUser
- Checkout: Name: Checkout, Template: NONE, instead check the Is checkout box
- Receipt: Name: Receipt, Template: Receipt
- However, this time, please note that we'll select different templates, which makes sense since we're now creating a checkout process for signed-in users.
With a small exception in User management, the following should be set up the same way as Checkout Anonymous:
- Notification e-mail
- Field validation
- Newsletter
- Empty Cart
- In User management disable 'Create user in checkout' since the user is already logged in
- Payment & delivery
- Additional settings
That's it for the Shopping Cart App!
Logo & Links - Checkout User
Head back to the Content tab. If you want, you can configure Enable delivery date field in checkout again or one of the other options.
Scroll down to the Logo section attach the logo the same way you did in Checkout Anonymous.
In the Links section, do not select a 'Sign in page link' and 'Checkout User page link' since they're only relevant to the checkout anonymous process
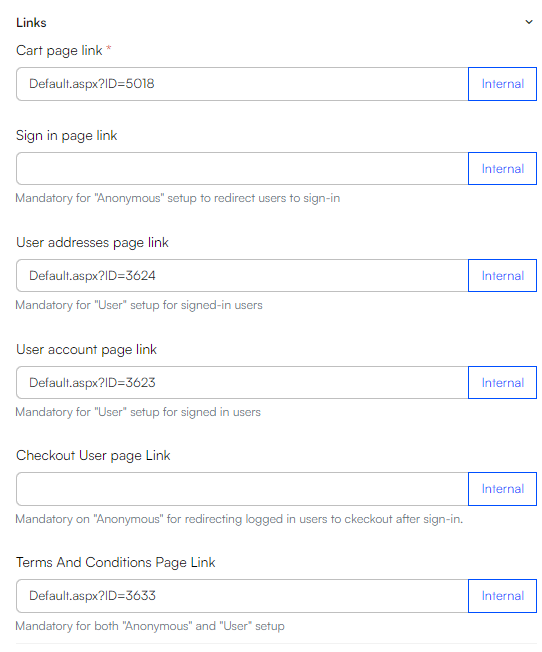
Finally, hit Save
And that's it! You've successfully created the Checkout process for logged-in users! Feel free to go through a checkout process to check if it works!
Exercise 5: Empty Cart
The Last thing we need to do is build the Empty Cart page. This is a regular content page and you can use the visual editor to create whichever content you want. In our example we'll create this:

Feel free to design the empty cart the way you want it, but to create this specific design, do the following:
- Add a 1-column row to the page
- Add a Feature column the column
- Select the specific icon and set the size to 128 x 128
- Give it the title: Empty cart
- Give it the text: Seems like you don't have any items in your cart
- Under Title settings, select h1 and Headline 1
- Hit Save
And that's it! Congratulations, you've successfully created a checkout process from scratch that handles how the checkout process works if users of your website are logged in or anonymous.