Designs & Templates
In introduction to designs and how they are constructed
A design is a collection of files which control how content from a DynamicWeb solution is shown in frontend - static resources, templates, and so on - stored in a folder on disk. A DynamicWeb design typically consists of the following:
- Templates with markup and code fetching content from the DynamicWeb solution
- Static resources such as css, javascript, etc.
Below a simple example of a template structure. All templates will always be under the /Files/Templates folder.
/Files/
├── Templates/
│   ├── Designs/
│   │   ├── myDesign/
│   │   │   ├── Paragraph/
│   │   │   │   ├── image.cshtml
│   │   │   │   ├── text.cshtml
│   │   │   ├── Navigation/
│   │   │   │   ├── topNavigation.cshtml
│   │   │   │   ├── leftNavigation.cshtml
│   │   │   ├── myLayout1.cshtml
│   │   │   ├── myLayout2.cshtml
│   │   │   ├── myMaster.cshtml
A design (myDesign above) is a 'root' folder for a group of templates that are used to render an entire website. DynamicWeb can have multiple websites using different designs - each design being in different designs folders.
Inside a design there are layouts (containing the overall markup like <head> and <body> sections) - that would be the myLayout1.cshtml and myLayout2.cshtml templates above. They would contain 2 different layouts - i.e. one with a top navigation and one with a left navigation. They will both be using the PageViewModel ViewModel.
The design folder contains subfolders for other types of templates - Paragraphs and Navigation. Each of these folders contains templates specific for that type of content. The paragraph templates will be using the ParagraphViewModel and the navigation templates will be using the NavigationTreeViewModel
Many features and apps in DynamicWeb will have its own subfolder inside the design-folder with templates using the relevant with ViewModels or tags specific to that functionality.
Design-folders are placed under Files/Templates/Designs - each design should have a dedicated subfolder here, and will appear in the Templates-section in the Assets-area tree.
 A design is applied to a website/area by opening the website settings for the website, switching to the Layout tab, and selecting a default page template. Once you've selected a default page layout, only layouts from that design can be selected elsewhere, e.g. when selecting a non-default templates for a page or a paragraph.
Setup website
When you have installed a new Dynamic
To create a page:
- Click the +-icon next to the 'Navigation' section
- Choose a 'Standard page'
- Give it a name i.e. 'Home'
- Press 'Save and close'
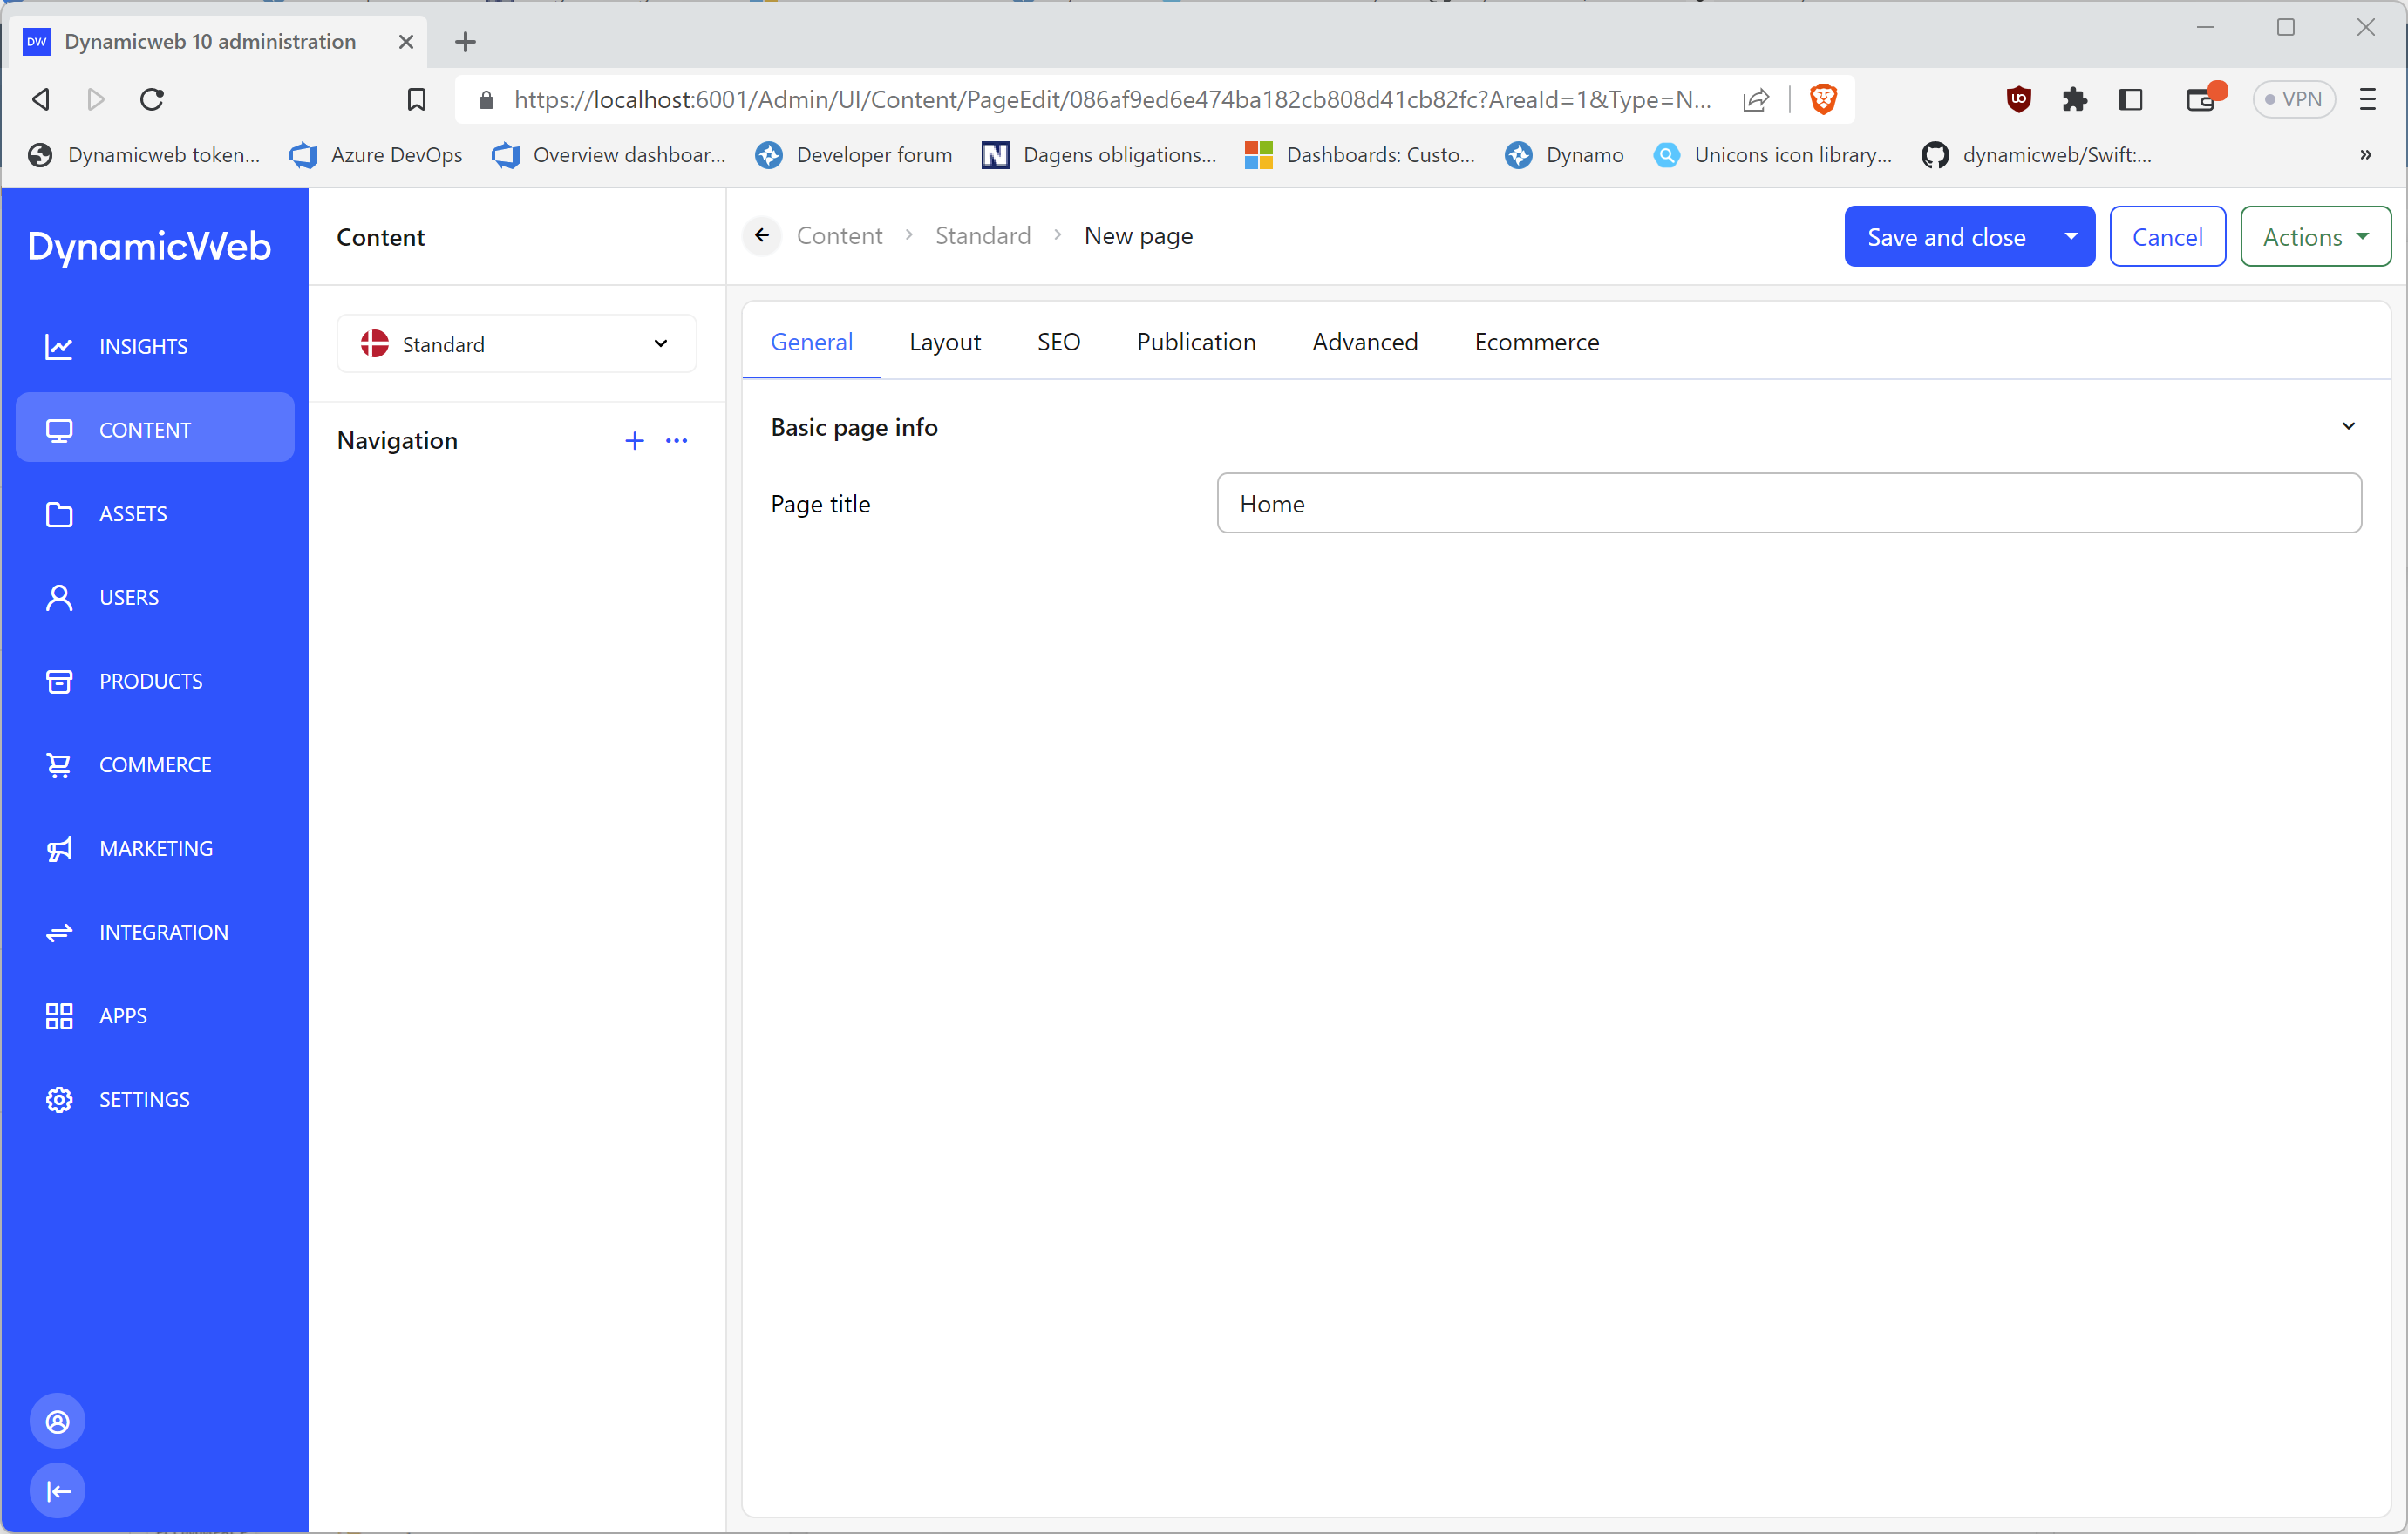
You now have a home page with no content.
Right click the page and choose 'preview' and see what happens

This is the preview of your 'Home' page:
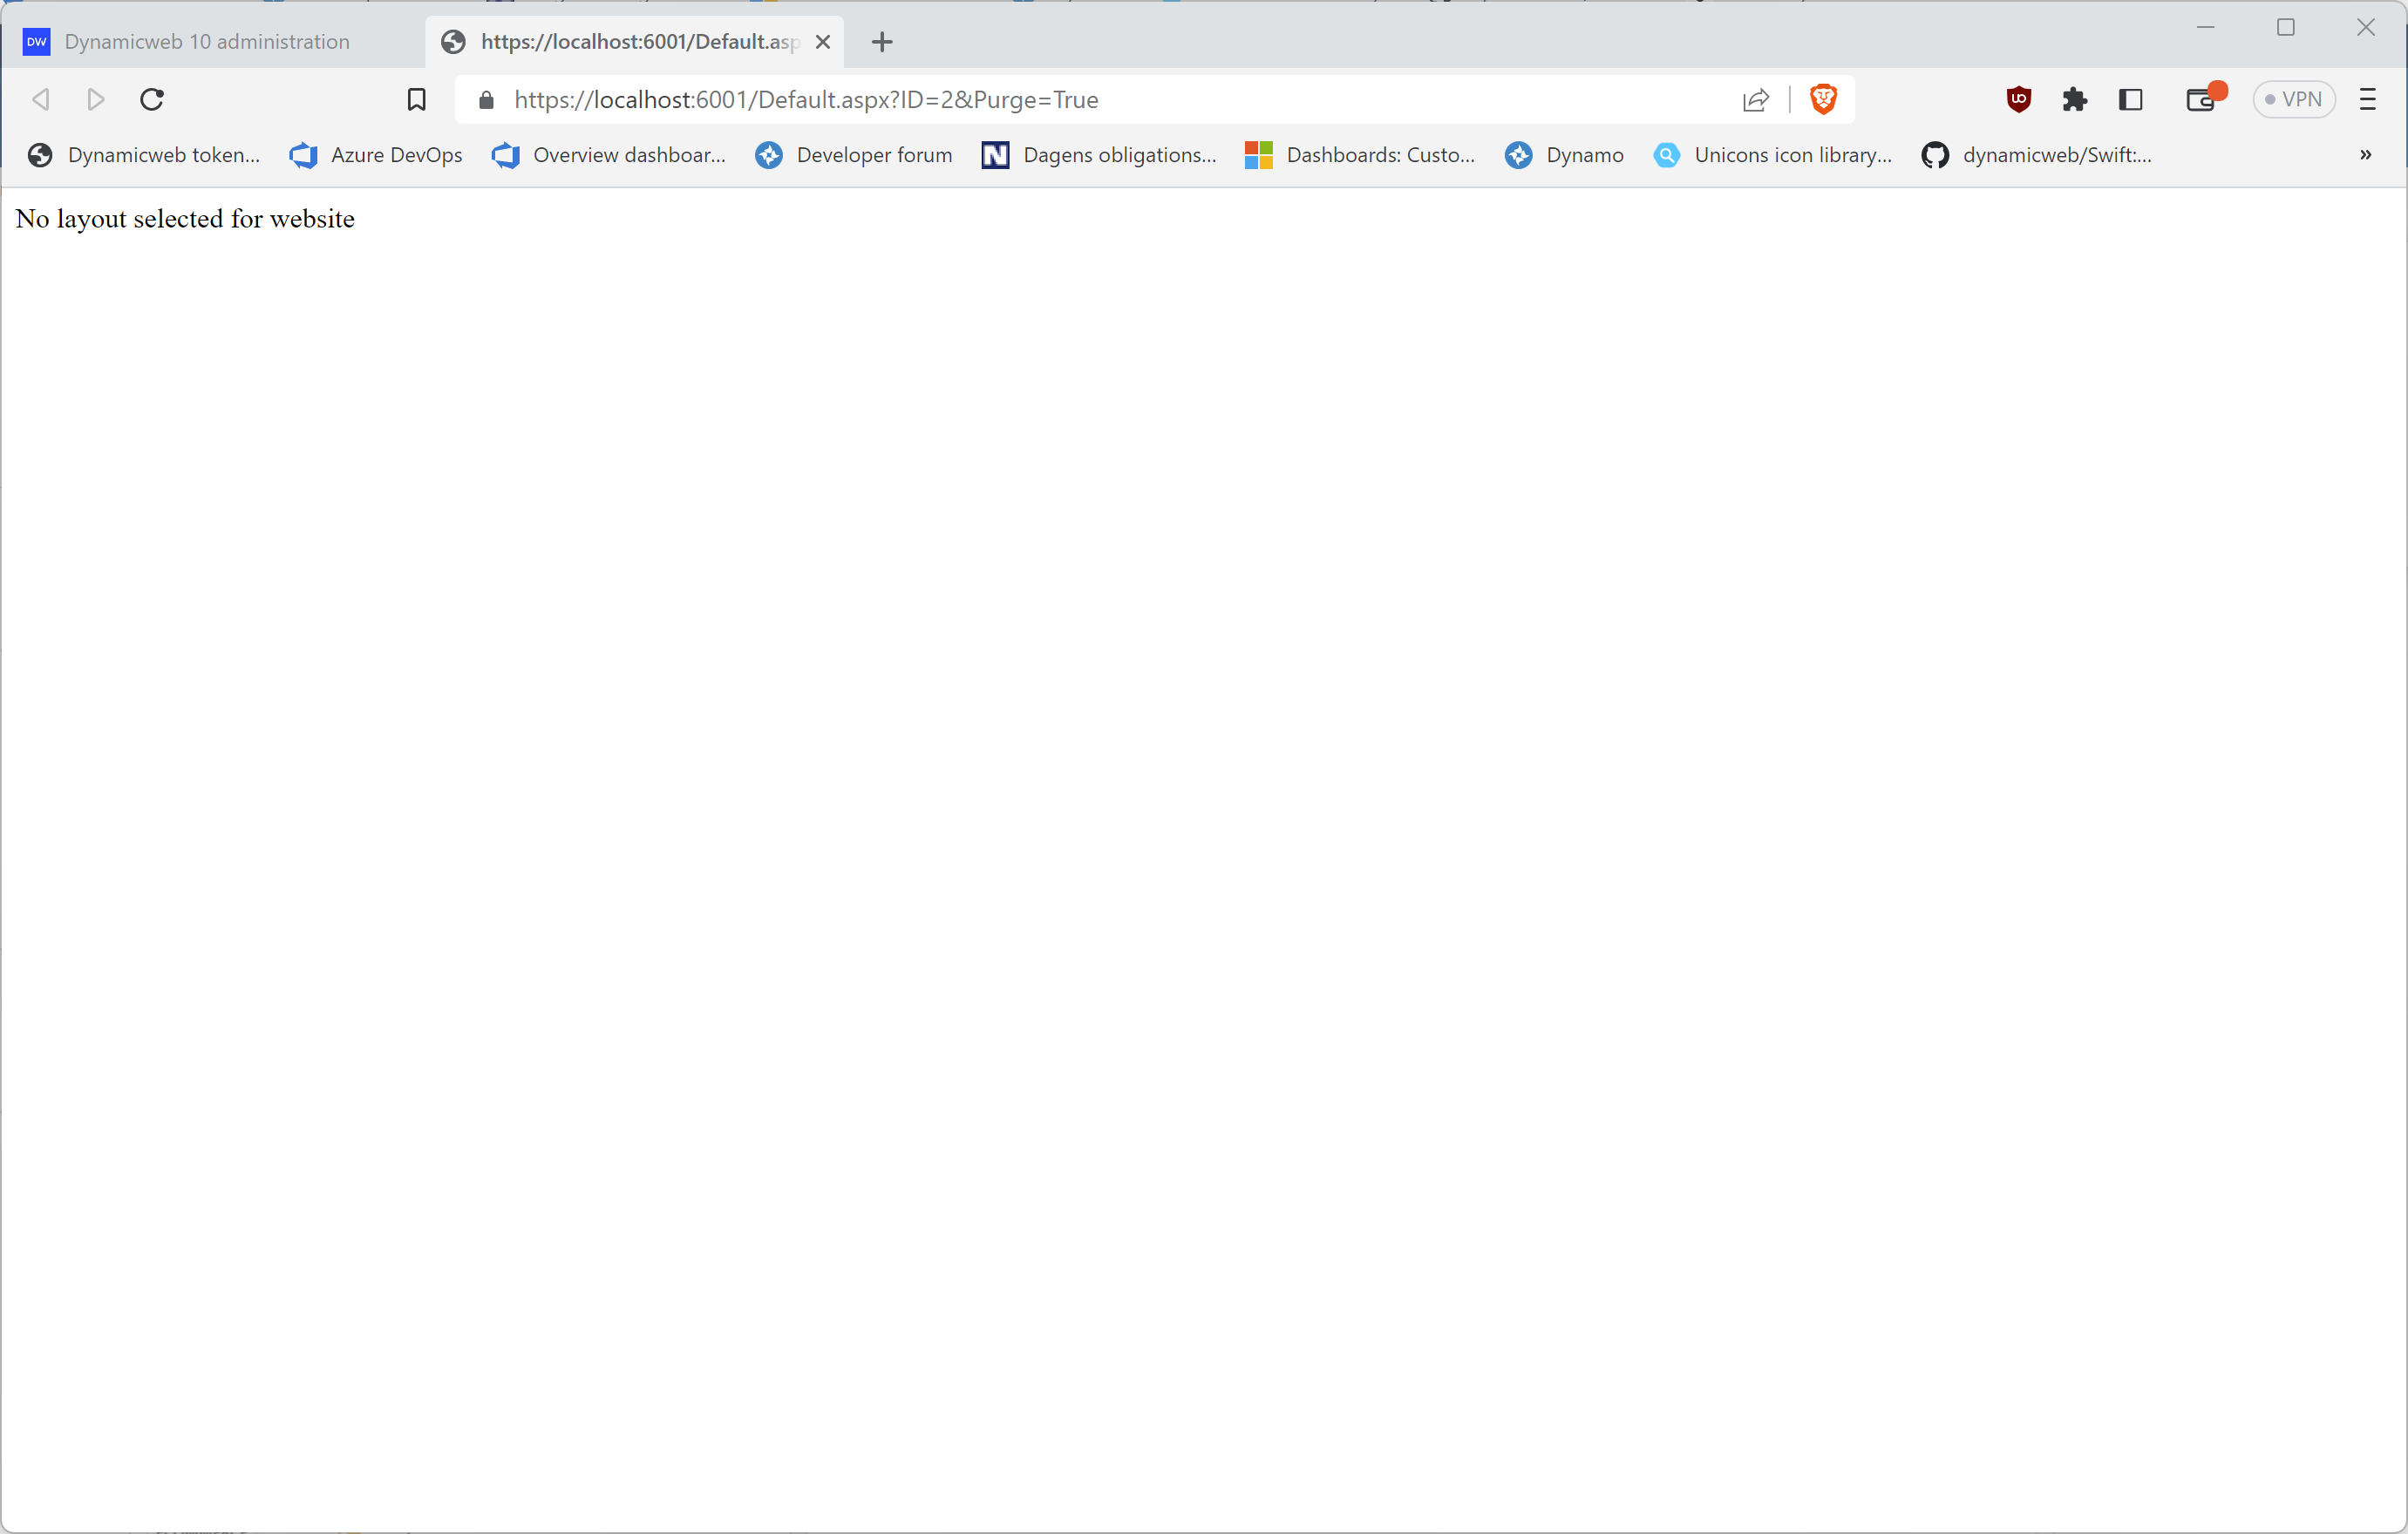
You will see the message 'No layout selected for website'
This website still does not have a design or any layouts which is why we see this message.
Creating a design
To create a design, you first create a design-folder and then a page layout:
- Go to 'Assets' and navigate to the folder
/Templates/Designs/ - Click the +-icon next to the 'Designs' folder to create a subfolder - this will be our design.
- Name the folder 'MySimpleDesign', click 'Create'
- Right click the new 'MySimpleDesign' folder and choose 'New file'
- Name the file 'Layout_default.cshtml', click 'create'
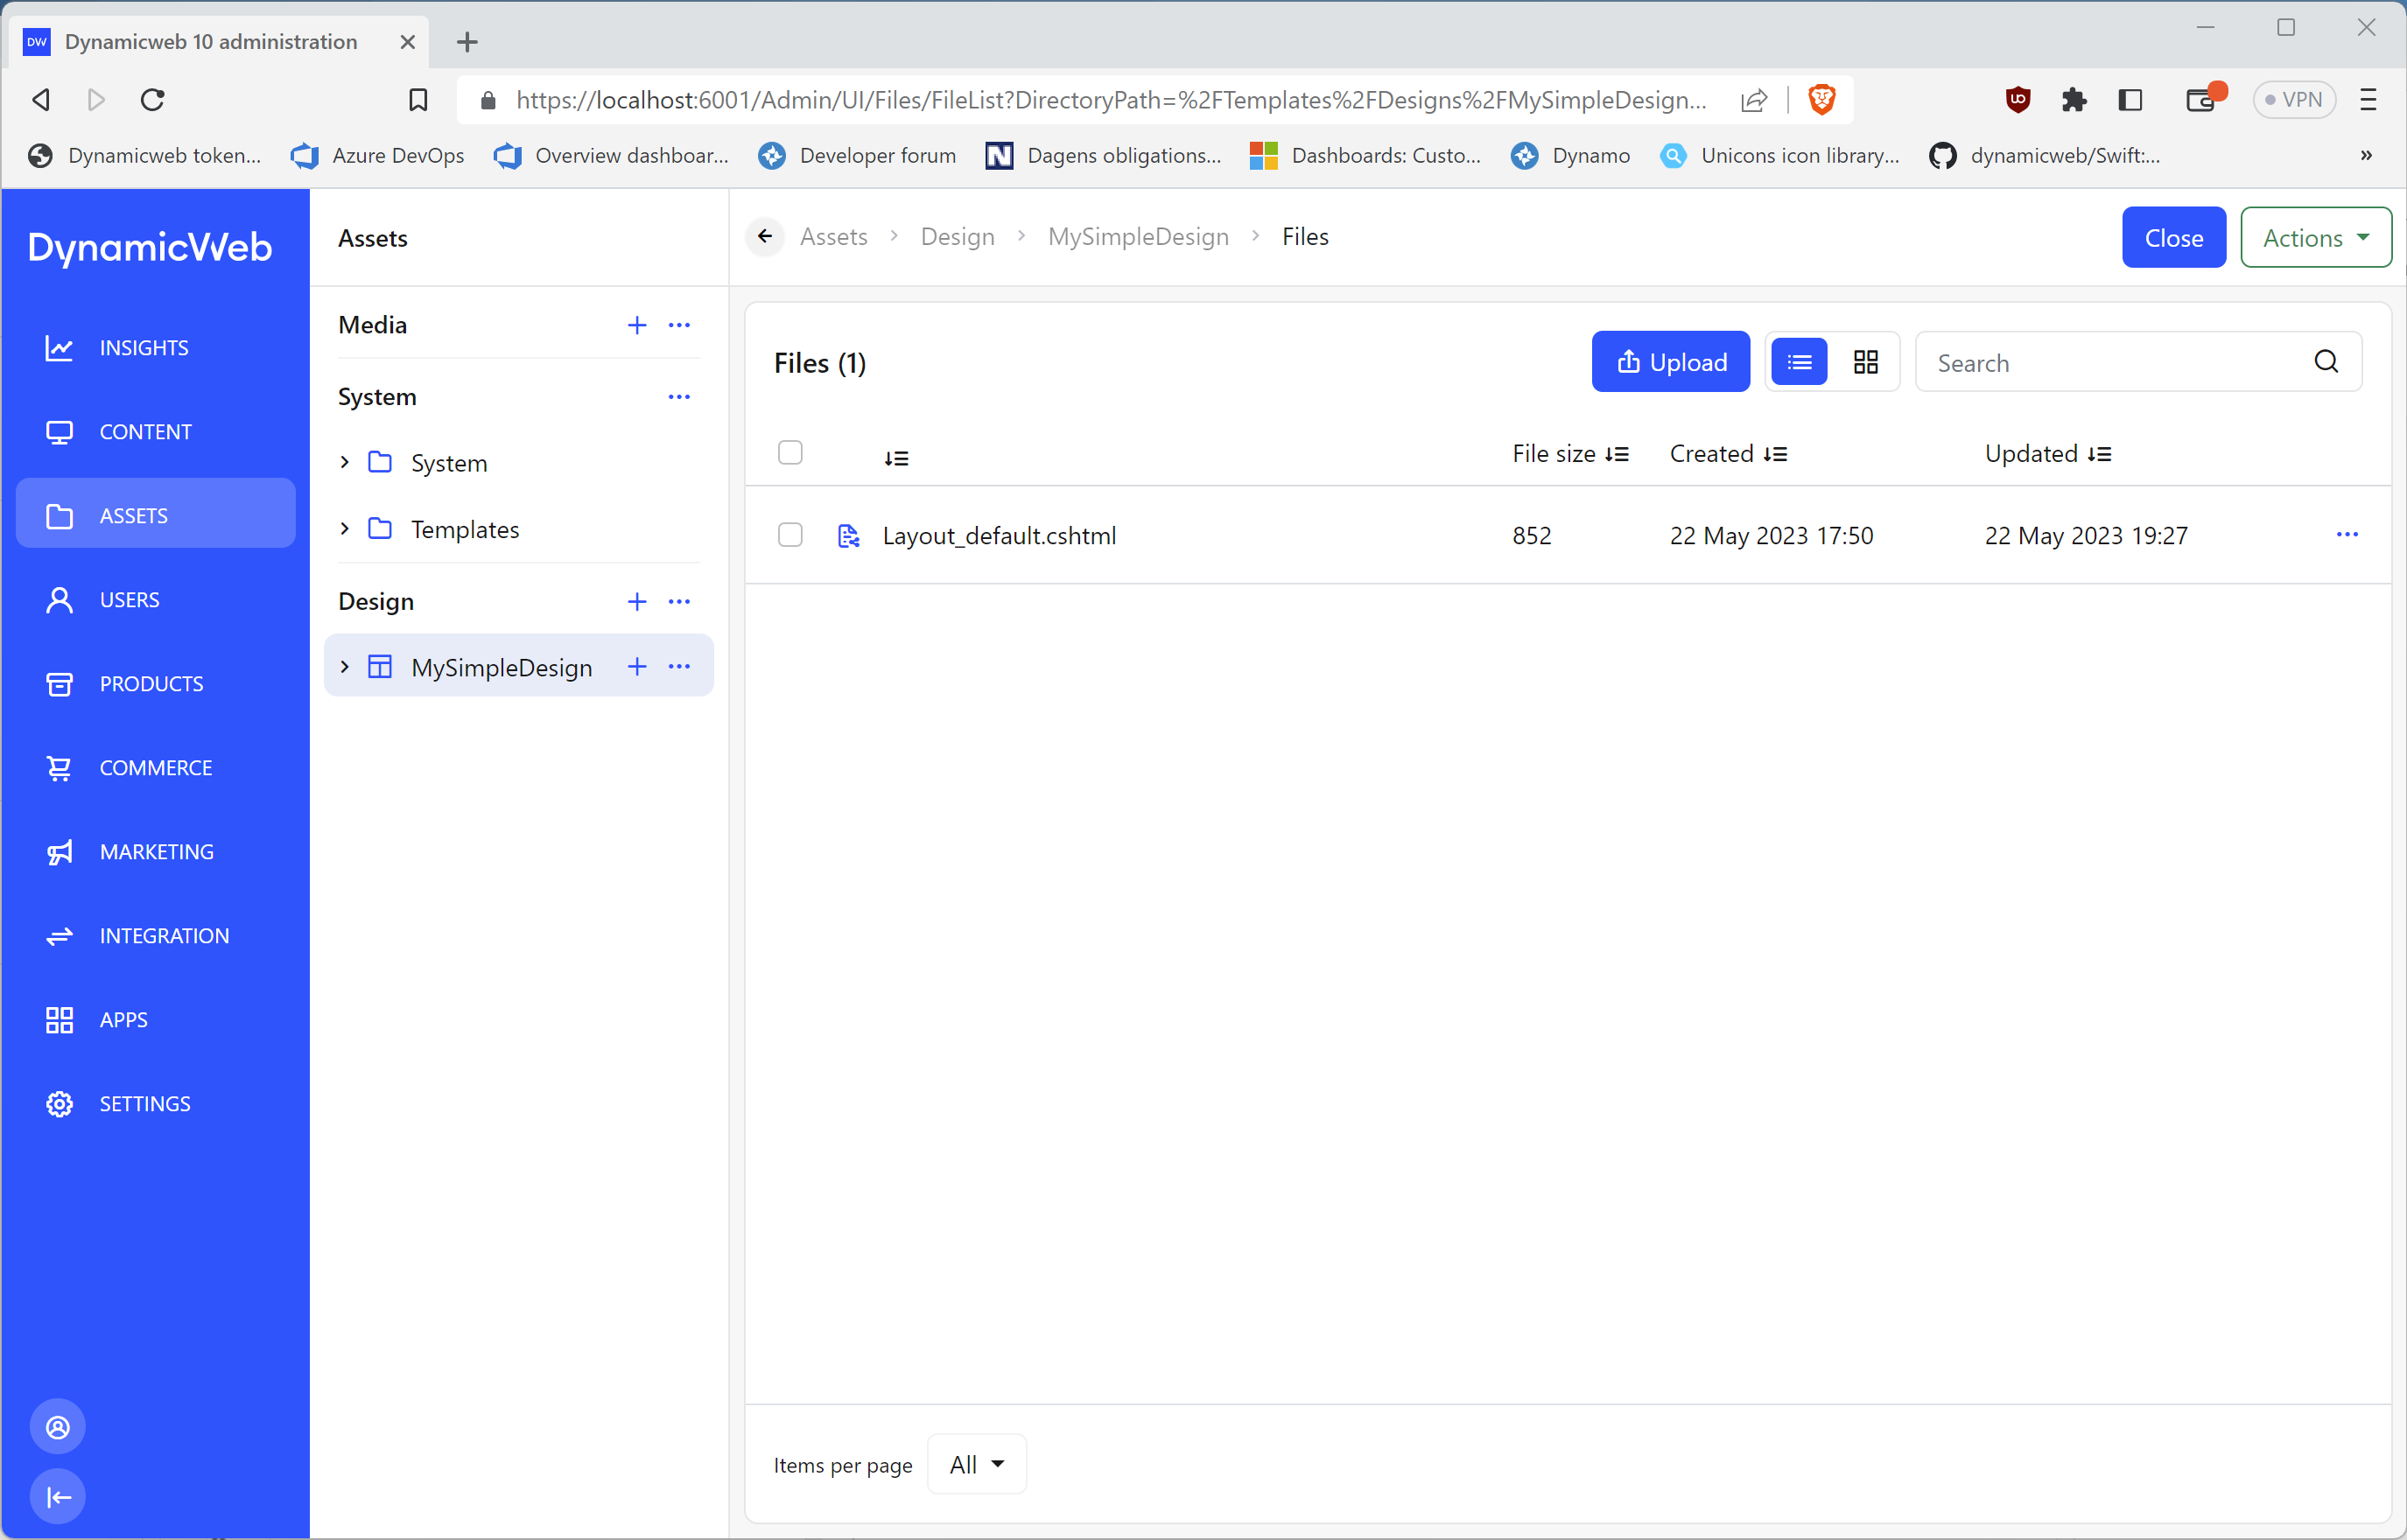
You now have a design (the folder named 'MySimpleDesign') and 1 layout in the design named 'Layout_default.cshtml'.
The layout is currently just an empty text file, of course. Lets add some markup and apply the layout to the website:
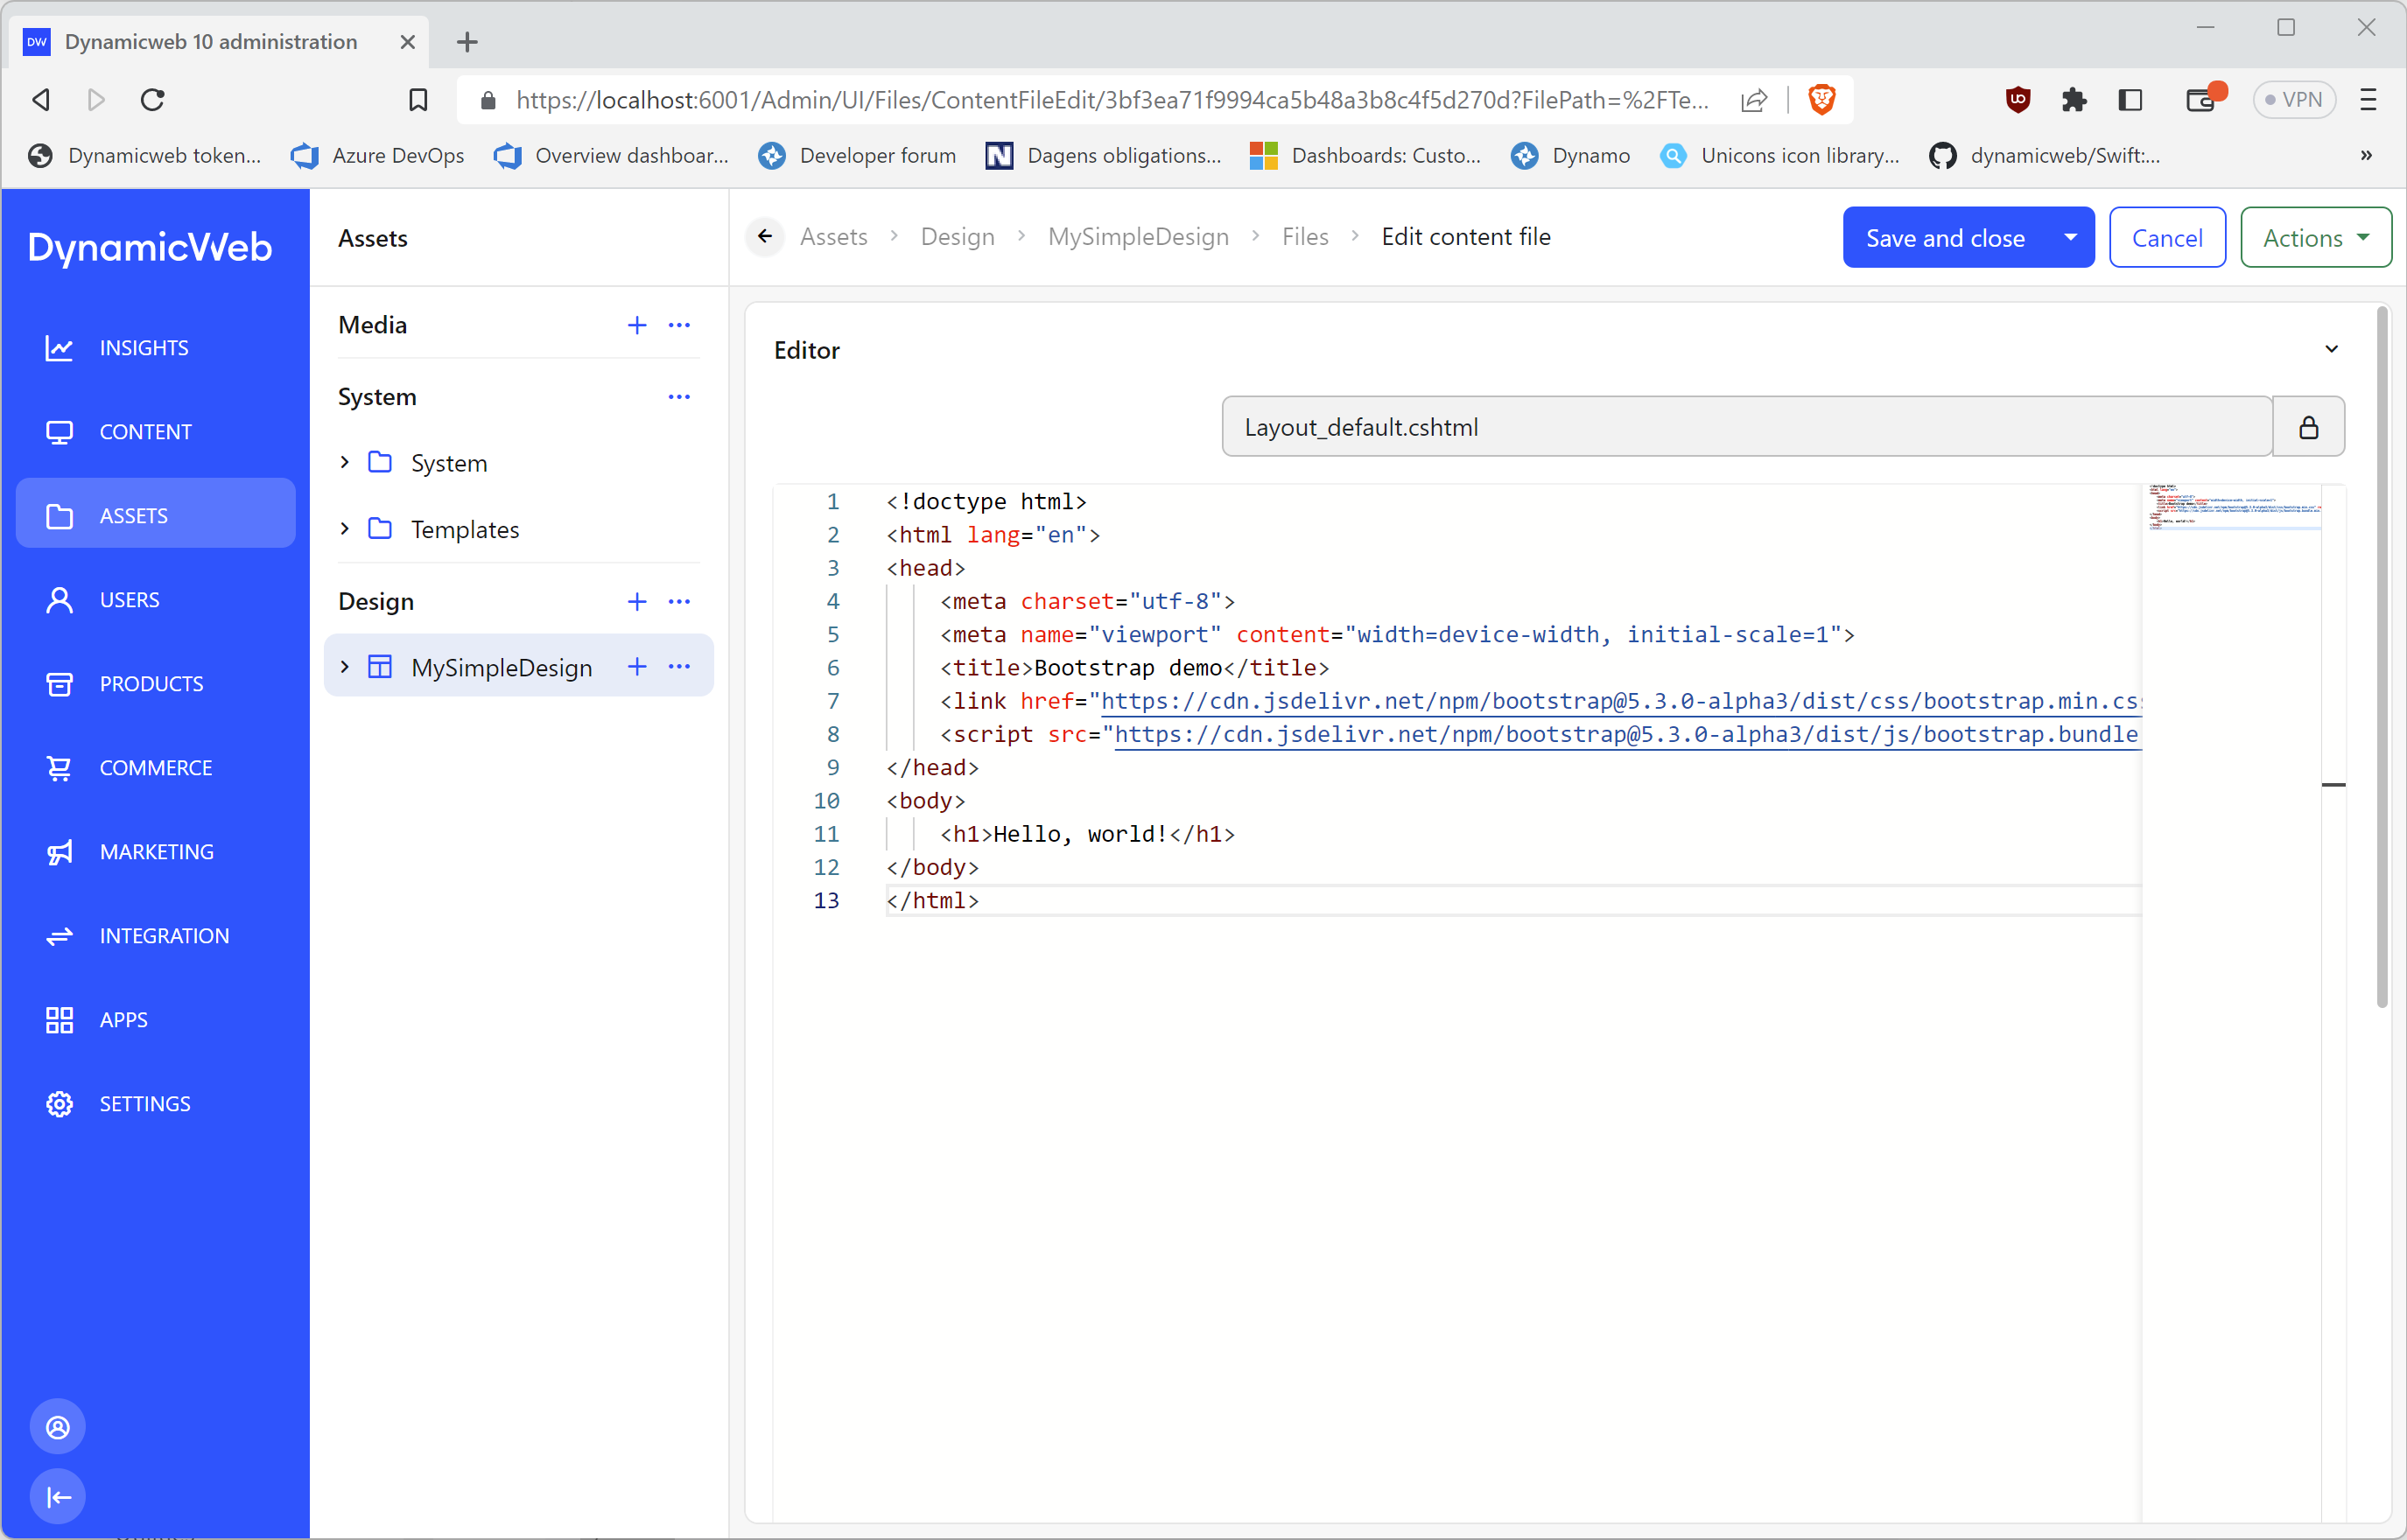
- Click the
...-menu for the 'Layout_default.cshtml' and choose 'Edit' - Add some markup to the file.
In this example we will use Bootstrap's Quick start template - cut'n'paste the markup to the file editor in DynamicWeb and press 'Save and close'.
Bootstrap markup
<!doctype html>
<html lang="en">
<head>
    <meta charset="utf-8">
    <meta name="viewport" content="width=device-width, initial-scale=1">
    <title>Bootstrap demo</title>
    <link href="https://cdn.jsdelivr.net/npm/bootstrap@5.3.0-alpha3/dist/css/bootstrap.min.css" rel="stylesheet" integrity="sha384-KK94CHFLLe+nY2dmCWGMq91rCGa5gtU4mk92HdvYe+M/SXH301p5ILy+dN9+nJOZ" crossorigin="anonymous">
    <script src="https://cdn.jsdelivr.net/npm/bootstrap@5.3.0-alpha3/dist/js/bootstrap.bundle.min.js" integrity="sha384-ENjdO4Dr2bkBIFxQpeoTz1HIcje39Wm4jDKdf19U8gI4ddQ3GYNS7NTKfAdVQSZe" crossorigin="anonymous" defer></script>
</head>
<body>
    <h1>Hello, world!</h1>
</body>
</html>
Result in DynamicWeb
At this point the layout is still static, which means that the content you see in frontend if you preview the page doesn't come from anything you've filled out in the DynamicWeb administration.
Choosing the default layout
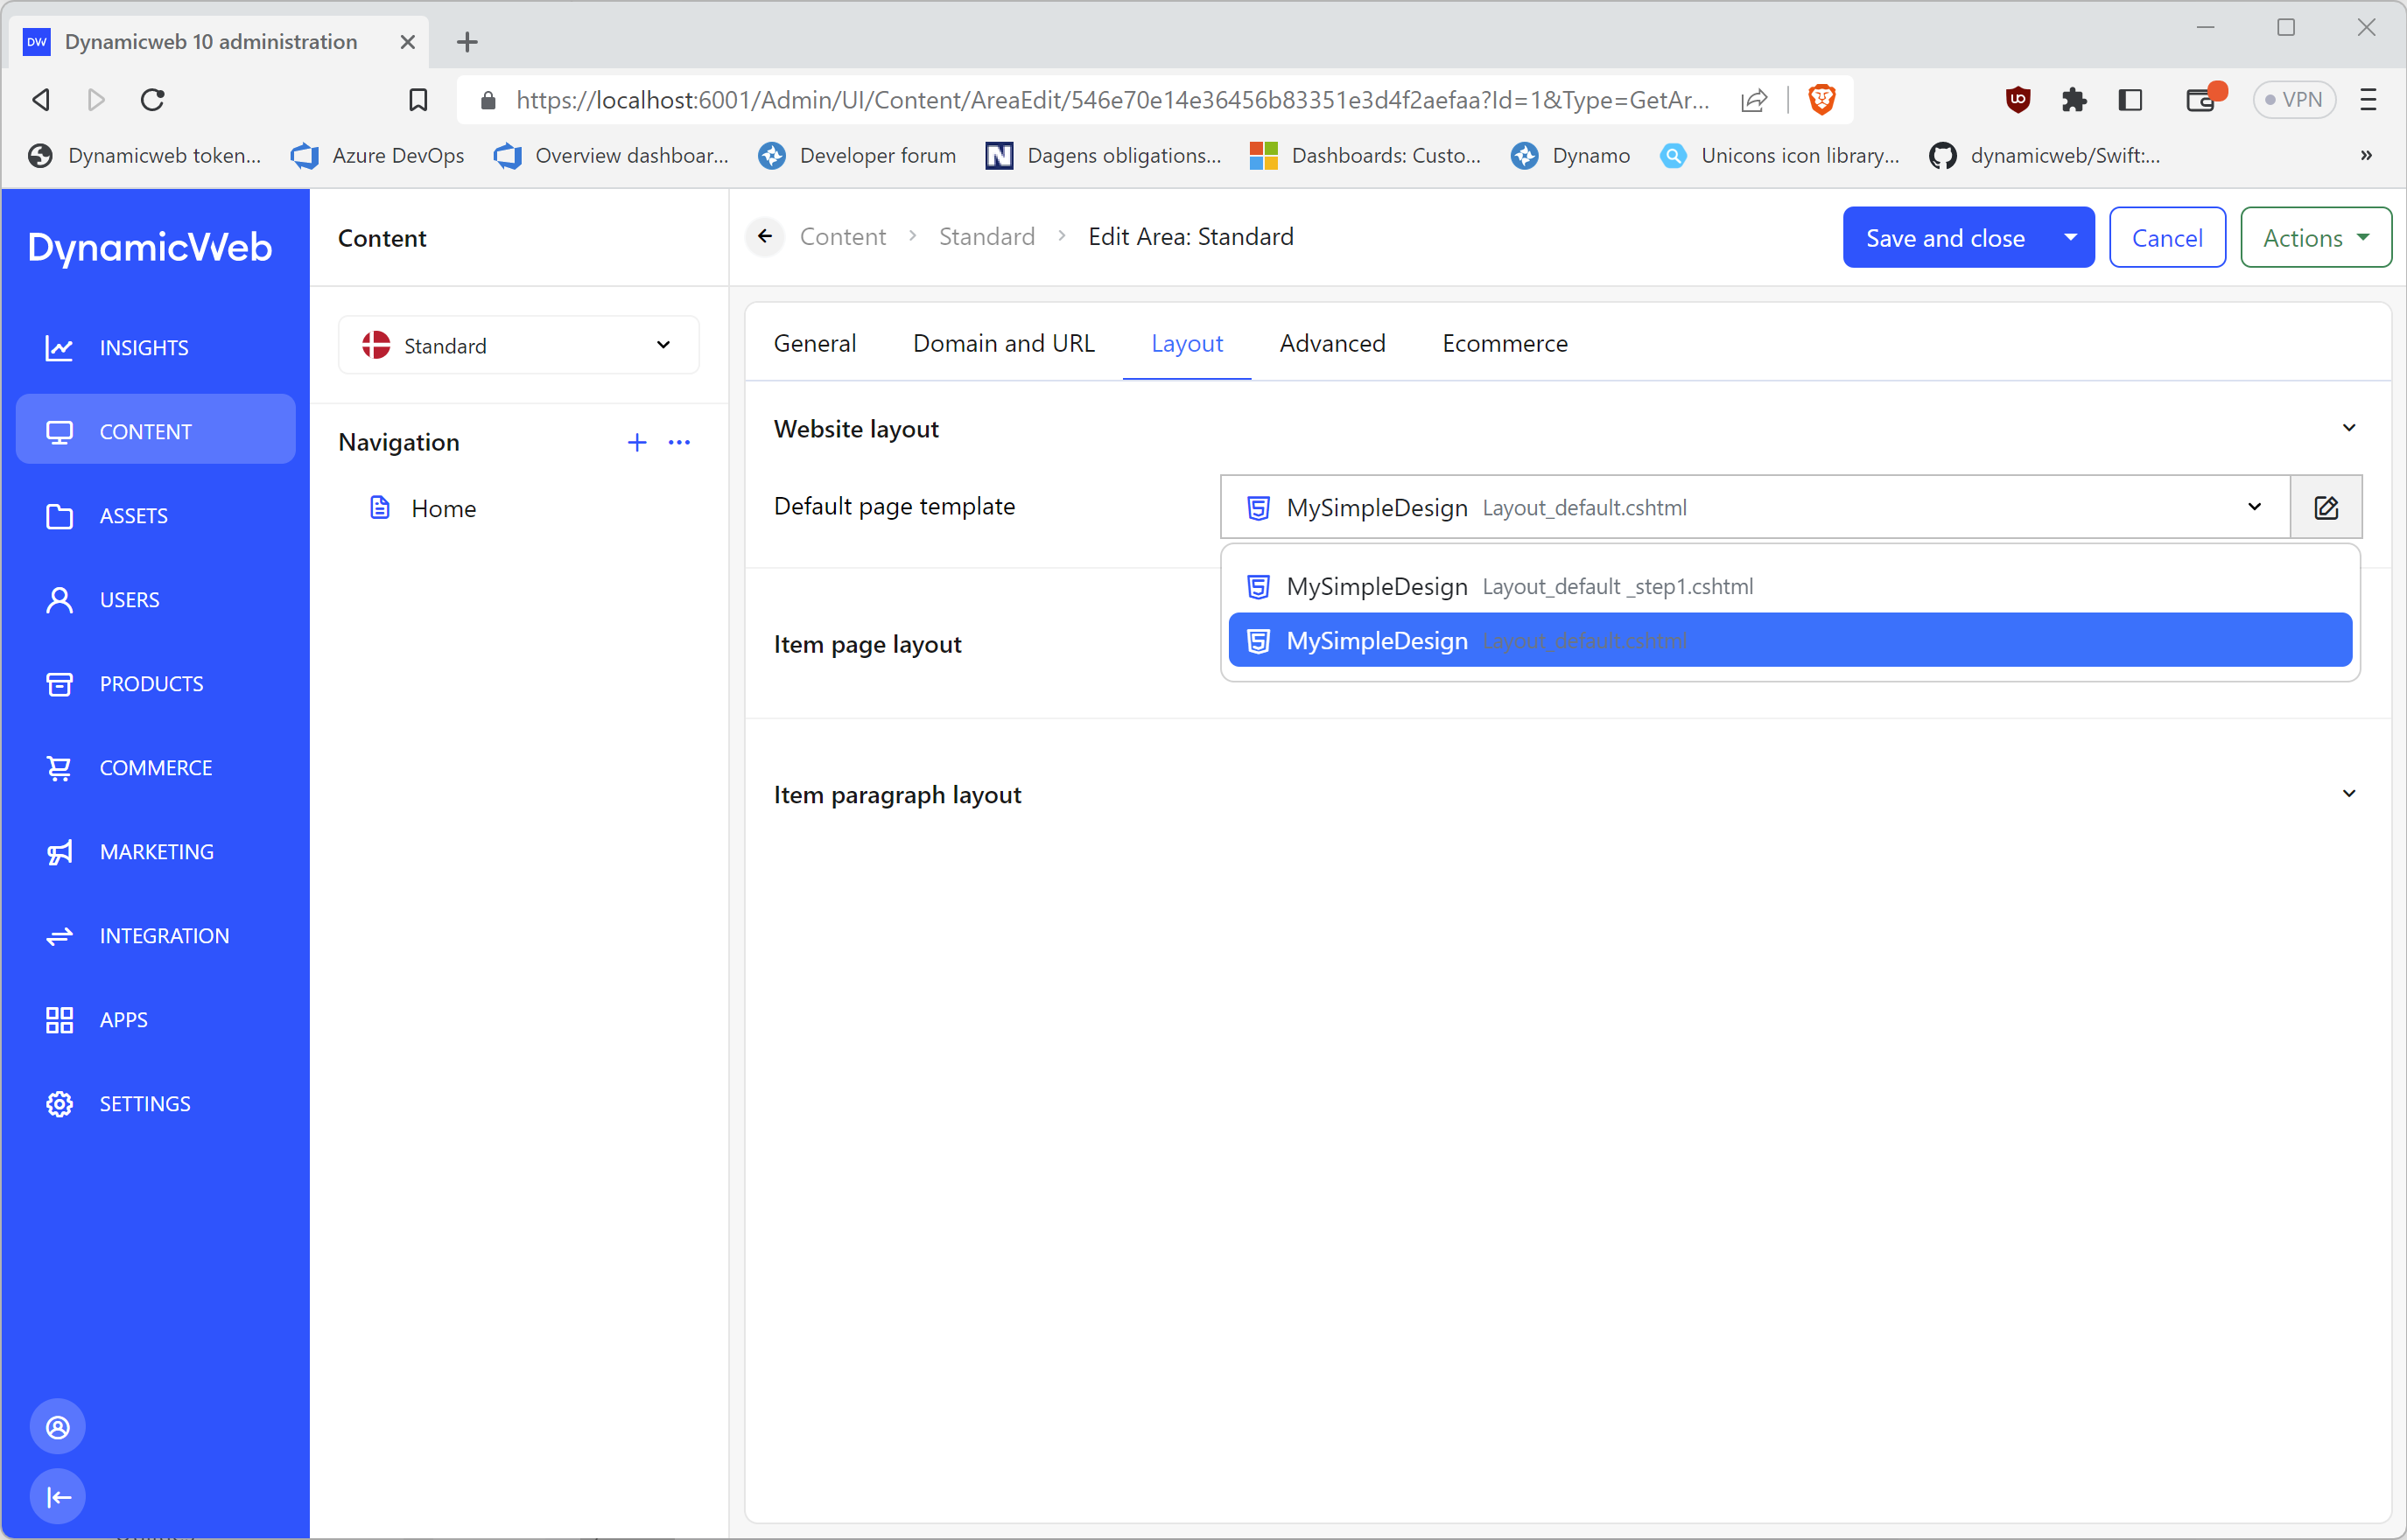
Before we make it use content from DynamicWeb, we will apply it to the website as the default layout for pages:
- Open the Content-area
- In the tree, use the
...-menu to open the Websites-list - You should see a website called 'Standard'
- Click the website to edit it and go to the 'Layout'-tab
- On the layout tab, a default page template can be selected. Select the template we just created, 'Layout_default.cshtml'
- Save
From now on, this template will be used on all pages unless another template is explicitly applied to specific pages. More on that later.
This setting will also 'lock' all pages in this website to only be able to use layouts from this design, i.e. which are located in this Design-folder.
Lets preview our 'Home' page and see how it renders now:
- Right click the 'Home' page in the navigation tree
- Choose 'Preview'
You will see the static content from the layout file:

Using ViewModels to create dynamic layouts
Lets change the layout template from being static to showing content from the page, which is to say change it from being static to being dynamic.
To do so, you need to specify which ViewModel to use. You can think of a ViewModel as a sort of prepared catalog of data you typically want to use for specific types of layouts.
The ViewModel we've created for page layouts is the Page
When you inherit this ViewModel in your layout...
@inherits Dynamicweb.Rendering.ViewModelTemplate<Dynamicweb.Frontend.PageViewModel>
...you can use **@Model** in your template to access data from DynamicWeb. Change the the template to this:
@inherits Dynamicweb.Rendering.ViewModelTemplate<Dynamicweb.Frontend.PageViewModel>
<!doctype html>
<html lang="en">
  <head>
    <meta charset="utf-8">
    <meta name="viewport" content="width=device-width, initial-scale=1">
    <title>@Model.Title</title>
    <link href="https://cdn.jsdelivr.net/npm/bootstrap@5.3.0-alpha3/dist/css/bootstrap.min.css" rel="stylesheet" integrity="sha384-KK94CHFLLe+nY2dmCWGMq91rCGa5gtU4mk92HdvYe+M/SXH301p5ILy+dN9+nJOZ" crossorigin="anonymous">
    <script src="https://cdn.jsdelivr.net/npm/bootstrap@5.3.0-alpha3/dist/js/bootstrap.bundle.min.js" integrity="sha384-ENjdO4Dr2bkBIFxQpeoTz1HIcje39Wm4jDKdf19U8gI4ddQ3GYNS7NTKfAdVQSZe" crossorigin="anonymous" defer></script>
  </head>
  <body>
    <h1>Hello, @Model.Name!</h1>

  </body>

</html>
@Model.Name is the name of the page - 'Home' - and @Model.Title is the meta title from the page. Try editing the page - open the page settings, go to the SEO tab, and change the title. Refresh the page in the frontend and see the title changed.
Save the template and preview the page again. You can now see the title of the page in <title> tag and the name of the page in the <h1>-tag.
The result of the rendering will look like this:
<!doctype html>
<html lang="en">
  <head>
    <meta charset="utf-8">
    <meta name="viewport" content="width=device-width, initial-scale=1">
    <title>Welcome to Dynamicweb</title>
    <link href="https://cdn.jsdelivr.net/npm/bootstrap@5.3.0-alpha3/dist/css/bootstrap.min.css" rel="stylesheet" integrity="sha384-KK94CHFLLe+nY2dmCWGMq91rCGa5gtU4mk92HdvYe+M/SXH301p5ILy+dN9+nJOZ" crossorigin="anonymous">
    <script src="https://cdn.jsdelivr.net/npm/bootstrap@5.3.0-alpha3/dist/js/bootstrap.bundle.min.js" integrity="sha384-ENjdO4Dr2bkBIFxQpeoTz1HIcje39Wm4jDKdf19U8gI4ddQ3GYNS7NTKfAdVQSZe" crossorigin="anonymous" defer></script>
  </head>
  <body>
    <h1>Hello, Home!</h1>

  </body>

</html>

Layouts
You often need to create different page layouts for different types of content. Luckily, creating additional layouts is easy - you just create new layout files in our design folder:
- Navigate to Assets > Templates > Designs > MySimpleDesign
- Right click our 'Layout_Default.cshtml' file and choose 'Copy here'
- Rename the copied file to 'Layout_aboutUs.cshtml'
- Edit the 'Layout_aboutUs.cshtml' file so it has a different layout (below a simple sample)
@inherits Dynamicweb.Rendering.ViewModelTemplate<Dynamicweb.Frontend.PageViewModel>
<!doctype html>
<html lang="en">
<head>
<meta charset="utf-8">
<meta name="viewport" content="width=device-width, initial-scale=1">
<title>@Model.Title</title>
<link href="https://cdn.jsdelivr.net/npm/bootstrap@5.3.0-alpha3/dist/css/bootstrap.min.css" rel="stylesheet" integrity="sha384-KK94CHFLLe+nY2dmCWGMq91rCGa5gtU4mk92HdvYe+M/SXH301p5ILy+dN9+nJOZ" crossorigin="anonymous">
<script src="https://cdn.jsdelivr.net/npm/bootstrap@5.3.0-alpha3/dist/js/bootstrap.bundle.min.js" integrity="sha384-ENjdO4Dr2bkBIFxQpeoTz1HIcje39Wm4jDKdf19U8gI4ddQ3GYNS7NTKfAdVQSZe" crossorigin="anonymous" defer></script>
</head>
<body>
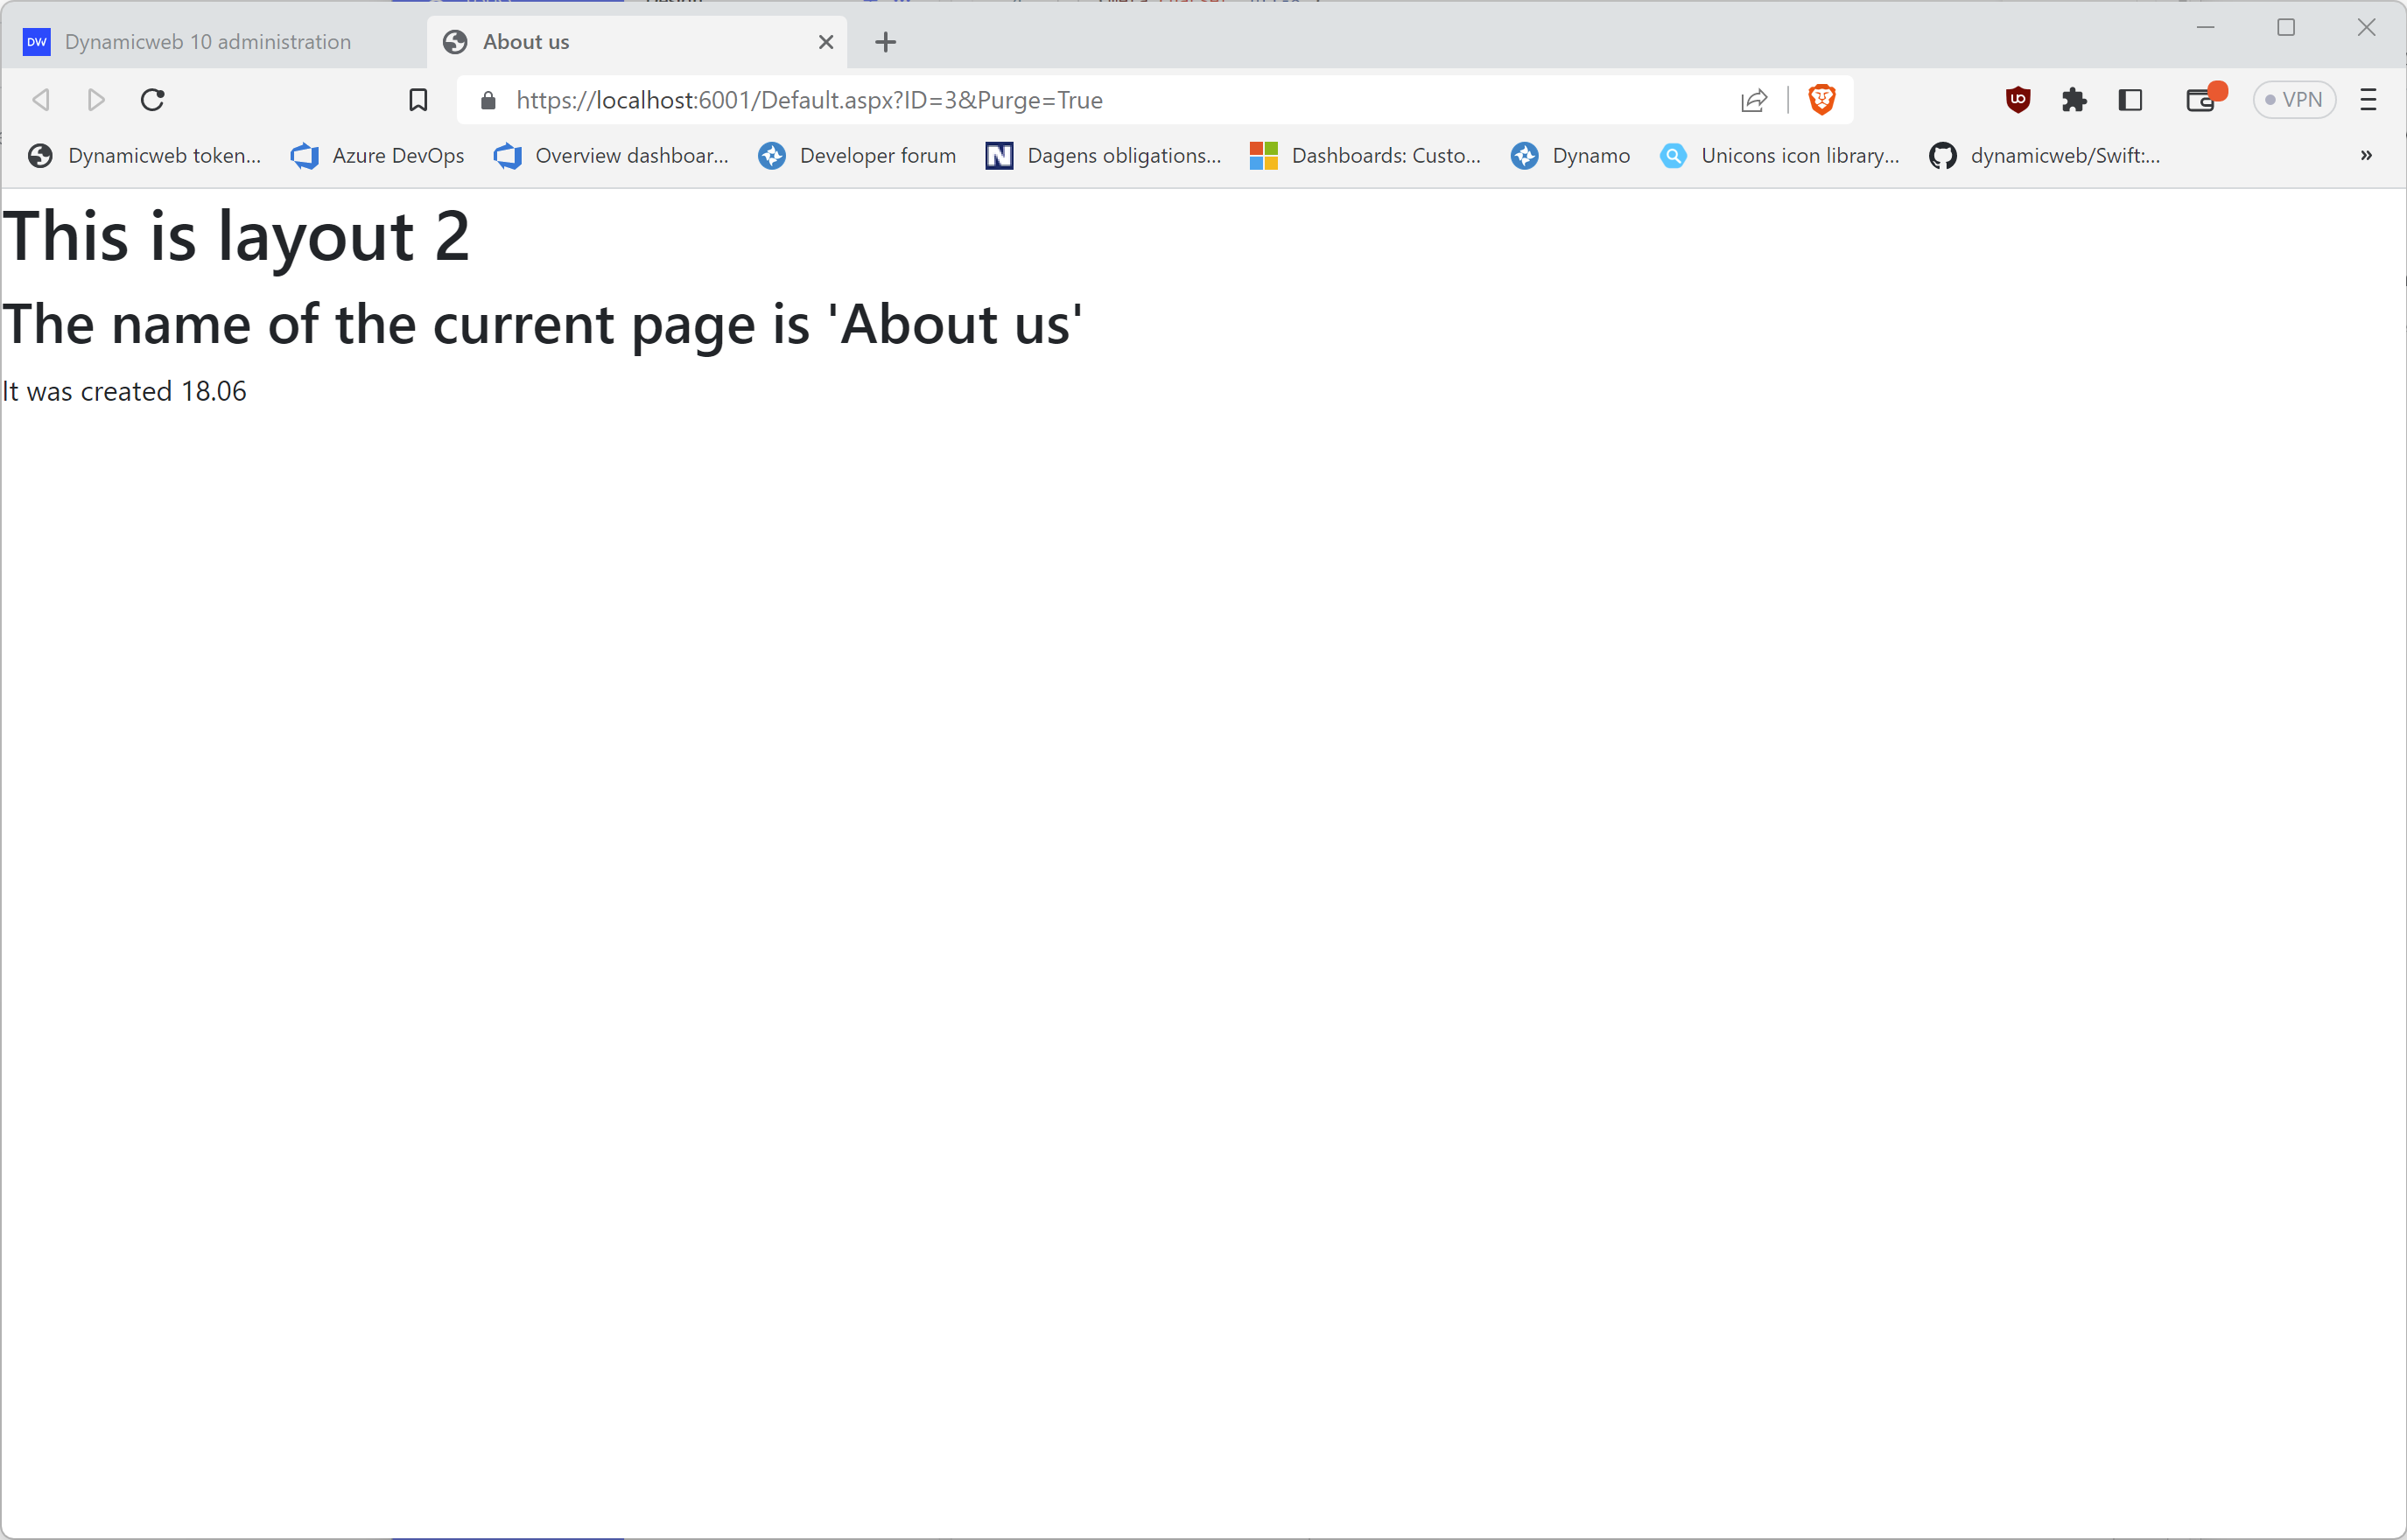
<h1>This is layout 2</h1>
<h2>The name of the current page is '@Model.Name'</h2>
<div>It was created @Model.CreatedDate.ToShortTimeString()</div>
</body>
</html>
Create a new page in the website called 'About us' and choose the 'Layout_aboutUs.cshtml'
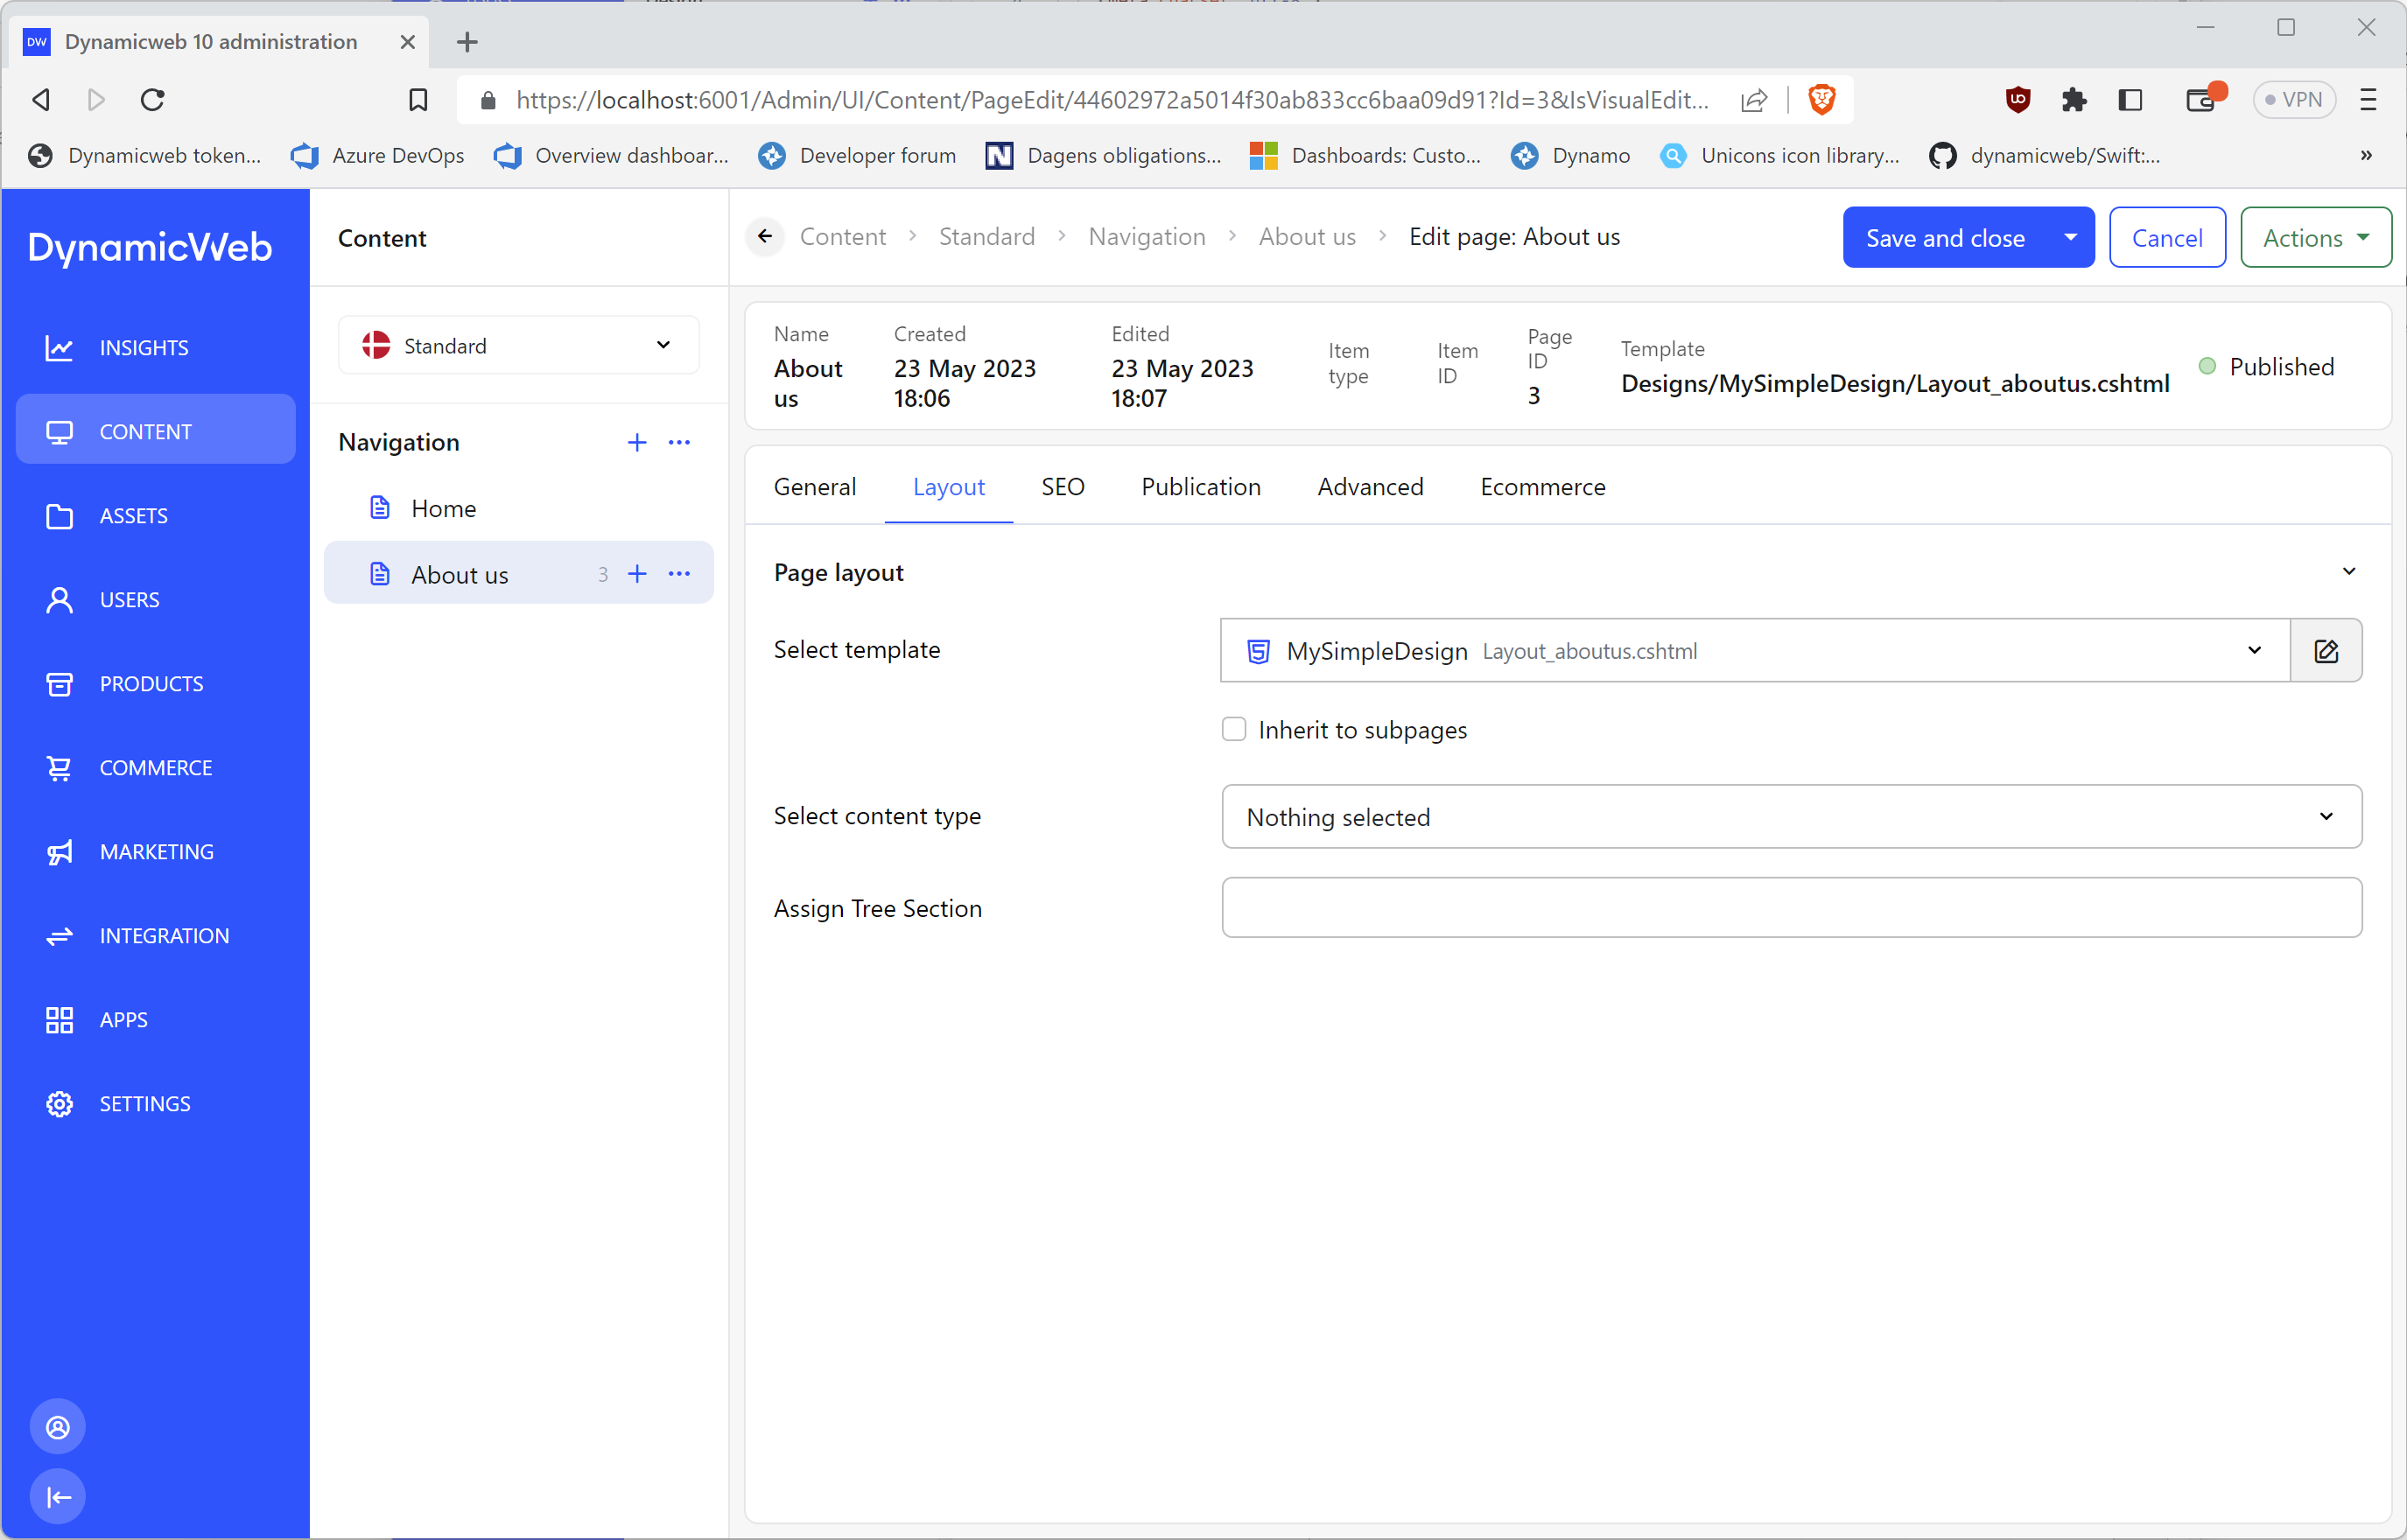
Preview the page and see the result
You now have a design with 2 layout templates in a design with different pages using them.
Master templates
In the layout example above the 2 layout templates are very similar - they share <head> section and will at some point have much more shared code.
The <body> section in our example is what is different.
But... it's kind of dumb to have the same code written twice. To avoid that you can use a master template to hold the shared code, so only the differences are left in the different layouts.
To create a master template:
- Copy one of the layout files and rename it to 'Master.cshtml'
- Remove everything in
<body>section - Add
@ContentPlaceholder()where the content was
Master.cshtml
@inherits Dynamicweb.Rendering.ViewModelTemplate<Dynamicweb.Frontend.PageViewModel>
<!doctype html>
<html lang="en">
  <head>
    <meta charset="utf-8">
    <meta name="viewport" content="width=device-width, initial-scale=1">
    <title>@Model.Title</title>
    <link href="https://cdn.jsdelivr.net/npm/bootstrap@5.3.0-alpha3/dist/css/bootstrap.min.css" rel="stylesheet" integrity="sha384-KK94CHFLLe+nY2dmCWGMq91rCGa5gtU4mk92HdvYe+M/SXH301p5ILy+dN9+nJOZ" crossorigin="anonymous">
    <script src="https://cdn.jsdelivr.net/npm/bootstrap@5.3.0-alpha3/dist/js/bootstrap.bundle.min.js" integrity="sha384-ENjdO4Dr2bkBIFxQpeoTz1HIcje39Wm4jDKdf19U8gI4ddQ3GYNS7NTKfAdVQSZe" crossorigin="anonymous" defer></script>
  </head>
  <body>
    @ContentPlaceholder()
  </body>
</html>
The master template now contains the code shared between layouts. You can now change the layout templates to use the master template, and then when a page is rendered the content of the layout templates will be inserted where the @ContentPlaceholder() is in the master template.
To make the layout templates use the master template:
- Open the layout template
- Remove everything that is not inside
<body> - Add a directive in the top of the template to specify the master template
Layout_default.cshtml
@inherits Dynamicweb.Rendering.ViewModelTemplate<Dynamicweb.Frontend.PageViewModel>
@MasterPageFile("Master.cshtml")

<h1>Hello, @Model.Name!</h1>
Layout_aboutUs.cshtml
@inherits Dynamicweb.Rendering.ViewModelTemplate<Dynamicweb.Frontend.PageViewModel>
@MasterPageFile("Master.cshtml")

<h1>This is layout 2</h1>

<h2>The name of the current page is '@Model.Name'</h2>

<div>It was created @Model.CreatedDate.ToShortTimeString()</div>
Preview the pages again and see they still look the same in frontend.
Add something to your master template and observe that the change is visible in both pages using the 2 different layouts.
Now that you understand the principle of master templates, let's add a real design to the master template. The layout below features some more master-appropriate elements:
- A header with logo and navigation
- A main section with a ContentPlaceholder() where page layout content is inserted
- A footer
Master.cshtml
@inherits Dynamicweb.Rendering.ViewModelTemplate<Dynamicweb.Frontend.PageViewModel>
<!doctype html>
<html lang="en">
<head>
<meta charset="utf-8">
<meta name="viewport" content="width=device-width, initial-scale=1">
<title>@Model.Title</title>
<link href="https://cdn.jsdelivr.net/npm/bootstrap@5.3.0/dist/css/bootstrap.min.css" rel="stylesheet" integrity="sha384-9ndCyUaIbzAi2FUVXJi0CjmCapSmO7SnpJef0486qhLnuZ2cdeRhO02iuK6FUUVM" crossorigin="anonymous">
<script src="https://cdn.jsdelivr.net/npm/bootstrap@5.3.0/dist/js/bootstrap.bundle.min.js" integrity="sha384-geWF76RCwLtnZ8qwWowPQNguL3RmwHVBC9FhGdlKrxdiJJigb/j/68SIy3Te4Bkz" crossorigin="anonymous" defer></script>
</head>
<body>
<header class="top-0 position-sticky bg-white">
<nav class="navbar navbar-expand-lg py-0 pb-1" aria-label="Offcanvas navbar large">
<div class="container">
<a class="navbar-brand fw-medium" href="#">DynamicWeb.</a>
<button class="navbar-toggler" type="button" data-bs-toggle="offcanvas" data-bs-target="#offcanvasNavbar2" aria-controls="offcanvasNavbar2" aria-label="Toggle navigation">
<span class="navbar-toggler-icon text-white"></span>
</button>
<div class="offcanvas offcanvas-end" tabindex="-1" id="offcanvasNavbar2" aria-labelledby="offcanvasNavbar2Label">
<div class="offcanvas-header">
<h5 class="offcanvas-title" id="offcanvasNavbar2Label">Navigation</h5>
<button type="button" class="btn-close" data-bs-dismiss="offcanvas" aria-label="Close"></button>
</div>
<div class="offcanvas-body">
<ul class="navbar-nav nav-underline justify-content-end flex-grow-1">
<li class="nav-item">
<a class="nav-link p-0 active" href="#">Home</a>
</li>
<li class="nav-item">
<a class="nav-link p-0" href="#">About us</a>
</li>
</ul>
</div>
</div>
</div>
</nav>
</header>
<main>
@ContentPlaceholder()
</main>
<footer class="py-4 py-md-5 mt-5 bg-body-tertiary border-top">
<div class="container py-4 py-md-5 px-4 px-md-3 text-body-secondary">
<div class="row">
<div class="col-sm">
<small>© Dynamicweb @DateTime.Now.Year</small>
</div>
<div class="col-sm text-center">News</div>
<div class="col-sm text-end">Social</div>
</div>
</div>
</footer>
</body>
</html>
Navigations
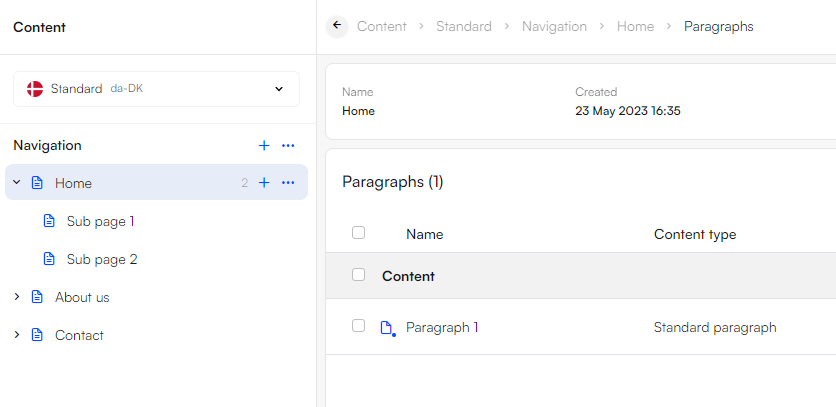
Navigations are a representation of the pages created in the content tree, for example a top navigation:

They are rendered using the Navigation
There are two ways to use the NavigationTreeViewModel:
- Inline in any template using
@GetNavigation(NavigationSettings)which will return a NavigationTreeViewModel - Using a separate template using
@Navigation.RenderNavigation(Template, NavigationSettings)which will return rendered markup using the passed template
Both rendering methods takes a Navigation
Here we are using GetNavigation() inline to create a top navigation. The NavigationSettings-object is defined inside the GetNavigation-function, and you loop though the returned navigation nodes directly in the template:
@inherits Dynamicweb.Rendering.ViewModelTemplate<Dynamicweb.Frontend.PageViewModel>
<!doctype html>
<html lang="en">
<head>
    <title>@Model.Title</title>
</head>
<body>
    <header>
        <ul>
            @{
                var myNavigation = GetNavigation(new() { StopLevel = 1 });
                foreach (var node in myNavigation.Nodes)
                {
                    <li>
                        <a href="@node.Link">@node.Name</a>
                    </li>
                }
            }
        </ul>
    </header>
</body>
</html>
In this example, we're using the @Navigation.RenderNavigation() method. The NavigationSettings-object is again defined inside the method, and again only has one setting (StopLevel = 1).
@inherits Dynamicweb.Rendering.ViewModelTemplate<Dynamicweb.Frontend.PageViewModel>
<!doctype html>
<html lang="en">
<head>
    <title>@Model.Title</title>
</head>
<body>
    <header>
        @Navigation.RenderNavigation("Navigation/TopNavigation.cshtml", new() { StopLevel = 1 })
    </header>
</body>
</html>
As you can see, this method requires you to point to a navigation template which contains the code for looping through navigation nodes.
@inherits Dynamicweb.Rendering.ViewModelTemplate<Dynamicweb.Frontend.Navigation.NavigationTreeViewModel>

<ul>
    @foreach (var node in Model.Nodes)
    {
        <li>
            <a href="@node.Link">@node.Name</a>
        </li>
    }
</ul>
Navigation templates are typically placed inside a Navigation-folder in the main design folder, but it's not a requirement.
Both examples above will render a one level navigation - i.e. a top navigation - due to the stop level setting. The output will look something like this:
<header>
  <ul>
      <li>
          <a href="/home">Home</a>
      </li>
      <li>
          <a href="/about-us">About us</a>
      </li>
      <li>
          <a href="/contact">Contact</a>
      </li>
  </ul>
</header>
Secondary navigations
Consider the following content page structure:
- Home
  - Subpage 1
  - Subpage 2
- About us
  - Meet the team
  - Management
- Contact
  - Dealer map
Notice how each 1st level page has one or more subpages, these are second level pages, and by using different settings for StartLevel, StopLevel and ExpandMode in the NavigationSettings-object, as well as different markup, you can create a variety of different navigation structures.
A top-sublevel navigation renders the subpages of the active top node in a separate navigation, here a left-side navigation:
@inherits Dynamicweb.Rendering.ViewModelTemplate<Dynamicweb.Frontend.PageViewModel>
<!doctype html>
<html lang="en">
<head>
    <title>@Model.Title</title>
</head>
<body>
    <header>
        <ul id="topNavigation">
            @{
                var myTopNavigation = GetNavigation(new() { StopLevel = 1 });
                foreach (var node in myTopNavigation.Nodes)
                {
                    <li>
                        <a href="@node.Link">@node.Name</a>
                    </li>
                }
            }
        </ul>
    </header>
    <main>
        <nav>
            <ul id="leftNavigation">
            @{
                var myLeftNavigation = GetNavigation(new() { StartLevel = 2, StopLevel = 2 });
                foreach (var node in myLeftNavigation.Nodes)
                {
                    <li>
                        <a href="@node.Link">@node.Name</a>
                    </li>
                }
            }
            </ul>
        </nav>
        <article>
            Content
        </article>
    </main>
</body>
</html>
A top-dropdown navigation renders the subpages of all top nodes as dropdowns.
@inherits Dynamicweb.Rendering.ViewModelTemplate<Dynamicweb.Frontend.PageViewModel>
<!doctype html>
<html lang="en">
<head>
    <title>@Model.Title</title>
</head>
<body>
    <header>
        <div class="dropdown">
            @{
                var dropdownNavigation = GetNavigation(new() { StopLevel = 2, ExpandMode = Dynamicweb.Frontend.Navigation.ExpandMode.All });
                foreach (var node in dropdownNavigation.Nodes)
                {
                    <button class="btn btn-link dropdown-toggle" type="button" data-bs-toggle="dropdown" aria-expanded="false">
                        @node.Name
                    </button>
                    <ul class="dropdown-menu">
                        @foreach (var subnode in node.Nodes)
                        {
                            <li>
                                <a class="dropdown-item" href="@subnode.Link">@subnode.Name</a>
                            </li>
                        }
                    </ul>

                }
            }
        </div>
    </header>
</body>
</html>
A tree navigation uses StopLevel = 3 and ExpandMode = All in the NavigationSettings object to render a folded out tree of all nodes until level 3:
@inherits Dynamicweb.Rendering.ViewModelTemplate<Dynamicweb.Frontend.PageViewModel>
<!doctype html>
<html lang="en">
<head>
    <title>@Model.Title</title>
</head>
<body>
    <nav>
        @{
            var treeNavigation = GetNavigation(new() { StopLevel = 3, ExpandMode = Dynamicweb.Frontend.Navigation.ExpandMode.All });
            <div id="treeNavigation">
                @{
                    RenderMyNavigation(treeNavigation.Nodes);
                }
            </div>
        }
        }
    </nav>

    @functions {
        void RenderMyNavigation(IEnumerable<Dynamicweb.Frontend.Navigation.NavigationTreeNodeViewModel> navigationNodes)
        {
            if (navigationNodes.Any())
            {
                <ul>
                    @foreach (var node in navigationNodes)
                    {
                        <li>
                            <a href="@node.Link">@node.Name</a>
                            @if (node.Nodes.Any())
                            {
                                RenderMyNavigation(node.Nodes);
                            }
                        </li>
                    }
                </ul>
            }
        }
    }

</body>
</html>
NavigationSettings
The NavigationSettings-object you pass to either of the methods used to render a navigation can have various properties - more than we've used in the examples above.
If you use a lot of properties, it's sometimes easier to parse for others if you define the object outside the method, like here:
@{
    var navigationSettings = new Dynamicweb.Frontend.Navigation.NavigationSettings()
    {
        StartLevel = 1,
        StopLevel = 5,
        IncludeFoldersAndHidden = false,
        ExpandMode = Dynamicweb.Frontend.Navigation.ExpandMode.All
    };

    var navigationTemplate = "Navigation/Default.cshtml";
}

@Navigation.RenderNavigation(navigationTemplate, navigationSettings)
Below we've created examples of how you can use some of the properties and what for.
Root nodes
By default, the navigation root is dynamic and depends on the current active page and the StartLevel property, but the NavigationSettings class contains two properties for controlling the root node of a navigation; RootPageId and RootNavigationTag.
The RootPageId property let's you specify a root node by the page ID:
var navigation = GetNavigation(new() { RootPageId = 123 });
Using page IDs is very specific and hardcoded, but also easy when working locally. However, when a layout is used across multiple websites and pages this approach is unsuitable; page IDs will not be the same on the other websites and solutions.
In those cases you can set the root node by the navigation tag:
var navigation = GetNavigation(new() { RootNavigationTag = "contactPages" });
The navigation tag is set using the page settings. You can use the same navigation tag on different pages on different websites, and so the design is easier to use across websites.
Expand mode
The ExpandMode-property can be used decide how the navigation tree should expand, e.g. like a breadcrumb, like a full tree or like a expanded tree.
Consider the following page tree structure:
- Home (Active page)
  - Sub page 1
  - Sub page 2
- About us
  - Meet the team
  - Management
- Contact
  - Dealers
If used with ExpandMode.Path...
GetNavigation(new() { StopLevel = 2, ExpandMode = Dynamicweb.Frontend.Navigation.ExpandMode.Path })
...the navigation will look like this:
<ul>
  <li>
    <a href="/home">Home</a>
    <ul>
        <li>
            <a href="/home/sub-page-1">Sub page 1</a>
        </li>
        <li>
            <a href="/home/sub-page-2">Sub page 2</a>
        </li>
    </ul>
  </li>
  <li>
    <a href="/about-us">About us</a>
  </li>
  <li>
     <a href="/contact">Contact</a>
  </li>
</ul>
If used with ExpandMode.PathOnly...
GetNavigation(new() { StopLevel = 2, ExpandMode = Dynamicweb.Frontend.Navigation.ExpandMode.PathOnly })
...the navigation will look like this:
<ul>
  <li>
    <a href="/home">Home</a>
  </li>
</ul>
If used with ExpandMode.All...
GetNavigation(new() { StopLevel = 2, ExpandMode = Dynamicweb.Frontend.Navigation.ExpandMode.All })
...the navigation will look like this:
<ul>
  <li>
    <a href="/home">Home</a>
    <ul>
      <li>
        <a href="/home/sub-page-1">Sub page 1</a>
      </li>
      <li>
        <a href="/home/sub-page-2">Sub page 2</a>
      </li>
    </ul>
  </li>
  <li>
    <a href="/about-us">About us</a>
    <ul>
      <li>
          <a href="/about-us/meet-the-team">Meet the team</a>
      </li>
      <li>
          <a href="/about-us/management">Management</a>
      </li>
    </ul>
  </li>
  <li>
    <a href="/contact">Contact</a>
    <ul>
      <li>
          <a href="/contact/dealers">Dealers</a>
      </li>
    </ul>
  </li>
</ul>
If used with ExpandMode.None...
GetNavigation(new() { StopLevel = 2, ExpandMode = Dynamicweb.Frontend.Navigation.ExpandMode.None })
...the navigation will look like this:
<ul>
  <li>
    <a href="/home">Home</a>
  </li>
  <li>
    <a href="/about-us">About us</a>
  </li>
  <li>
    <a href="/contact">Contact</a>
  </li>
</ul>
NavigationTreeNodes
Each node in a navigation - a NavigationTreeNode - is represented by a Navigation
Two boolean properties are used to find out which nodes are active or in the current navigation path:
IsActive- true for the active navigation nodeInPath- true for the active navigation node and its parents all the way up to the top level
The properties can be used to add css classes:
 @foreach (var node in navigationNodes)
{
    <li class="@(node.InPath ? "fw-bold" : "")">
        <a href="@node.Link" class="@(node.IsActive ? "active" : "")">@node.Name</a>
    </li>
}
There are other properties as well, so we encourage you to take a look at the linked API documentation.
Content models
In Dynamicweb, content is made up of pages and paragraphs.
When you create a design, you need to think about which types of pages and paragraphs you want to make available, how you want those objects to be shown on the screen (backend and frontend), and how you want the editor to interact with them. This is known as a content model.
Dynamicweb supports 3 different types of content model, depending on the need of the editor and the implementation model:
- Content placeholders is an unstructured format, where you define one or more content placeholders on a page layout. You can create paragraphs and place them under a content placeholder, they are then rendered sequentially.
- A content grid is also an unstructured format, where you define a grid and some row types. Editors can then use the Visual Editor to insert rows & columns on a page to create a grid, and then add paragraphs to each column containing text, images, or other types of content.
- Page based items is a structured format, where each type of page is tied to a specific item type e.g. News, Blogpost, or Case story, etc. Each item type has a specific list of fields matching the type of content, for a Blogpost this could be heading, image, author, date, text, etc. This content model does not use paragraphs, because the content layout is fixed.
As you can see, these content models serve different purposes and can also be combined using different layout templates.
Here are some more details about each type of content model.
Content Placeholders
To create a placeholder, define one or more placeholders by adding a placeholder definition in the layout template. This is done using the Placeholder-method of the PageID, a name, and optionally some setting.
<header>
    ...
</header>
<main>
    @Model.Placeholder("content", "Content")
</main>
<footer>
    ...
</footer>
The ID is used for placing paragraphs into the placeholder, so if you change the ID after adding content, the content will be removed from that placeholder. The name is shown in the backend on the list of paragraphs:
The settings available to you are:
| Property | Description | Default value | Possible values |
|---|---|---|---|
| Default | Whether new content should be placed in this container by default (page edit). | False | True or False |
| Sort | Controls the sorting in administration (page edit). | 0 | 1-99 |
| Template | The template that should be used for items in this container. | Any valid paragraph template. Must be placed in /Templates/Paragraph, /Templates/Designs/Paragraph or /Templates/Designs/DesignName/Paragraph |
A content placeholder with all properties defined could look like this:
@Model.Placeholder("content", "Content", "default:true;sort:1;template:default.cshtml")
Content Grid
To create a content grid, define a grid by:
- Adding a grid definition in the layout template
- Adding a grid definition file in json in the design folder
When a grid is defined on a page, the Visual Editor will be the default editing interface in the backend, and the editor can add rows and paragraphs to the grid.
To define a grid in a layout, use the Grid method of the Page
<header>
    ...
</header>
<main>
    @Model.Grid("contentgrid", "Grid", "", "Page")
</main>
<footer>
    ...
</footer>
In the Design-folder, you can then add a grid definition and some row templates.
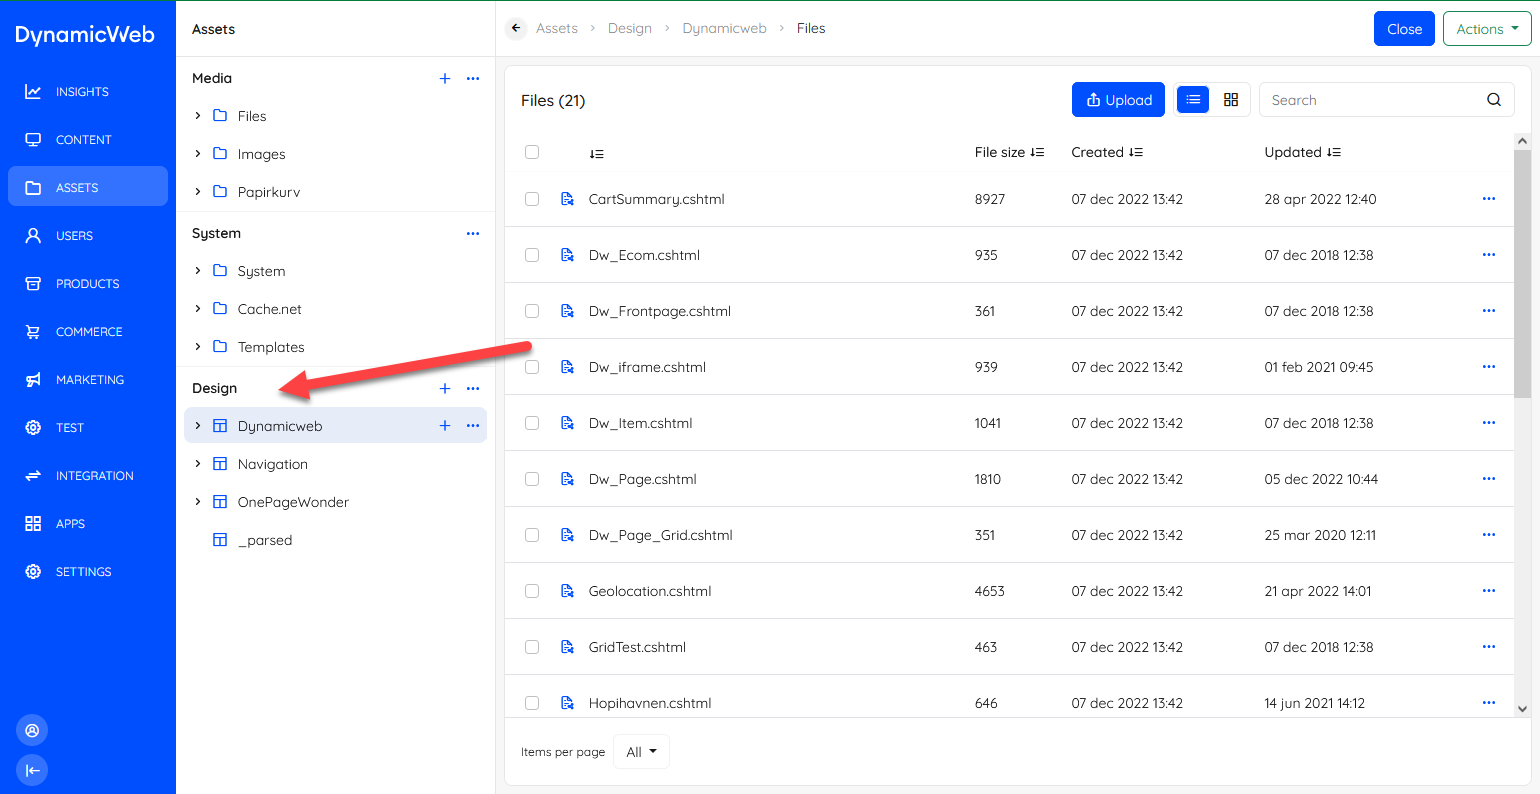
First create a Grid-folder in the root of the design folder:
/Files/
├── Templates/
│   ├── Designs/
│   │   ├── myDesign/
│   │   │   ├── ...
│   │   │   ├── Grid/
Inside the Grid-folder, create a subfolder per Grid-definition supported by the design. Often you will only have one - in this case it should be name Page as this is the gridTypeId used in the layout Grid-definition.
/Files/
├── Templates/
│   ├── Designs/
│   │   ├── myDesign/
│   │   │   ├── ...
│   │   │   ├── Grid/
│   │   │   │   ├── Page/
In the grid definition subfolder - Page/ - create a RowDefinitions.json file and define some rows:
[
  {
    "Id": "1Column",
    "Name": "1 Column",
    "Description": "1 row with 1 column",
    "Template": "1Column.cshtml",
    "ColumnCount": 1,
    "ItemType": "",
    "Thumbnail": "/Files/Templates/Designs/MySimpleDesign/_assets/images/VisualEditor/DW_Row_1-column.svg"
  },
  {
    "Id": "2Columns",
    "Name": "2 Columns",
    "Description": "1 row with 2 columns",
    "Template": "2Columns.cshtml",
    "ColumnCount": 2,
    "ItemType": "",
    "Thumbnail": "/Files/Templates/Designs/MySimpleDesign/_assets/images/VisualEditor/DW_Row_2-column.svg"
  }
]
The properties are:
| Property | Use | Notes |
|---|---|---|
| Id | The id of the row type | Rows in the database are stamped with a row type id; if the id changes they will fail |
| Name | Name of the row type | Shown in the UI in the list of rows and paragraphs |
| Description | Description of the row type | Shown in the UI below the name in the list of rows and paragraphs |
| Template | Point to the template used for rendering the row | By convention this is placed inside a RowTemplates folder in the grid definition subfolder |
| ColumnCount | Sets the number of columns for the row | |
| ItemType | Point to an item type which is used for row settings in the administration | E.g. to set a background colour, background image, the height, etc. |
| Thumbnail | Point to an image to show in when editors add new rows to a page |
Inside the grid definition subfolder, create a RowTemplates subfolder and some templates defining the rows and columns:
Here is a 1Column.cshtml template:
@inherits Dynamicweb.Rendering.ViewModelTemplate<Dynamicweb.Frontend.GridRowViewModel>

<div class="container">
    <div class="row">
        <div class="col">
            @Model.Column(1).Output()
        </div>
    </div>
</div>
Here is a 2Column.cshtml template:
@inherits Dynamicweb.Rendering.ViewModelTemplate<Dynamicweb.Frontend.GridRowViewModel>

<div class="container">
    <div class="row">
        <div class="col">
            @Model.Column(1).Output()
        </div>
        <div class="col">
            @Model.Column(2).Output()
        </div>
    </div>
</div>
These examples use explicit Column numbers - columns can also be iterated using @Model.Columns
In the end, the folder structure of a grid should look something like this:
/Files/
├── Templates/
│   ├── Designs/
│   │   ├── myDesign/
│   │   │   ├── ...
│   │   │   ├── Grid/
│   │   │   │   ├── Page/
│   │   │   │   │   ├── RowDefinitions.json
│   │   │   │   │   ├── RowTemplates/
│   │   │   │   │   │   ├── 1Column.cshtml
│   │   │   │   │   │   ├── 2Column.cshtml
│   │   │   ├── gridLayout.cshtml
When the grid has been defined, rows can be added to the page using the visual editor in the backend.
After rows have been created, each row will have one or more columns where content can be added
Page-based items
Instead of using placeholders or a grid, a page can use an item type to define the fields that will be the content of the page. When using this setup, you won't use paragraphs at all.
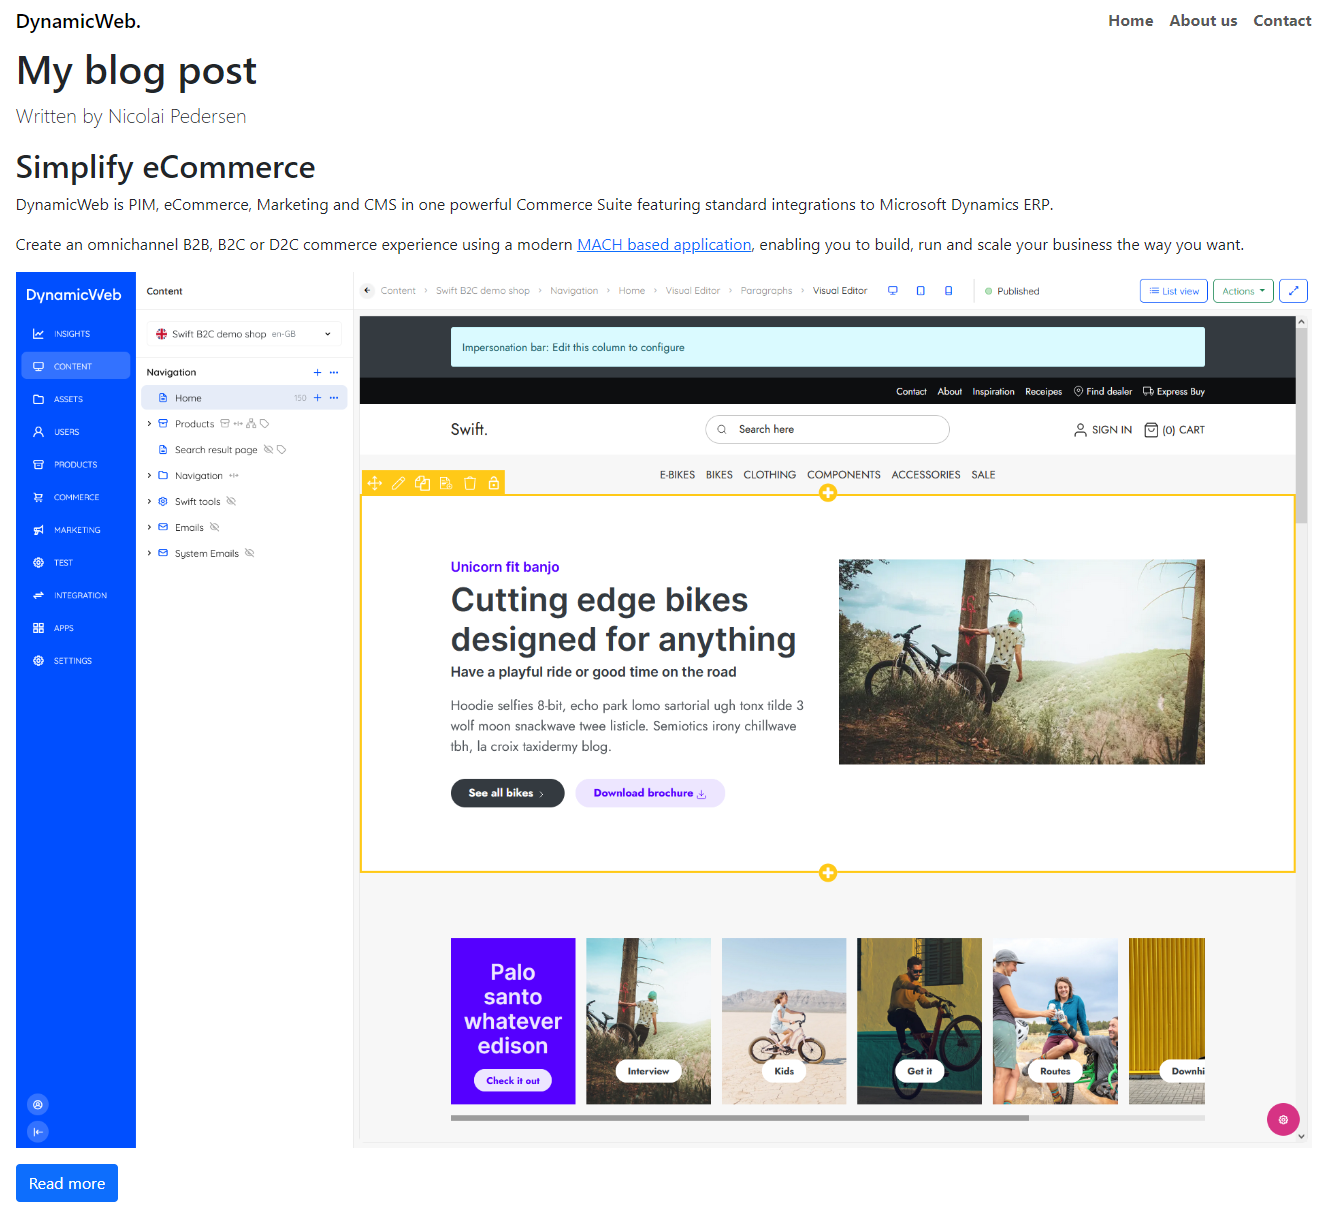
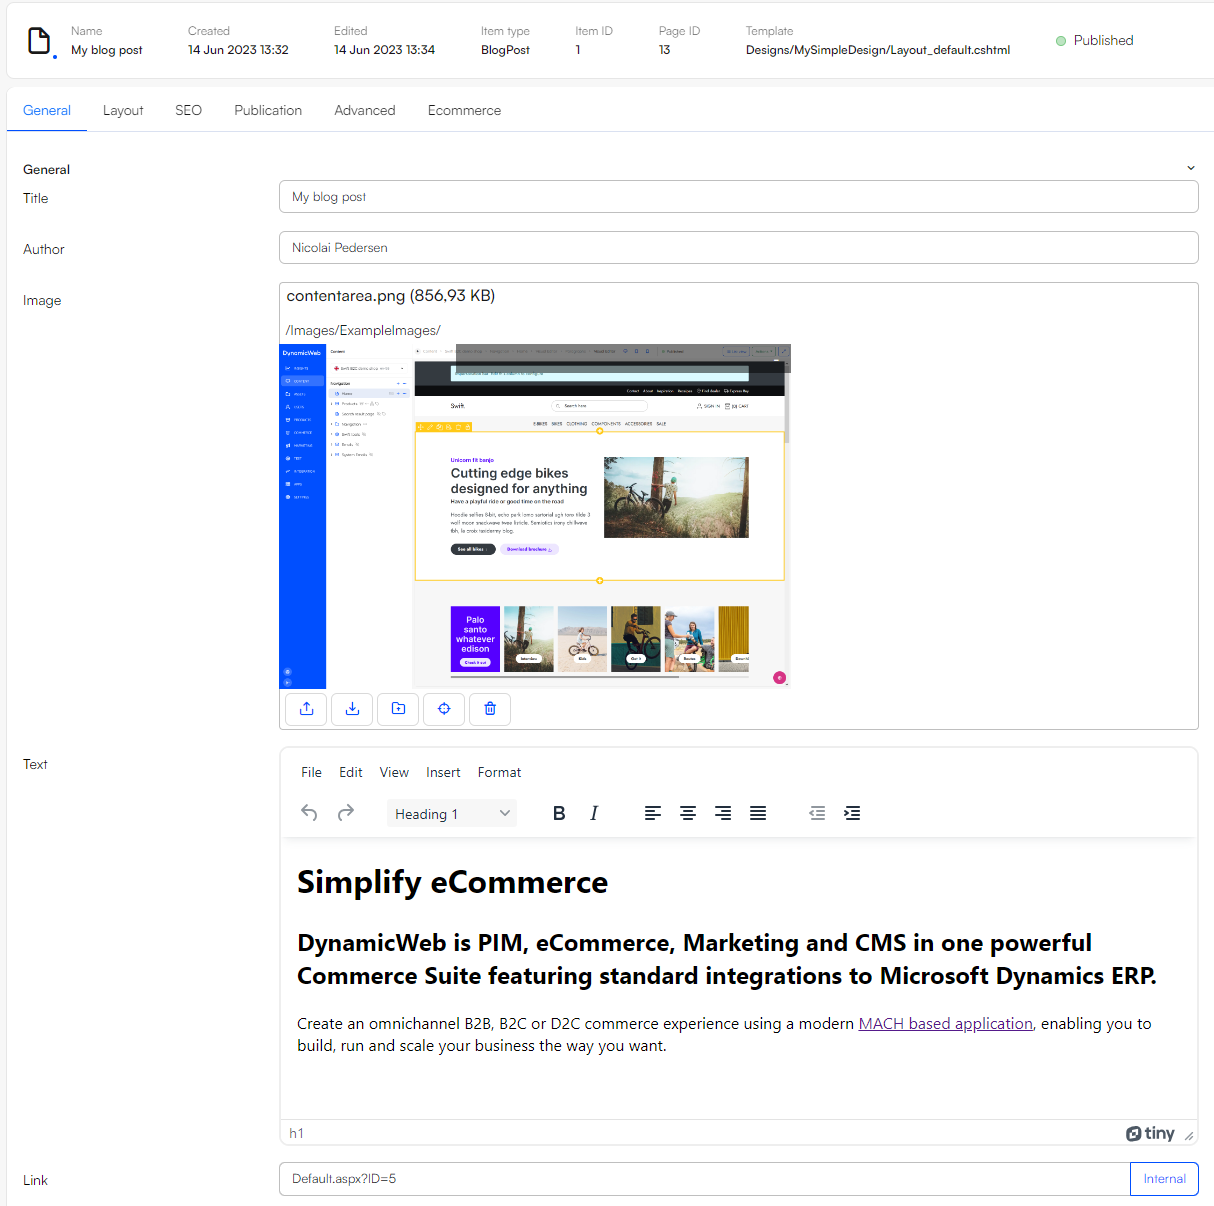
As an example, let's say we have created and item type called "BlogPost" and create a page using this item type. The BlogPost item type has these fields:
- Title
- Author
- Image
- Text
- Link

Creating a new page using the blog post item type will allow you to add the content on the page
To render this item type, a layout template specific to the BlogPost item type is required.
The system name of the blog post itemtype is BlogPost - to create a layout for the itemtype, name the template using the system name - BlogPost.cshtml - and place in the root of the design folder.
In this template, inherit the PageItem-property, which returns an Item
An ItemViewModel has a number of methods for getting property-type specific objects or ViewModels, for example GetFile() which returns a FilePath, or GetString() which returns a string-object, and so on.
Using these principles, you can create templates for each item type...
@inherits Dynamicweb.Rendering.ViewModelTemplate<Dynamicweb.Frontend.PageViewModel>

<header>
    ...
</header>
<main>
    <h1>@Model.Item.GetString("Title")</h1>
    <p class="lead">Written by @Model.Item.GetString("Author")</p>
    <p>
        @Model.Item.GetString("Text")
    </p>
    <p>
        <img src="@Model.Item.GetFile("Image").Path" class="img-fluid" />
    </p>
    <p>
        <a href="@Model.Item.GetLink("Link").Url" class="btn btn-primary">Read more</a>
    </p>
</main>
<footer>
    ...
</footer>
... which will render fixed page layouts: